Group Build prototyping phase
-
Vierax

- Location: France (Lille)
- Main keyboard: Tipro MID KM128 Bépo layout
- Main mouse: Kensington Orbit Trackball
- Favorite switch: MX Clear / MX Grey (under thumbs)
- DT Pro Member: -
- Contact:
Lasercut means that aluminium and steel layers should be manufactured elsewhere as you did in the first GB, shouldn't they ?matt3o wrote:it's still laser cut (not CNC milled), so the same constrains apply BUT the material is very easy to work and if treated correctly it will look like a solid piece of matter (the layers would be hardly visible).
Can you cut acrylic too ? (I can be interested to do a preliminary test for my layout)
Birch is perfect : cheap, as light to be coloured and darken and no annoying resin problems like with pine wood.matt3o wrote:birch plywood probably.
color depends on how you treat the wood. You can go from natural (like above) to red or very dark like ebony.
As you said, it's really simple to varnish (and tint) wood. To have the best result, you need to preliminary use a paintbrush and glue all faces even the internal to create a impenetrable barrier and avoid any intrusion in the wood stucture (fungus, humidity) that could alter its form and durability. It's wise to repeat this step with at least a second layer. I make this with the standard glue used for wood and it's perfect. Since this is a vinyl-based glue, you can make an imprimatura by adding directly colours if you own vinyl paint (pretty rare now but Lefranc&Bourgeois still sells a serie called "Flashe" )
Another solution to protect raw wood is to wax it but I didn't experiment this technique since I always want to decorate it.
After this operation you can apply any paint and varnish without problem. Cheap acrylic paint tubes left in a box in the attic is sufficient : diluted into water to make a coloured juice then you apply a varnish. It's even possible to use the gouache of children but it's a bit opaque, doesn't support several layers without mixing and really need a non-water dilution varnish to keep your graphism intact. But even if it needs the longest drying steps, IMHO the best rendering is to use oil-based paint and varnish used with a solvent. Turpentine is still the best choice : easier to paint with than White Spirit and really cheaper than Spike lavender's essence (Lavandula latifolia, used by the richest/devoted fine art painters)
You can also add colours directly in a varnish but it's a bit harder to have the right ingredients (Dammar varnish is nice since it's diluted to create painting mediums too)
Bonus for relief modeling : Before all of that, you can cheaply customise your keyboard by engraving your case with a pyrography iron or using a gouge for lino/woodcut (plywood is very great for this technique but it's hard to master) or a Dremel.
You can also make a textured surface with the glue during the first step, working it during drying, or using a fine art texturing paste.
Now that I think of it... the problem will be to find a way to weigthen the case
I have the same concern, especially with a splitted design. Steel is the best idea : it can be a plate added in the bottom (could be hidden inside the case) or some large feet (probably expensive).Muirium wrote:An obvious weight would be a nice 3 mm thick layer of steel, or two, held within the wooden exterior, down near the base. Love a heavy keyboard!
-
matt3o

- -[°_°]-
- Location: Italy
- Main keyboard: WhiteFox
- Main mouse: Anywhere MX
- Favorite switch: Anything, really
- DT Pro Member: 0030
- Contact:
there's a wood varnish that we call "turapori" (best translation is "pore filler") which is normally used for wood. It can be more or less strong (based on the thinner used) and in various colors. Usually after 2 o 3 passes the surface looks uniform and the color is very natural (like that was the original wood color). Of course the surface needs some processing before varnishing.
The case will be 100% wood, including the plate, so I don't need a second order for metal, but I could add acrylic.
As I said, the only problem I see is adding some ballast without cutting some steel.
The case will be 100% wood, including the plate, so I don't need a second order for metal, but I could add acrylic.
As I said, the only problem I see is adding some ballast without cutting some steel.
-
matt3o
- -[°_°]-
- Location: Italy
- Main keyboard: WhiteFox
- Main mouse: Anywhere MX
- Favorite switch: Anything, really
- DT Pro Member: 0030
- Contact:
yes, metal feet is an option, but you need to make them anyway, unless you can source them somewhere.
-
matt3o
- -[°_°]-
- Location: Italy
- Main keyboard: WhiteFox
- Main mouse: Anywhere MX
- Favorite switch: Anything, really
- DT Pro Member: 0030
- Contact:
too light. we would need at least 100-200g
anyway the whole keyboard would be heavier than a poker for example, so I don't know if this is really a problem.
anyway the whole keyboard would be heavier than a poker for example, so I don't know if this is really a problem.

-
matt3o
- -[°_°]-
- Location: Italy
- Main keyboard: WhiteFox
- Main mouse: Anywhere MX
- Favorite switch: Anything, really
- DT Pro Member: 0030
- Contact:
they would be so easy to CNC with the 4th axis
-
pasph
- Location: Italy
- DT Pro Member: -
are those heavy enough?matt3o wrote:too light. we would need at least 100-200g
anyway the whole keyboard would be heavier than a poker for example, so I don't know if this is really a problem.
http://www.fonderiaroma.com/catalogo/pa ... a-disegno/
-
matt3o
- -[°_°]-
- Location: Italy
- Main keyboard: WhiteFox
- Main mouse: Anywhere MX
- Favorite switch: Anything, really
- DT Pro Member: 0030
- Contact:
lol, that would work 
-
Medowy

- Location: Finland
- Main keyboard: HHKB Pro 2 Type-S
- Main mouse: G500s
- Favorite switch: MX Black
- DT Pro Member: -
A keyboard that stays on your desk!pasph wrote:are those heavy enough?matt3o wrote:too light. we would need at least 100-200g
anyway the whole keyboard would be heavier than a poker for example, so I don't know if this is really a problem.
http://www.fonderiaroma.com/catalogo/pa ... a-disegno/
-
Nuum

- Location: Germany
- Main keyboard: KBD8X Mk I (60g Clears), Phantom (Nixdorf Blacks)
- Main mouse: Corsair M65 PRO RGB
- Favorite switch: 60g MX Clears/Brown Alps/Buckling spring
- DT Pro Member: 0084
Two variants of the layout I posted some days ago, with standard 6.25u spacebar:
- Custom 75 alt.png (26.06 KiB) Viewed 4306 times
- Custom 75 alt2.png (24.05 KiB) Viewed 4305 times
-
pexon

- Location: Shropshire, England
- Main keyboard: HHKB Pro 2
- Main mouse: Logitech G500
- Favorite switch: Topre
- DT Pro Member: -
- Contact:
I really like that layout. Similar to one of the custom Korean boards except ISO?

-
pexon
- Location: Shropshire, England
- Main keyboard: HHKB Pro 2
- Main mouse: Logitech G500
- Favorite switch: Topre
- DT Pro Member: -
- Contact:
Something about it I really like, I'm not an ISO user, but I'd be 100% interested in a board like that (without the Fn key)
-
pexon
- Location: Shropshire, England
- Main keyboard: HHKB Pro 2
- Main mouse: Logitech G500
- Favorite switch: Topre
- DT Pro Member: -
- Contact:
I meant the single Fn key in between the Ctrl + Alt keys 
-
Eszett

- Location: Germany
- Main keyboard: Filco Majestouch 2 TKL DE MX blue
- Main mouse: Logitech MX Master 2S
- DT Pro Member: -
I would prefer either F1-F12, or no F key at all, else it is neither fish nor fowl. Another question is, when you aim for a minimalistic layout, which I approve, how does this go with a Fn key three times on the board? But I took some inspiration from your sketch. You arranged the positions of RShift, Arrow keys, and this extra column to the right quite well.
Last edited by Eszett on 27 Apr 2014, 14:42, edited 2 times in total.
-
Muirium

- µ
- Location: Edinburgh, Scotland
- Main keyboard: HHKB Type-S with Bluetooth by Hasu
- Main mouse: Apple Magic Mouse
- Favorite switch: Gotta Try 'Em All
- DT Pro Member: µ
Multiple Fn keys can be useful for accessing different layers. And those are always handy on compact layouts.
I like Nuum's left function column. But of course I would!
I like Nuum's left function column. But of course I would!
Spoiler:
-
pexon
- Location: Shropshire, England
- Main keyboard: HHKB Pro 2
- Main mouse: Logitech G500
- Favorite switch: Topre
- DT Pro Member: -
- Contact:
The single Fn on my HHKB suits me perfectly, I personally feel that aesthetically, the Fn key on the left ruins it
-
scottc

- ☃
- Location: Remote locations in Europe
- Main keyboard: GH60-HASRO 62g Nixies, HHKB Pro1 HS, Novatouch
- Main mouse: Steelseries Rival 300
- Favorite switch: Nixdorf 'Soft Touch' MX Black
- DT Pro Member: -
This is the beauty of custom builds: just put another cap there and change it in Hasu's firmware!
-
Nuum
- Location: Germany
- Main keyboard: KBD8X Mk I (60g Clears), Phantom (Nixdorf Blacks)
- Main mouse: Corsair M65 PRO RGB
- Favorite switch: 60g MX Clears/Brown Alps/Buckling spring
- DT Pro Member: 0084
Yeah, keep in mind that you could allways change the function of the keys to whatever you like. This is all about key placement, not layout.scottc wrote:This is the beauty of custom builds: just put another cap there and change it in Hasu's firmware!
And now that some of you say it, there really are too much Fn keys. The F keys might not be necessary, but I like them aestheticwise.
Yeah, inspiration comes from the KMAC mini, but I couldn't live with Ctrl and Alt being so close together. In fact their positioning on a winkeyless keyboard is perfect for me.
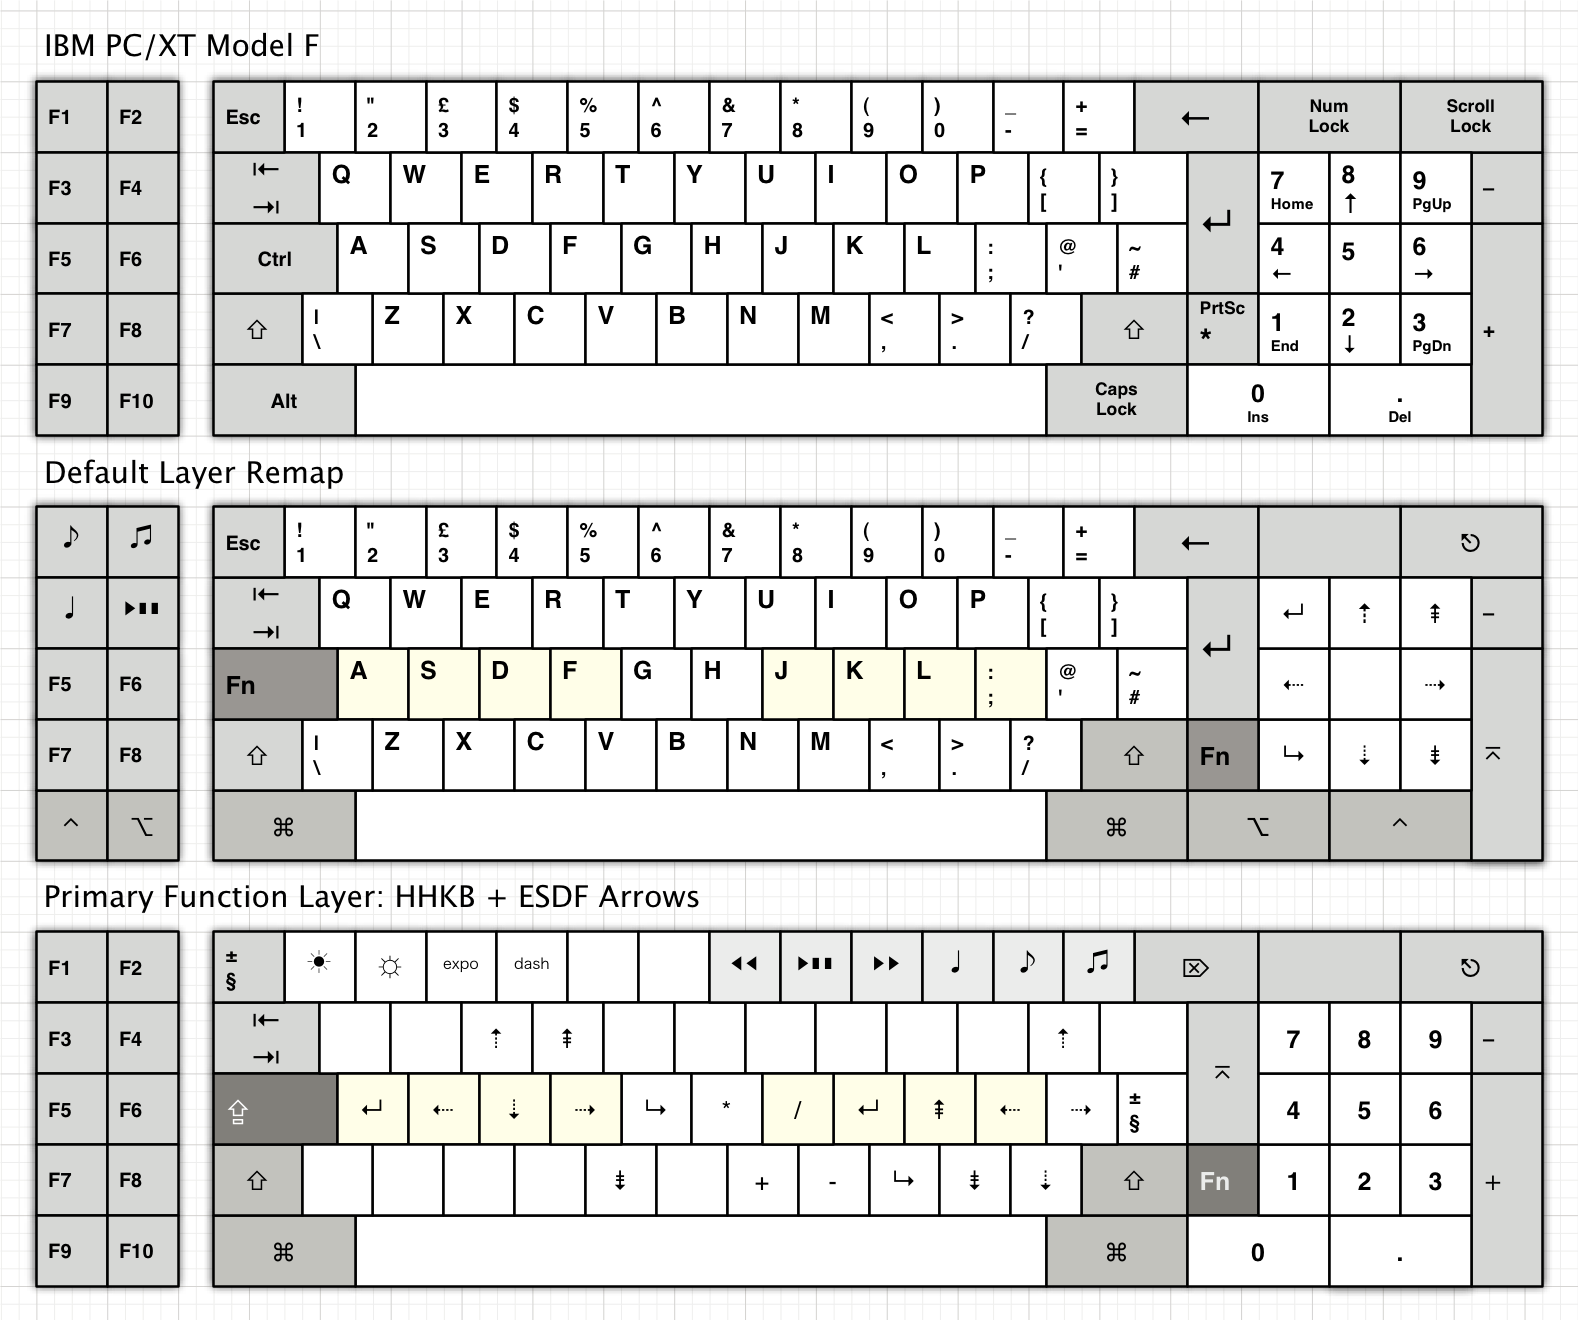
@Murium: Yeah, I quite like the layout of the IBM AT/XT model F's, too. Only problem for me is the bottom row, I need more modifiers. And perhaps arrow keys inside the numpad. Something like this.
Edit: And don't mind the colors, I just wanted to try CMYW next to the Cherry BoW color scheme.
Last edited by Nuum on 27 Apr 2014, 15:38, edited 3 times in total.
-
matt3o
- -[°_°]-
- Location: Italy
- Main keyboard: WhiteFox
- Main mouse: Anywhere MX
- Favorite switch: Anything, really
- DT Pro Member: 0030
- Contact:
I like both Nuum's designs. I ended up with 1.25u mods in my prototype, for no particular reason.
I find the f-row to be unneeded most of the times, I find myself very comfortable with FN+num-row.
I find the f-row to be unneeded most of the times, I find myself very comfortable with FN+num-row.
-
matt3o
- -[°_°]-
- Location: Italy
- Main keyboard: WhiteFox
- Main mouse: Anywhere MX
- Favorite switch: Anything, really
- DT Pro Member: 0030
- Contact:
oookay. I calculated some of the expenses for a wooden keyboard
- case composed by 5 layers of wood
- feet
- ready to use PCB (home-made not factory-made)
- diodes
- mini-USB port
- screws and wood inserts
All of the above goes for about €100. To that you need to add switches (approx €50) and keycaps (that's up to you).
The same keyboard in aluminum would go around €145, so it's not bad after all.
The only way to drastically reduce pricing would be by manufacturing 10 units at a the time. That would bring the cost of a single keyboard down to approx €70.
Having a CNC in-house would be the best of course...
-
Muirium
- µ
- Location: Edinburgh, Scotland
- Main keyboard: HHKB Type-S with Bluetooth by Hasu
- Main mouse: Apple Magic Mouse
- Favorite switch: Gotta Try 'Em All
- DT Pro Member: µ
Cool. Any savings on making several home made PCBs at once? I have a few I'm after, including the M84 experiment, and a PCB for my shiny 60%.
XT fans unite!
I'd do one thing to your XT-based layout: shorten right shift and put an HHKB style Fn key there, because I'm crazy for those. Would you have the arrow cluster be on the default layer (0) or are they behind Fn (layer 1)? The XT's bottom row is its greatest weakness and I think you've made several nice improvements. Although I find my arrow keys (right on layer zero) in the numpad to be very useable and quite roomy.
Just think of the PBT Granite options on such a board. The Multimedia kit is waiting!
Meanwhile, for my shot at this project, I'll dismay Matteo by thinking really small again. I love my minimalist keyboards! And now I've got short little M84s to try.
Nuum wrote:@Murium: Yeah, I quite like the layout of the IBM AT/XT model F's, too. Only problem for me is the bottom row, I need more modifiers. And perhaps arrow keys inside the numpad. Something like this.
- Nuum XT.png (46.89 KiB) Viewed 4192 times
I'd do one thing to your XT-based layout: shorten right shift and put an HHKB style Fn key there, because I'm crazy for those. Would you have the arrow cluster be on the default layer (0) or are they behind Fn (layer 1)? The XT's bottom row is its greatest weakness and I think you've made several nice improvements. Although I find my arrow keys (right on layer zero) in the numpad to be very useable and quite roomy.
Just think of the PBT Granite options on such a board. The Multimedia kit is waiting!
Meanwhile, for my shot at this project, I'll dismay Matteo by thinking really small again. I love my minimalist keyboards! And now I've got short little M84s to try.
-
Ichigo87

- Location: Paris, France
- Main keyboard: Noxary X60 v1
- Main mouse: G502 Lightspeed
- Favorite switch: Purple Zealios
- DT Pro Member: -
Hi, for 100€ i am in for the test run of an iso version.matt3o wrote:Ok. I'll have a wooden test run of 2 samples. The layout will be this:
1 ISO, 1 ANSI.
I really don't know how it will turn out but If someone is interested please ping me and I'll put you in a not-binding list of interested parties. The final cost should be half of a full aluminum layered keyboard. I can also full assemble it for you if you want.
