IBM 107 FMK - IBM 107 472X-41-53951 - Lot of pictures

Name the new born keyboard

Buckling Steel
7
30%
7i$
0
No votes
47i$
0
No votes
terminator
4
17%
Exoskeleton
0
No votes
The Ingot
1
4%
i(HAVE0)$
3
13%
Hartman
2
9%
IBM 107 FMK
6
26%
Hulk
0
No votes
 
Total votes: 23

User avatar
idollar
i$

01 Apr 2015, 08:06

Hello,

I was working with the keyboard yesterday. I have taken some mesurements that I will post hopefully after work today
If someone is interested in mesuring any specific part, tell me. I will post it.
DSC_9805.jpg
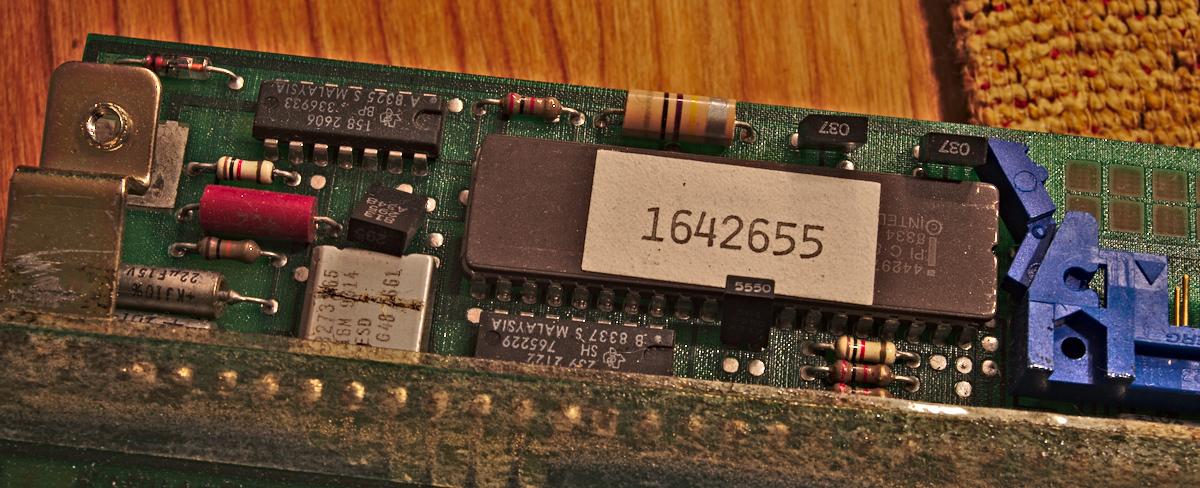
DSC_9805.jpg (752.11 KiB) Viewed 4865 times

User avatar
idollar
i$

01 Apr 2015, 18:10

I have added new sections and pictures. Let me know your comments.
If you have interest on seeing something special, ask for it!

User avatar
LLRnR
\m/

01 Apr 2015, 18:26

Your photos are really wonderful!

Just a quick question, for wet sanding, do you use a special tool or can you just use sand paper and a sponge (between your palm and the sand paper)? I'm planning to sand the back plate of my SSK, which is a bit rusty.

User avatar
idollar
i$

01 Apr 2015, 18:33

LLRnR wrote: Your photos are really wonderful!

Just a quick question, for wet sanding, do you use a special tool or can you just use sand paper and a sponge (between your palm and the sand paper)? I'm planning to sand the back plate of my SSK, which is a bit rusty.
Thanks for the appreciation. It is nice to read that my effort is appreciated.

Regarding the sanding is as simple as having a glass with water near by. I cut a small piece of sand paper and put it for no more than two seconds in the water. Then I sand gently, without pressing too much.
If your plate is rusty you may want to press more.

If your target is a SSK back plate, you can search for a post with my results on the same part. (I will look for it for you, give me a second)

User avatar
0100010

01 Apr 2015, 18:34

Your PCB has quite a bit of holes in it. The PCB on my F107 only had two, one for each indexing pin on the bottom plate.

User avatar
idollar
i$

01 Apr 2015, 18:36

LLRnR wrote: Your photos are really wonderful!

Just a quick question, for wet sanding, do you use a special tool or can you just use sand paper and a sponge (between your palm and the sand paper)? I'm planning to sand the back plate of my SSK, which is a bit rusty.
There is the post that I mentioned

User avatar
idollar
i$

01 Apr 2015, 18:37

0100010 wrote: Your PCB has quite a bit of holes in it. The PCB on my F107 only had two, one for each indexing pin on the bottom plate.
The PCB that I am reparing is having 3 holes.
The back plastic cover between the PCB and the back plate was missing. I made one. This will come in future posts.

User avatar
idollar
i$

01 Apr 2015, 18:39

idollar wrote:
0100010 wrote: Your PCB has quite a bit of holes in it. The PCB on my F107 only had two, one for each indexing pin on the bottom plate.
The PCB that I am reparing is having 3 holes.
The back plastic cover between the PCB and the back plate was missing. I made one. This will come in future posts.
Hey, you are right. I did not notice the extra holes !

User avatar
LLRnR
\m/

01 Apr 2015, 18:47

idollar wrote: Regarding the sanding is as simple as having a glass with water near by. I cut a small piece of sand paper and put it for no more than two seconds in the water. Then I sand gently, without pressing too much.
If your plate is rusty you may want to press more.
Thanks for the info and for the link. I already have some sandpaper, quite different grits. Now I just need to find a free and calm weekend to bolt-mod my SSK and sand the plate.

Looking forward to see the rest of your restoration process!

User avatar
idollar
i$

01 Apr 2015, 19:05

LLRnR wrote: Looking forward to see the rest of your restoration process!
Then you should check the new chapter that I just posted: the new foam.
More will follow in a minute

User avatar
idollar
i$

01 Apr 2015, 19:10

I forgot to pictures to the new section 9. I have added them

User avatar
idollar
i$

01 Apr 2015, 19:21

and a section 10 ...

User avatar
LLRnR
\m/

01 Apr 2015, 19:27

(EDIT: Never mind, there's too much anticipation on my part (with reference to the reason for removing the old controller). I'll let your log follow and only ask questions only if I don't understand what it is that you're doing.)

User avatar
idollar
i$

01 Apr 2015, 21:20

LLRnR wrote: (EDIT: Never mind, there's too much anticipation on my part (with reference to the reason for removing the old controller). I'll let your log follow and only ask questions only if I don't understand what it is that you're doing.)
You may ask anything at any time !
I was busy with something else. I will post some new pictures now :-)

User avatar
idollar
i$

01 Apr 2015, 22:13

Added sections 11, 12, 13 and 14

User avatar
bitbang

01 Apr 2015, 22:20

This is amazing! I need to make time to restore mine.

User avatar
Halvar

01 Apr 2015, 22:28

Brilliant documentation! You should pursue a career in science ... 8-)

One of many photos that cry "DT header":
Image

Is it only the lighing or did you use a tilt shift filter?

User avatar
idollar
i$

01 Apr 2015, 22:36

Halvar wrote: Brilliant documentation! You should pursue a career in science ... 8-)
Perhaps when I grow up. :mrgreen:
Is it only the lighing or did you use a tilt shift filter?
It is just the lighting. Exposure of some 20sec. Very low and soft light. F22 if I remember correctly.
It is not rocket science ;)

User avatar
LLRnR
\m/

01 Apr 2015, 22:37

This is really inspiring. My project for this summer (when I have some space to breathe, I'm finishing my Master's degree now) is to acquire, restore and adapt a Model F AT. From what I see, it seems xwhatsit is the way to go for Fs and beamsprings. Did you get yours from OHS Park?

User avatar
idollar
i$

01 Apr 2015, 22:37

Enough for today.
If I cut an additonal picture my brain will explode

User avatar
idollar
i$

01 Apr 2015, 22:40

LLRnR wrote: This is really inspiring. My project for this summer (when I have some space to breathe, I'm finishing my Master's degree now) is to acquire, restore and adapt a Model F AT. From what I see, it seems xwhatsit is the way to go for Fs and beamsprings. Did you get yours from OHS Park?
An AT will not require an xwhatsit. A converter will do. It is cheaper and you will keep the keyboard as it was originaly build.
Check the first post. You will find a link to a "lot of pictures" that I did for an AT

I received the xwhatsit together with my first 107. The restoration that you see is my second keyboard. I like it so much that I got one for the office and a second one for home.

User avatar
fohat
Elder Messenger

01 Apr 2015, 22:43

idollar wrote:
An AT will not require an xwhatsit. A converter will do.
As I recall, Soarer originally wrote his firmware to be able to re-map his AT.

User avatar
idollar
i$

01 Apr 2015, 22:46

@LLRnR

And your proposed name is ... ?

User avatar
LLRnR
\m/

01 Apr 2015, 22:47

idollar wrote: An AT will not require an xwhatsit. A converter will do. It is cheaper and you will keep the keyboard as it was originaly build.
Check the first post. You will find a link to a "lot of pictures" that I did for an AT

I received the xwhatsit together with my first 107. The restoration that you see is my second keyboard. I like it so much that I got one for the office and a second one for home.
Hehe, it's not hard to figure why it is that you like it so much!

What I plan to do for the AT is to remap a lot of keys on the AT. I can see it working as a great layout, just not in its original state. In this case, if a xwhatsit is not required, the better for me, as it's easier and cheaper to buy Teensies than xwhatsit's.
fohat wrote: As I recall, Soarer originally wrote his firmware to be able to re-map his AT.
In the meantime, there's a new confirmation from fohat.

Great, so if it's just the AT, a Teensy with Soarer's, a soldering iron and a lot of guts that I need, that'll do :mrgreen: Thanks for the hints, guys!
Last edited by LLRnR on 01 Apr 2015, 22:53, edited 1 time in total.

User avatar
LLRnR
\m/

01 Apr 2015, 22:49

idollar wrote: @LLRnR

And your proposed name is ... ?
Ohh hmmm... I found i(HAVE0)$ to be very funny! :D I'm not that good with names, though, lemme think... in any case, it should be something recalling the sheer mass of metal on this beautiful beast, now tamed.

EDIT: I know! Hulk! :lol:

User avatar
idollar
i$

01 Apr 2015, 22:53

Upss, I missed you post. I added to the list

User avatar
idollar
i$

01 Apr 2015, 23:30

For those that do not know how this thread works: the interesting bit is at the beginning of the thread (first page). The first post contain the pictures.

User avatar
fohat
Elder Messenger

01 Apr 2015, 23:38

LLRnR wrote:
What I plan to do for the AT is to remap a lot of keys on the AT. I can see it working as a great layout, just not in its original state.

it's just the AT, a Teensy with Soarer's, a soldering iron
Depending on how good you are at the workbench, this

https://geekhack.org/index.php?topic=48288.0

is what you really want to do.

User avatar
idollar
i$

02 Apr 2015, 09:23

Hi,

As you know, the restoration is not finished, but since the beginning of the week I am using this keyboard at the office to test the feeling of the raw metal.
Yesterday I got a little electric shock from the keyboard. In the morning and in the afternoon.
Today, wearing different shoes, I got another one.


I thought that it was worth reporting to check if someone else had the same problem or it is only liked to the direct touch with the metal. In my opinion and from the safety point of view, it should not make a difference to have it painted or not. The design should be resilient to this.

It could well be that the earthing is not well done. I will check it and report. I do not have the required tools with me (nor the required time to do it now)

Cheers.

Íñigo

User avatar
LLRnR
\m/

02 Apr 2015, 09:37

fohat wrote: Depending on how good you are at the workbench, this

https://geekhack.org/index.php?topic=48288.0

is what you really want to do.
I think I've stumbled upon this some while ago. Thanks for the link, it's an excellent thread and the spacebar mod is just amazing.
idollar wrote: Yesterday I got a little electric shock from the keyboard. In the morning and in the afternoon.
After everything you've done for her, this is how she repays you!...

I hope it's just the grounding and that it can be easily fixed. Good luck!

Post Reply

Return to “Workshop”