New Buckling Spring Design

User avatar
regack

15 Apr 2015, 02:45

wcass wrote: Not per-key lighting. The LEDs will be in the frame of the case and my hope is that the case will funnel the light to the barrel frame (under the key caps) and the case edge around the key caps. I will be using just a few bright LEDs so it is quite possible that the light will not be evenly distributed. The only way for me to know for sure is to test. Just for this test i will be using adhesive vinyl to make temporary reflectors to try to channel the light where i want it to go. Once/if i find something that I like, i can replace the vinyl with thin acrylic for a more professional look.

To illustrate what i am going for, consider this side view of the front edge of the keyboard. Grey lines are clear acrylic, blue lines represent a thin reflective covering. A red LED on the PCB shines up in a 120 arch. The top and front edge of the case (top and left side in this view) reflect the light so that the only place light can escape is under the key caps.
LEDs.jpg
I think it will have an nice glow under everything. Here's what ended up with, by accident (apologies in advance for the terrible quality).

Image

So that's an SMD RGB led mounted to the surface of the PCB, just below the acrylic. I do have a hole drilled through the acrylic just where the LED is, which I think helps the light enter the edge of the acrylic and spread it around. That wasn't my intention, I just wanted somewhere for the light to shine through in case I didn't go with clear acrylic. I get light all around the edges of the acrylic. I imagine the effect would be intensified if I had a white PCB instead.

Also, I kind of like the Model 'W' suggestion.
Last edited by regack on 15 Apr 2015, 02:49, edited 1 time in total.

User avatar
Redmaus
Gotta start somewhere

15 Apr 2015, 02:48

I think if you could vary the intensity of the light it would be much better. Do you have dimming lights?

User avatar
wcass

15 Apr 2015, 05:47

scottc wrote: I'm sorry if this is a stupid question but I can't figure it out. Will this take Model F barrels, or should we cut up Model M barrel plates for it?
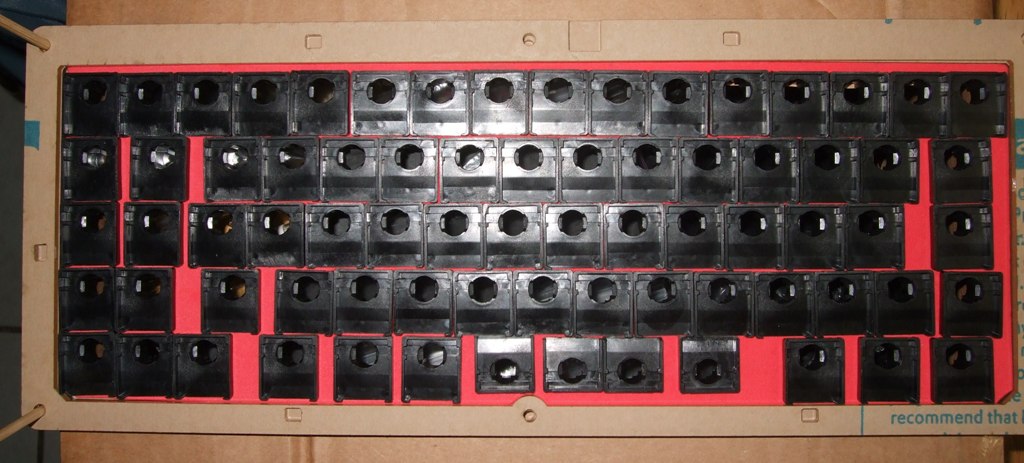
It needs model F barrels. The acrylic is specifically cut for the "notch" (AT and 122) type - but I want to try out using the easier to get "pin" (XT and Bigfoot) type (but cut off the pin). Why? Remember the OP - I want to give discarded ideas a try. I want to see if the barrels will keep alignment from just the tight grid they are packed into. If it is not satisfactory, I have an AT that i can use. You can see that i had to trim 4 of the barrels so that they will fit properly when flipped 180° for the space bars.
barrels1.jpg
barrels1.jpg (93.92 KiB) Viewed 13661 times
barrelFrame2.jpg
barrelFrame2.jpg (115.16 KiB) Viewed 13661 times
The LEDs are the biggest unknown. The ones i chose are fairly bright, 1690mdc @ 20mA with 125° viewing angle. I have 6 spots that i might put the LEDs, but it is very unlikely that i will use them all. I will most likely only use just two.

There was a slight change in plan for the case. In an earlier thread, i said that there would be 4 layers - two 3mm and two 6mm - with one of the 6mm layers needing to be etched. It turns out that doing everything in 3mm is much easier and therefore cheaper. There are now 6 layers. I'm going to leave the paper on until i am ready to weld them together.

Bottom Layer - this goes under the PCB
AcrylicLayer1.jpg
AcrylicLayer1.jpg (80.72 KiB) Viewed 13661 times
2nd Layer - this goes on top of the top membrane and has cut-outs for USB and LEDs
AcrylicLayer2.jpg
AcrylicLayer2.jpg (102.74 KiB) Viewed 13661 times
3rd Layer - solvent welded to layer 2, this just adds another 3mm for the barrels and foam
AcrylicLayer3.jpg
AcrylicLayer3.jpg (101.06 KiB) Viewed 13661 times
4th Layer - solvent welded to layer 3, this holds the barrels
AcrylicLayer4.jpg
AcrylicLayer4.jpg (89.63 KiB) Viewed 13661 times
5th layer - solvent welded to layer 4, this is trim and the last layer with screw holes
AcrylicLayer5.jpg
AcrylicLayer5.jpg (108.4 KiB) Viewed 13661 times
After welding layers 2-5, the holes will be enlarged with a #21 drill bit and tapped for #10-32 polycarbonate screw.
Side view of the case layers 2-5.
AcrylicSideFront.jpg
AcrylicSideFront.jpg (72.02 KiB) Viewed 13661 times
6th layer - solvent welded to layer 5, this is finish trim
AcrylicLayer6.jpg
AcrylicLayer6.jpg (100.49 KiB) Viewed 13661 times

User avatar
macmakkara

15 Apr 2015, 10:15

Are you using MEK or something similar to weld thwm togrther?

User avatar
Redmaus
Gotta start somewhere

15 Apr 2015, 13:41

__red__ wrote: Great project here wcass - I'm excited to see how it goes.

Random questions if I may:
i) Gold plated or copper?
ii) Do you have a "punched" acrylic sheet or something between your top layer and your PCB so that gravity doesn't activate all the keys for you?

As you're making your board out of acrylic I'll mention this - I've managed to make F barrels which are low friction by using additives to cast urethane. Unfortunately the additives make the barrels opaque (and i've been working on a transparent Model F design).

I'm also working on a proper working F foot which will work with the capacitance pads but that's for another thread.

I can't wait to see your final product!

What about this guys barrels?


Red

andrewjoy

15 Apr 2015, 14:37

can the plat be made compatible with the XT style barrels that have a pin in place of a bit sticking out of the barrel

User avatar
wcass

15 Apr 2015, 15:27

andrewjoy wrote: can the plat be made compatible with the XT style barrels that have a pin in place of a bit sticking out of the barrel
I am using pin type barrels (but have removed the pin). I will let you all know how that turns out.
Redmaus wrote: What about this guys barrels?
They should work, but I don't think __red__ has production high enough yet. I also doubt that hand crafted barrels will be cost effective. I would love to see someone shop this around to see if one of the plastic manufacturers would be interested in making maybe 10k (100 keyboard) of them.

andrewjoy

15 Apr 2015, 17:00

I have used the pin type to replace a broken one of the other type and its ok its not bad at all :). Dunno how a whole keyboard of them world work.

User avatar
wcass

18 Apr 2015, 03:23

The PCBs came in from PCBWay. Here are a few pictures.
Sorry but it looks like i didn't clean the bed before scanning.
PCB 001.jpg
PCB 001.jpg (275.31 KiB) Viewed 13556 times
PCB 002.jpg
PCB 002.jpg (414.75 KiB) Viewed 13556 times
Bad news on the actual membrane part of the project. The prototype service is down for maintenance. I hope they are not down for too long.

User avatar
regack

18 Apr 2015, 03:40

Exciting stuff :D. I take it D11-16 are the LEDs around the perimeter?

User avatar
wcass

18 Apr 2015, 04:23

regack wrote: I take it D11-16 are the LEDs around the perimeter?
Yep.
Here's a shot with the first layer of acrylic on top. As you can see, the LEDs will be inside the acrylic.
PCB2.JPG
PCB2.JPG (157.8 KiB) Viewed 13552 times
And here with the barrels and pad.
PCB3.JPG
PCB3.JPG (182.44 KiB) Viewed 13552 times

User avatar
0100010

18 Apr 2015, 05:29

Will those barrels work inverted like that?

Image

User avatar
wcass

18 Apr 2015, 06:01

0100010 wrote: Will those barrels work inverted like that?
I think they will, but don't know for sure. That's the point of this keyboard - to try out some pretty radical ideas. This keyboard will test a lot of them and i don't expect that all will survive public scrutiny at the end.

The inverted barrels idea is an attempt to make the space bars more comfortable on the thumbs. To do that, i will flip the caps 180° - so that the tops are angled forward instead of back. To flip the caps, i have to flip the barrel. But the barrel is not directly underneath the cap - it is slightly ... below?under?forward? ... off center - which is why the barrels had to be cut when flipped.

User avatar
Redmaus
Gotta start somewhere

18 Apr 2015, 06:36

I am liking these ideas wcass. But what about _red_'s barrels? The only thing I really don't like about this project is the fact that we need to salvage barrels.

User avatar
wcass

27 Apr 2015, 02:25

OK, first a disclaimer. I suck at soldering. It is not anything that will improve with practice - trust me on this or read about it here.

That said, i just did this:
PCB 005.jpg
PCB 005.jpg (457.25 KiB) Viewed 13479 times
No LEDs yet. I will probably populate the two spots at the top and see how that looks.

Layers 2 through 5 of the case have been solvent welded together and are ready to be tapped. Test fit on top of the PCB is good.

User avatar
ramnes
ПБТ НАВСЕГДА

27 Apr 2015, 02:29

Aw, good luck with your tremor.

Looks neat! Happy to see this project move forward. :)

User avatar
Redmaus
Gotta start somewhere

27 Apr 2015, 02:50

I am really looking forward to getting one of these!

User avatar
Touch_It

27 Apr 2015, 06:58

Shit. I'm going to end up needing one of these:(. Work looks great so far

User avatar
wcass

28 Apr 2015, 06:19

I tapped the holes in the case and test assembled the keyboard. I use a box to assemble my buckling spring keyboards. The box has a rectangular cut-out close to the outline of the barrels so that the barrels and springs hang into the box. Remember to leave empty spots for the stabilizer inserts.
test assembly barrels and springs.JPG
test assembly barrels and springs.JPG (231.9 KiB) Viewed 13405 times
The rubber mat here is cut down from an old 122 (same one that supplied the pivot and springs). I will not be using this for the final - for that i will be using Theraband Red which is 8 mil thick (same as what IBM used).
test assembly rubber.JPG
test assembly rubber.JPG (189.75 KiB) Viewed 13405 times
I don't have top or middle membranes yet, so i just dropped on the PCB (bottom membrane), bottom acrylic sheet, and screwed it down with 6 polycarbonate flat head screws.
test assembly bottom.JPG
test assembly bottom.JPG (136.07 KiB) Viewed 13405 times
Pull it out of the box, flip it over, and put on the key caps. I don't remember where i put my stabilizer inserts - so the caps that take those are not on. I think it looks pretty nice.
test assembled top.JPG
test assembled top.JPG (172.25 KiB) Viewed 13405 times
test assembled angle.JPG
test assembled angle.JPG (151.61 KiB) Viewed 13405 times
There is a bit of extra space between rows - a mm or two. I did not put any curve on the back plate, so I should have expected this. The extra space does not look or feel weird though, and it might allow more LED back-lighting to come through. The extra space and lack of a curve improves visibility of the front facing legends i have on some of the caps. I think that key feel is more like the feel of an F than the feel of an M. And one last revelation that was completely unexpected; typing on this keyboard is MUCH quieter than any other buckling spring keyboard i own.

User avatar
Madhias
BS TORPE

28 Apr 2015, 09:13

Exciting! I am really looking forward to your finished project, you're heading now to the finish line!
wcass wrote: I think that key feel is more like the feel of an F than the feel of an M. And one last revelation that was completely unexpected; typing on this keyboard is MUCH quieter than any other buckling spring keyboard i own.
That is very interesting, feel like an F and quiet - you should make a video in the end if possible. But I really have to make also a keyboard like that, it is very interesting - for me as a daily Model M user!

User avatar
Redmaus
Gotta start somewhere

28 Apr 2015, 13:11

This is great!! One thing that does bother me is the keys look rather "jiggled around".

User avatar
wcass

28 Apr 2015, 14:49

Redmaus wrote: This is great!! One thing that does bother me is the keys look rather "jiggled around".
That would be my weld job which wants the same kind of dexterity as soldering. Much of that will disappear as the solvent trapped between the sheets evaporates. But I plan on "PlastiDipping" the top face and outer edge with a coat of white and then a top coat of black. The white inner coat will reflect the LED lighting toward the underside of the caps. And if i decide that i don't like that look, i can just peel it off.

User avatar
Redmaus
Gotta start somewhere

28 Apr 2015, 15:36

What caps will we be using for the spacebar? wheelwriter keys?

User avatar
regack

28 Apr 2015, 16:29

I'm so excited, I really want to make one of these :D :D

User avatar
wcass

28 Apr 2015, 16:34

I'll be using blank shift keys - but flipped so that they are angled forward instead of angled back. The "left shift" will be on the right and the "right shift" will be on the left. This puts the "break" at the center of the B key. I want to order a set in white from Unicomp and dye them red.

So, ... flat black case, red caps, red LED backlighting, removable micro USB, 65%, quiet buckling springs.

User avatar
vsev

28 Apr 2015, 16:48

So wonderful looking board you did here, really excited to make one also when available !

User avatar
Redmaus
Gotta start somewhere

28 Apr 2015, 17:31

Will we get a starter set of keys with the case? Please tell me we do. It would be cool to have a default look. I like the idea of red keys. Also, will the LED backlighting be dimmable? Because otherwise I feel they will be too bright.

andrewjoy

28 Apr 2015, 17:53

awesome project ! i want one. mmm possibly have the plates made out of steel :D

the M flippers in the F barrels just look wrong tho :P

User avatar
wcass

28 Apr 2015, 19:53

andrewjoy wrote: awesome project ! i want one. mmm possibly have the plates made out of steel the M flippers in the F barrels just look wrong tho
I was thinking about that too. The_Beast does very nice woodwork and he has a buddy that cuts aluminum and steel at a very reasonable price. I think it would look great to get the bottom and barrel frame made from .125" or 3mm aluminum and have the other case layers made from fine dark wood. The LEDs would be invisible though, so would probably leave them off.
Redmaus wrote: Will we get a starter set of keys with the case? Please tell me we do. It would be cool to have a default look. I like the idea of red keys. Also, will the LED backlighting be dimmable? Because otherwise I feel they will be too bright.
Maybe, but probably not. Key caps are a very personal thing. Most of the caps are fairly common, so not including them will keep the price lower. I may offer dyed caps as an add-on service. Dimmable LEDs is a target, but I have not looked into it enough yet.

User avatar
Redmaus
Gotta start somewhere

28 Apr 2015, 20:31

And get some audio of the board typing! We crave the sound!

Post Reply

Return to “Workshop”