The Oven

bpiphany

24 Feb 2015, 14:31

Don't you hate being plain old average?
average.jpg
average.jpg (98.02 KiB) Viewed 1925 times

Then do something about it. Sum up some stuff.
sum.jpg
sum.jpg (182.86 KiB) Viewed 1925 times

And be awesome!!
oven1.JPG
oven1.JPG (204.68 KiB) Viewed 1925 times
oven2.JPG
oven2.JPG (226.16 KiB) Viewed 1925 times
oven3.JPG
oven3.JPG (229.3 KiB) Viewed 1925 times
oven4.JPG
oven4.JPG (227.9 KiB) Viewed 1925 times
Last edited by bpiphany on 24 Feb 2015, 15:30, edited 1 time in total.

bpiphany

24 Feb 2015, 14:33

The story

Thinking it was about time to move on from my toaster re-flow oven, I bought a mini oven (aka toaster oven) from one of the big Swedish hardware chains. It came with one baking plate and one grate (and a nifty tool to grab them when hot). I figured the plate would be good for spreading the heat more evenly. So I thought about buying another one just for the plate, and the extra power would come in handy as well. Sadly the combined amperage of two ovens would be slightly more than a 10A fuse can handle. So I decided I better get two extra and wire them up to a more powerful power source =D

The ovens come with four heating elements, two in the bottom and to in the top. They are 1380W combined (I presume that is at 240V and 5.75A). There is no insulation around the inner compartment, and the bottom and back of the oven is only a single plate.

I took the oven apart completely and drilled extra holes for the heating elements, they are now six each in the bottom and top. They are wired in their original configuration of two groups of two elements in series. Each group is connected to it's own phase. The total 4kW should be relatively easy to handle for the 3x16A three phase outlet.

The power inlet is a regular cable plug which I cut down a bit. It has a sort of bayonet assembly which let me jack it into a properly sized hole. I had to put it in the lathe to make some extra room for the plate, but after that it fit perfectly.

Since the back plate will become hot from being in direct connection with the oven compartment and I am planning to mount the relay onto it (along with the controller and other stuff) I extended the case backwards a few inches. Glass fiber insulation will be added when finishing up the last bits and pieces.

I don't quite know what to use the knobs for. The power indicator light will of course be used just for that. I hope the Oven will be overkill enough to require some sort of LCD display for temperature and power display.
Last edited by bpiphany on 24 Feb 2015, 15:32, edited 3 times in total.

User avatar
seebart
Offtopicthority Instigator

24 Feb 2015, 14:48

can´t wait to see "The Oven" in it´s modded state!

bpiphany

24 Feb 2015, 14:59

I'm waiting for the relay, and some glass fiber insulated wires to finish it up. Other than that it's more or less finished. I haven't added insulation yet, don't want to mess around with that until I screw it together the final time..

The most interesting parameter to find out about is what temperature change rate will be possible to achieve, and if I will be able to control the temperature curve in a good way. I've started messing around a bit with temperature data logging and PID controllers.

bpiphany

07 Mar 2015, 12:44

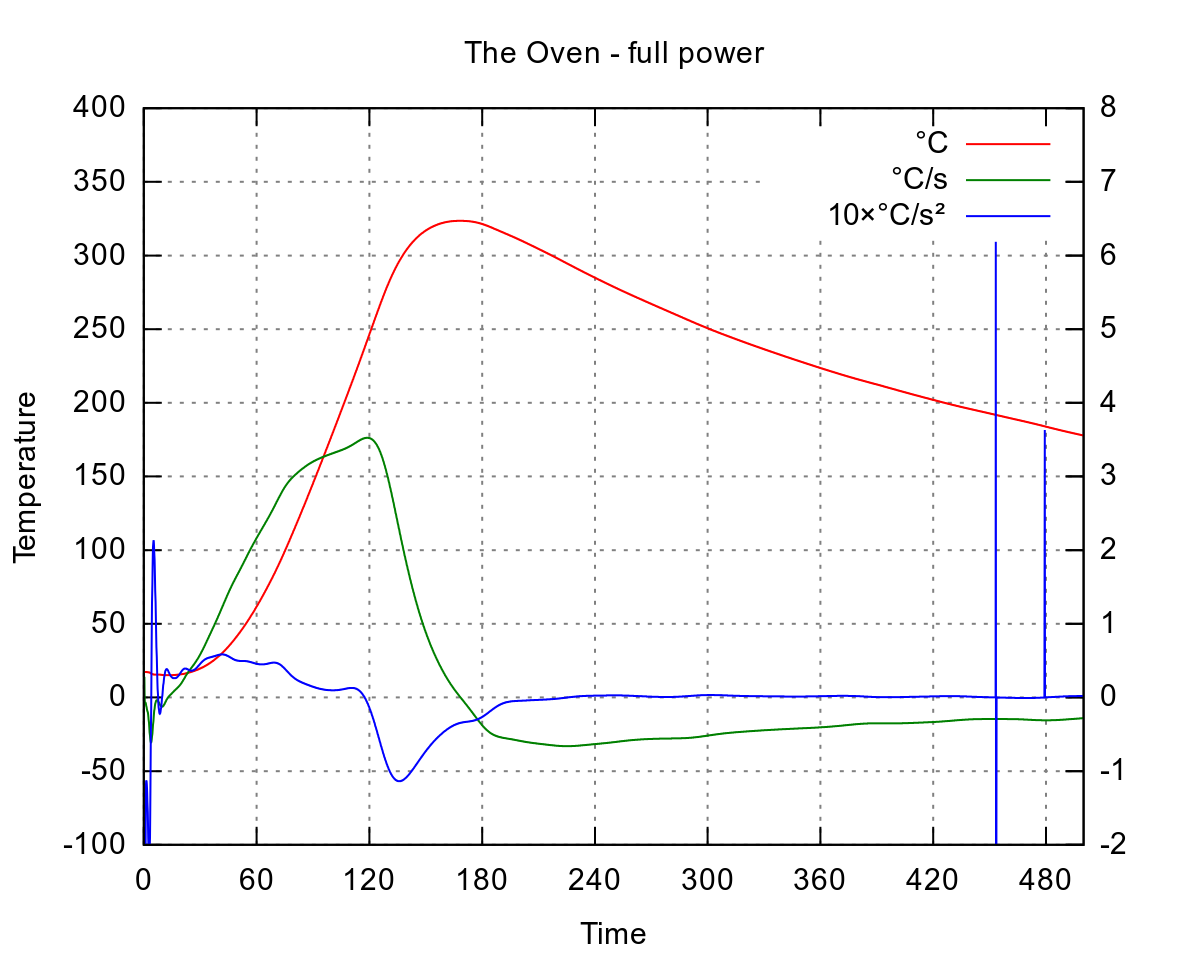
From PCB to char in 120 seconds...
full_power.png
full_power.png (91.37 KiB) Viewed 1764 times
With a similar setup as in http://deskthority.net/workshop-f7/toas ... ml#p210768 I made a test run of the oven before adding the relay or any insulation. I pulled the power when I the thermocouple reached 250°C. I should have realized it would overshoot by quite a bit. I was in a rather well ventilated room separate from the rest of the building, but the smell spread everywhere, even to nearby buildings =P

Since then I received the relay. Unfortunately it didn't work. Amazingly it popped open easily and with some luck I was able to repair it. One of the terminals for the control voltage had no connection to the internal circuitry, and even though the whole thing is filled up with epoxy I was able to patch it with a jumper. Unfortunately it (probably not even if ever functional) doesn't meet the 3-32V specification, so I had to figure out a way to supply 12V from a separate power supply controlled by a 5V Teensy..

Now I just need to trim in a PID controller to have a useful oven. And take more photos...

Post Reply

Return to “Workshop”