Page 1 of 4
Topre sliders, MX caps
Posted: 10 Feb 2014, 12:02
by matt3o
Okay my first attempt at 3d printing a topre slider with mx stem failed miserably.

The slider is too small and the 3d printing technology sucks.
Also if you look closely near the top there's a little dent that prevents the slider to slip out of the housing. So removing the sliders is not straightforward and requires some caution (or you might break the dent).
Now. I don't give up. The next step is to create my own real prototype out of a topre slider (gluing an mx stem inside of it) and mold it (with epoxy resin). It's more complicated than it seems because the mx slider has to be glued perfectly straight.
Unfortunately I don't have any more topre sliders (I used all the spare ones for various tests) so I require your help.
Do any of you have some spare intact Topre sliders around? I would gladly buy them from you.
Thanks
Posted: 10 Feb 2014, 12:57
by lowpoly
What kind of 3D printing did you use?
Posted: 10 Feb 2014, 13:01
by matt3o
lowpoly wrote:What kind of 3D printing did you use?
I tried on two online shops, one is local, the other is shapeways (the higher res the both could offer)
Posted: 10 Feb 2014, 15:52
by Muirium
matt3o wrote:Also if you look closely near the top there's a little dent that prevents the slider to slip out of the housing. So removing the sliders is not straightforward and requires some caution (or you might break the dent).
I've never taken apart a Topre keyboard, so this could be stupid. But is the dent strictly necessary? Is there anything to stop you from treating the custom stems as detachable items, like caps, which you simply put back on again?
matt3o wrote:Now. I don't give up.
Oh good. About that custom Bluetooth project? (I'll be patient…)
Posted: 10 Feb 2014, 15:56
by matt3o
Muirium wrote:matt3o wrote:Also if you look closely near the top there's a little dent that prevents the slider to slip out of the housing. So removing the sliders is not straightforward and requires some caution (or you might break the dent).
I've never taken apart a Topre keyboard, so this could be stupid. But is the dent strictly necessary? Is there anything to stop you from treating the custom stems as detachable items, like caps, which you simply put back on again?
No, the dent is not necessary, but if you want to swap the original slider with mine you have to take care of it anyway (unless you want to break all the dents)
Muirium wrote:
matt3o wrote:Now. I don't give up.
Oh good. About that custom Bluetooth project? (I'll be patient…)
too much lag and poor autonomy. they are the defects of all DIY BT chips I tried so far.
Posted: 10 Feb 2014, 15:57
by Muirium
Ah well. I foresee a second Minila Air in your life sooner or later…
Posted: 11 Feb 2014, 09:03
by matt3o
really?! no one has a topre slider hanging around?
I'll send anyone who finds one some free prototypes of the new slider.
Posted: 11 Feb 2014, 09:30
by damorgue
The wall thickness of the outer cylinder looks very thin. Especially since it at the bottom can be very thick, and even at the top can be significantly thicker. That should make it far easier to print.
Posted: 11 Feb 2014, 09:34
by matt3o
AFAIU the problem is the inset inside the cylinder (and anything <=1mm). Basically the prototypes I've got are filled inside the cylinder up to 2mm from the edge.
Posted: 11 Feb 2014, 13:13
by arbitrarycombination
Interesting. I was under the impression that Shapeways’ sintering process is sufficient for this purpose.
I have had Shapeways print a cap with a Cherry MX key stem and it turned out fine (although I had to bump the wall sizes slightly to comply with their recommendations). The dimensions could use some minor tweaking, but it holds onto the slider very well.
I would have thought that your task (which is pretty much the inverse part) would work as well. Which material did you use? Mine was Strong & Flexible Plastic. If you used their Detailed Plastic, the waxy support material that they use could have gotten in the way.
Can’t help you out with a slider, though, sorry. I don’t have any Topre switches around.
Posted: 11 Feb 2014, 13:15
by matt3o
thanks for your feedback, artitrary. I'll try to contact shapeways and see there's anything I can do to fix my 3d model.
yes the material was detailed plastic
Posted: 11 Feb 2014, 14:39
by matt3o
I rebuilt the whole model from scratch adding some sub-mm thickness here and there.
I sent it again for a second round of 3d print in "Ultra Detail" material. Crossing fingers.
Posted: 11 Feb 2014, 17:46
by suka
matt3o wrote:The slider is too small and the 3d printing technology sucks.
Must reply to such provocative statements

I'd gladly help you change your mind here with some testing. If you posted the source of your model and maybe a more detailed description of which areas were problematic I could try to reproduce a batch of slightly different sliders to figure out what the critical measurements are.
Bad news is, I do not have (nor ever had) a single Topre switch beneath my hands, so I cannot verify anything here on my end.
Posted: 11 Feb 2014, 18:06
by matt3o
thank you, suka. Really appreciated!
Shapeways have some very small and detailed pieces, so hopefully it was just a problem with my 3d model. Admittedly I had to convert between various file formats because I don't have a decent 3d modelling software (and I can't get my hear around Blender). That might be the source of the problem.
Anyway I'm confident that the latest iteration of the file has good syntax and I already sent it to shapeways. Be assured that I will contact you if this fails again.
If this works we will have to find a way to mass-produce though... one problem at a time.
Posted: 12 Feb 2014, 00:35
by bemailer
Hi matt3o,
I want to help you for this great project !
I could give you the 4 sliders corresponding to the F9-F12 caps since I never use them on my daily Realforce ...
How can I dismount them ?
Do I have to retire all screws on the back of the PCB to release the switches ?
Some screws are identified by an arrow on the back of the PCB, do you know why ?
Posted: 12 Feb 2014, 00:37
by suka
If you haven't tried OpenSCAD yet, this part would be a prime example for some experiments with it: I whipped up some crude code which should be fairly configurable, and find it a lot easier to prototypes that way than with blender, too, as much as I like it for more complicated and free-form designs.
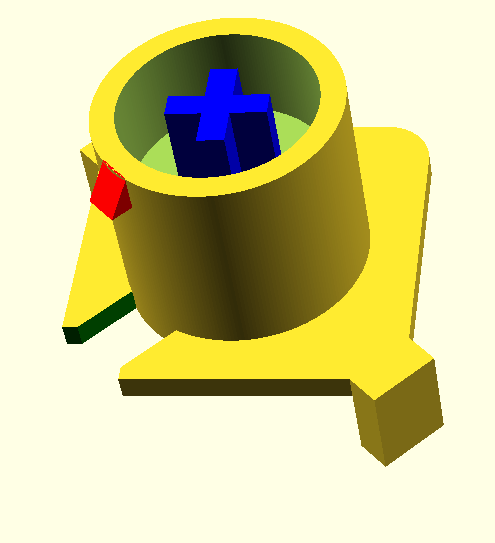
- OpenSCAD model
- MX-Topre.png (14.77 KiB) Viewed 10506 times
Hopefully your new models work out better, but judging from the size of the MX stem which should be 4x1mm² the dent and rim looks awfully thin for 3D printing - maybe the geometry could be changed in a few places?
Code: Select all
/**
 *  OpenSCAD model of MX caps to topre slider based on image from matt3o :
 *      http://deskthority.net/workshop-f7/topre-sliders-mx-caps-t7437.html
 *
 *  2014-02-11 suka @ deskthority
 *
 *  All sizes are on estimates from above image, so most likely wrong :-)
 *  Other @todos are commented, most notably the join of the dent and the exact shape of the base cutouts tips.
 *
 */

// set resolution to a higher value for smoother curves
$fn=230;

eps=0.001; // minimal offset for boolean operations

base_w  =  14;
base_h =   1;
base_radius = 2;

block_w = 3;
block_d = 1.5;
block_h=  4;

cyl_R = 5;
cyl_H = 8;
cyl_r = 4;
cyl_h = 4;

cut_w = 3;

dent_h=1.5;
dent_w=1;
dent_d=1.5;


// Base plate with cut-out, round corner and two blocks
difference() {
    union() {
        translate([-base_w/2, -base_w/2, 0]) {
            // base plate with one rounded corner
            hull(){
                translate([base_radius, base_w-base_radius, 0])  cylinder(r=base_radius, h=base_h);
                //translate([base_w-base_radius, base_radius, 0])  cylinder(r=base_radius, h=base_h);
                translate([base_w-1, 0, 0])                      cube([1,1,base_h]);
                translate([base_w-1, base_w-1, 0])               cube([1,1,base_h]);
                translate([0, 0, 0])                             cube([base_radius, base_radius, base_h]);
            }
            // two vertical blocks on base corners:
            translate([0,block_w/sqrt(2),-block_h+base_h]) rotate([0,0,-45]) translate([0,-block_d,0]) cube([block_w, block_d, block_h]);
            translate([base_w,base_w-block_w/sqrt(2), -block_h+base_h]) rotate([0,0,135]) translate([0,-block_d,0]) cube([block_w, block_d, block_h]);
        }
    }

    color("green"){
        // cut-out on one corner
        rotate([0,0,-135]) translate([-cut_w/2, cyl_R-1, -eps ]) cube([cut_w, base_w/2, base_h+2*eps]);
        // don't know what that cutout corners should look like
        translate([base_w/2-cut_w/sqrt(2)*1.3+eps, -base_w/2-eps, -eps]) cube([cut_w/sqrt(2)*1.3, cut_w/sqrt(2)*1.3, base_h+2*eps]);
    }
}

// Cylinder
difference() {
    cylinder(r=cyl_R, h=cyl_H+base_h);
    translate([0,0,     cyl_H+base_h-cyl_h+eps]) cylinder(r=cyl_r, h=cyl_h);
}


// cherry stem
color("blue") {
    rotate([0,0,90]) translate([-4/2, -1.0/2, cyl_h+base_h]) cube([4, 1.0, cyl_H-cyl_h]);
    rotate([0,0, 0]) translate([-4/2, -1.1/2, cyl_h+base_h]) cube([4, 1.1, cyl_H-cyl_h]);
}

// dent @todo fix connection to cylinder
rotate([0,0,-45]) color("red") {
    translate([dent_w/2+cyl_R-0.1,0,-dent_h/2+cyl_H+base_h]) rotate([0, -atan(dent_w/dent_h), 0])  {
        difference() {
            rotate([0, atan(dent_w/dent_h), 0]) cube([dent_w, dent_d, dent_h], center=true);
            translate([dent_w,0,0]) cube([2*dent_w, 2*dent_d, 2*dent_h], center=true);
        }
    }
}
Posted: 12 Feb 2014, 02:53
by wheybags
matt3o wrote:Do any of you have some spare intact Topre sliders around?
You could mold an unaltered slider, and make a copy in resin, then glue that.
Posted: 12 Feb 2014, 08:40
by matt3o
bemailer wrote:Hi matt3o,
I want to help you for this great project !
I could give you the 4 sliders corresponding to the F9-F12 caps since I never use them on my daily Realforce ...
How can I dismount them ?
Do I have to retire all screws on the back of the PCB to release the switches ?
Some screws are identified by an arrow on the back of the PCB, do you know why ?
thanks

let's see how my new model comes out.
suka wrote:If you haven't tried OpenSCAD yet, this part would be a prime example for some experiments with it: I whipped up some crude code which should be fairly configurable, and find it a lot easier to prototypes that way than with blender, too, as much as I like it for more complicated and free-form designs.
I'll review openSCAD, thanks. Unfortunately the thickness of the cylinder cannot be altered in either direction (internally it hits on the MX stem, externally on the Topre slider). The talon at the end of the cylinder is actually optional, if it doesn't come out the slider should work anyway.
wheybags wrote:matt3o wrote:Do any of you have some spare intact Topre sliders around?
You could mold an unaltered slider, and make a copy in resin, then glue that.
I considered that, but I would end up with a copy of copy and the slider is really small. Anyway if anything else fails, I'll do that.
Posted: 18 Feb 2014, 12:55
by matt3o
Devastating success!

Okay guys. I retract everything bad I said about 3D Printing! This time I picked the highest quality material and the end result is terribly good!
What can I say? they simply... work! I just need to make very small changes, but the sliders already work as they are now. I can't believe the quality of this thingies!
Posted: 18 Feb 2014, 13:31
by Muirium
And you'll sell them for what price?
Posted: 18 Feb 2014, 14:27
by damorgue
I would guess that they cost about 4€/ea at shapeways' rates?
Posted: 18 Feb 2014, 14:30
by matt3o
yes, prototypes are expensive, of course we have to find other ways for "mass production". I will probably mold them in epoxy resin, but theoretically we could ask SP to make the mold and print them. In which case I doubt 1 would cost more than $0.50
Posted: 18 Feb 2014, 16:14
by damorgue
Did you manage to fix the issues with supporting the type of caps which have larger supporting ribs on the inside? I tried this a few years back but that became a hassle. The cap either sat high or the slider had to have slits to allow ribs to sit in them, which made it interfere with the barrel.
Posted: 18 Feb 2014, 16:39
by matt3o
damorgue wrote:Did you manage to fix the issues with supporting the type of caps which have larger supporting ribs on the inside? I tried this a few years back but that became a hassle. The cap either sat high or the slider had to have slits to allow ribs to sit in them, which made it interfere with the barrel.
so far I just checked pretty standard keycaps (OEM, SP, ...) and they all seem to work pretty well. You could add 4 small slits, I actually did the barrel a fraction shorter than the original, that probably helps a little. I would have to try with one of those problematic keycaps.
Posted: 18 Feb 2014, 16:42
by Muirium
Have you still got an HHKB? Try a spacebar on it. I have some pictures to post of potential trouble for this.
Posted: 18 Feb 2014, 17:24
by Ichigo87
Awesome work, i would love to see my realforce with spherical keycaps. I see a lot of great group buy in 2014 !
Posted: 18 Feb 2014, 17:41
by Muirium
Well, watch out. Recently I proxied this HHKB Pro 2 for someone on the forum:
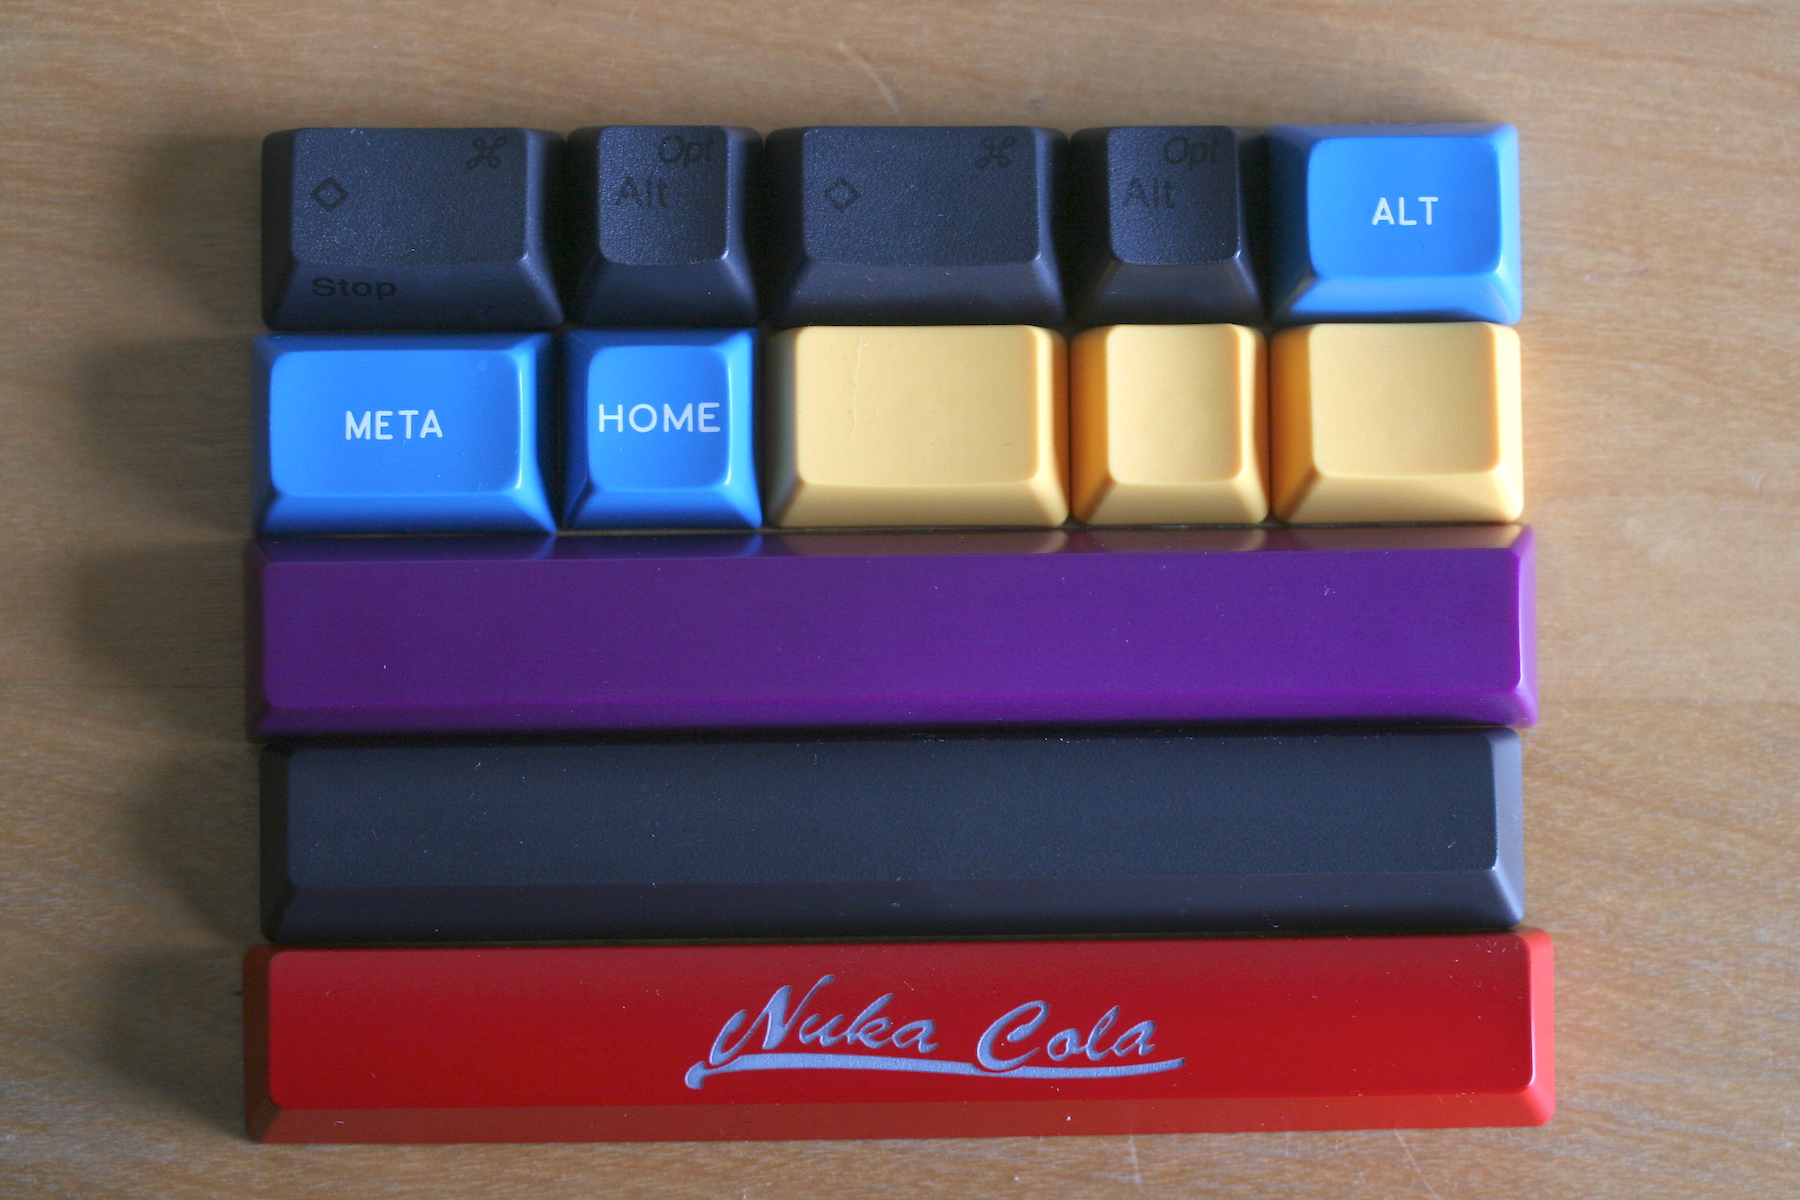
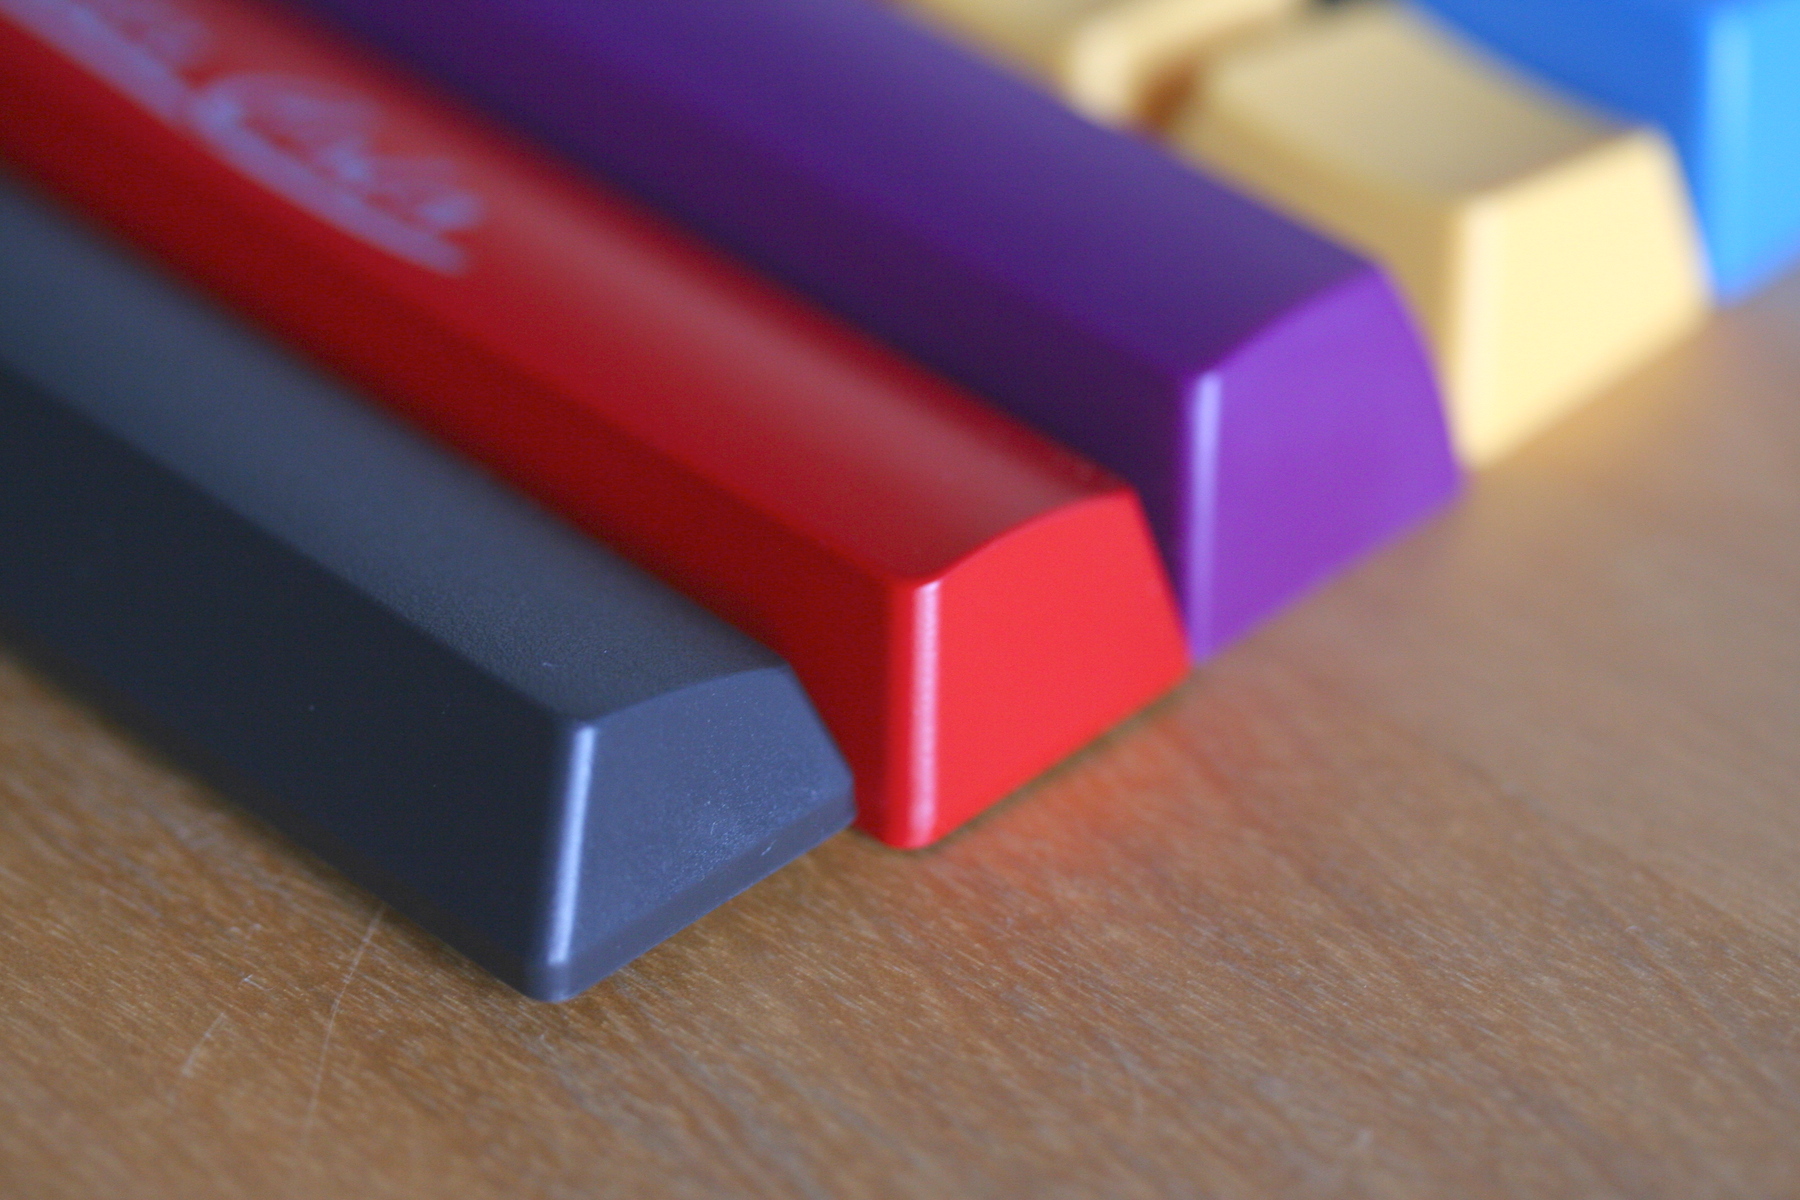
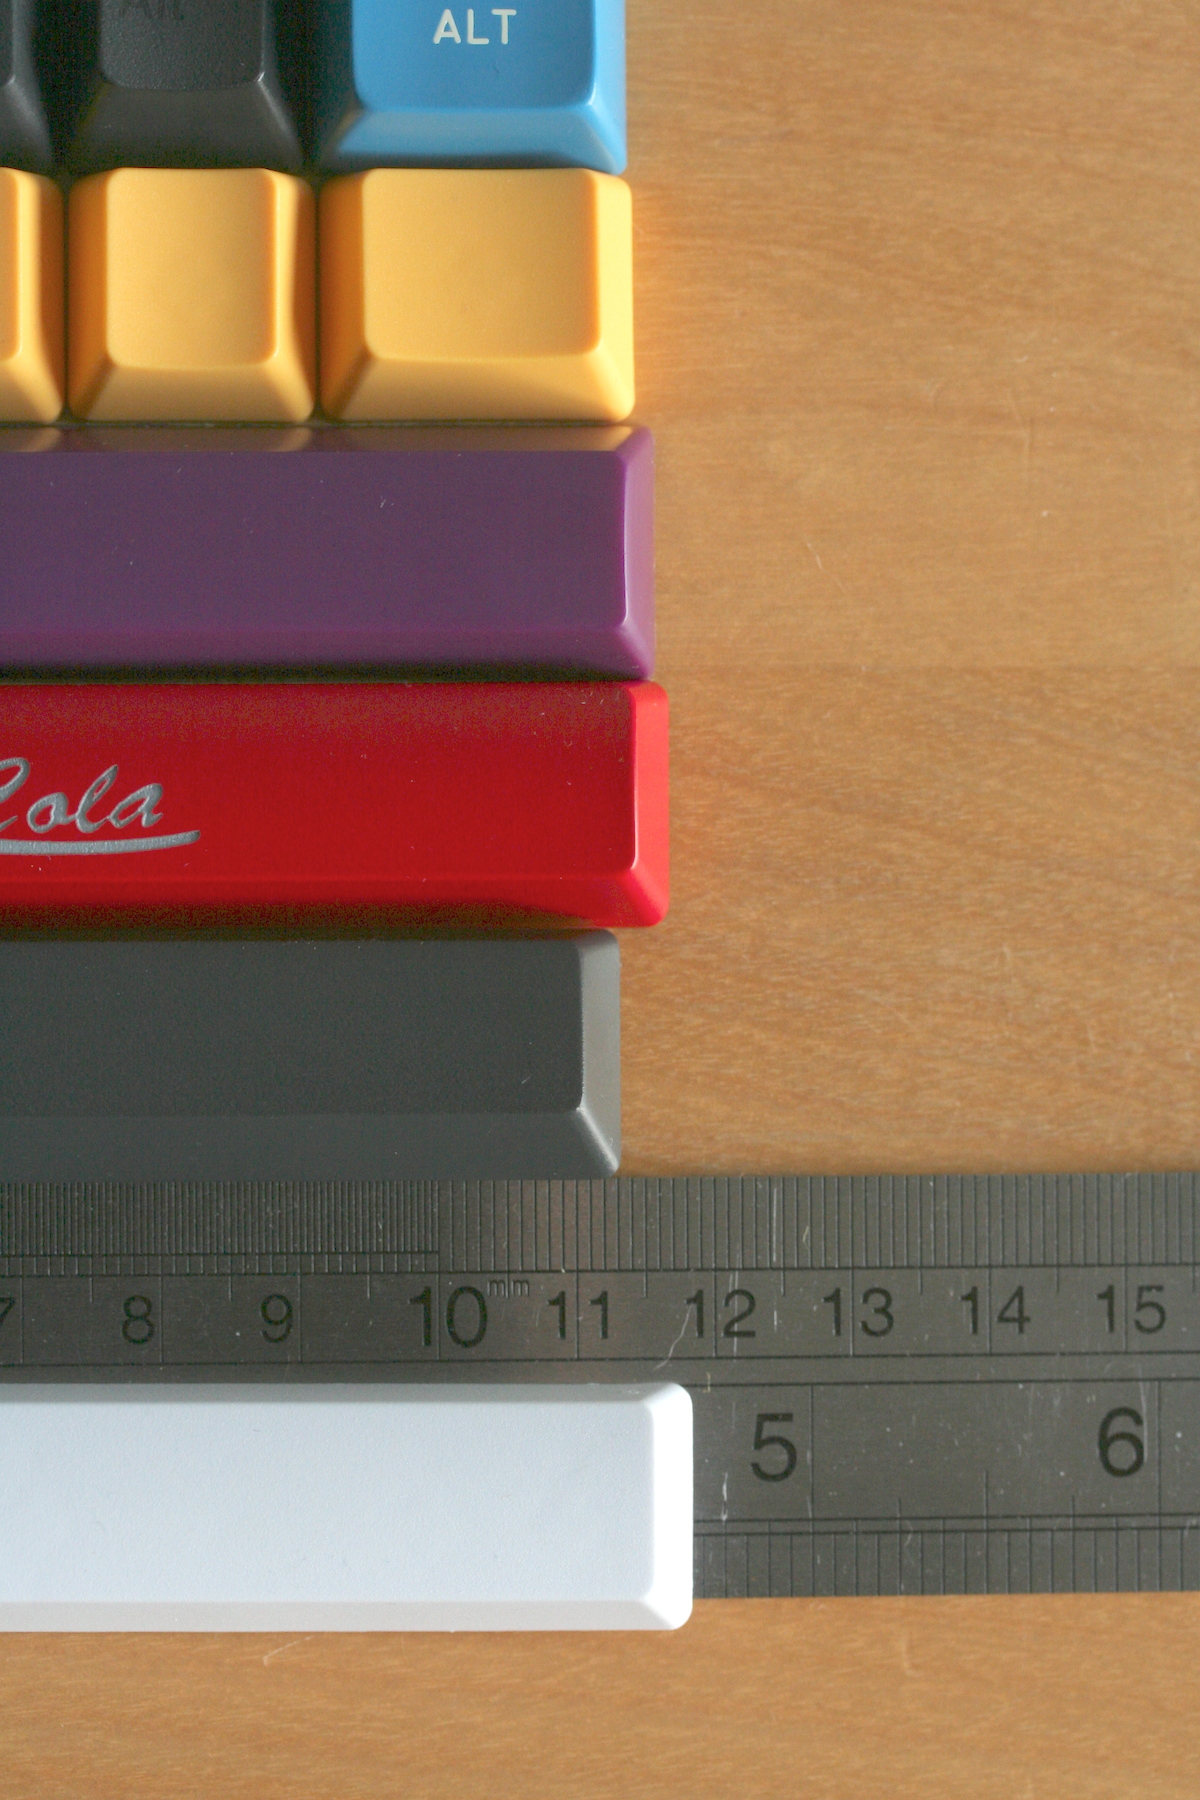
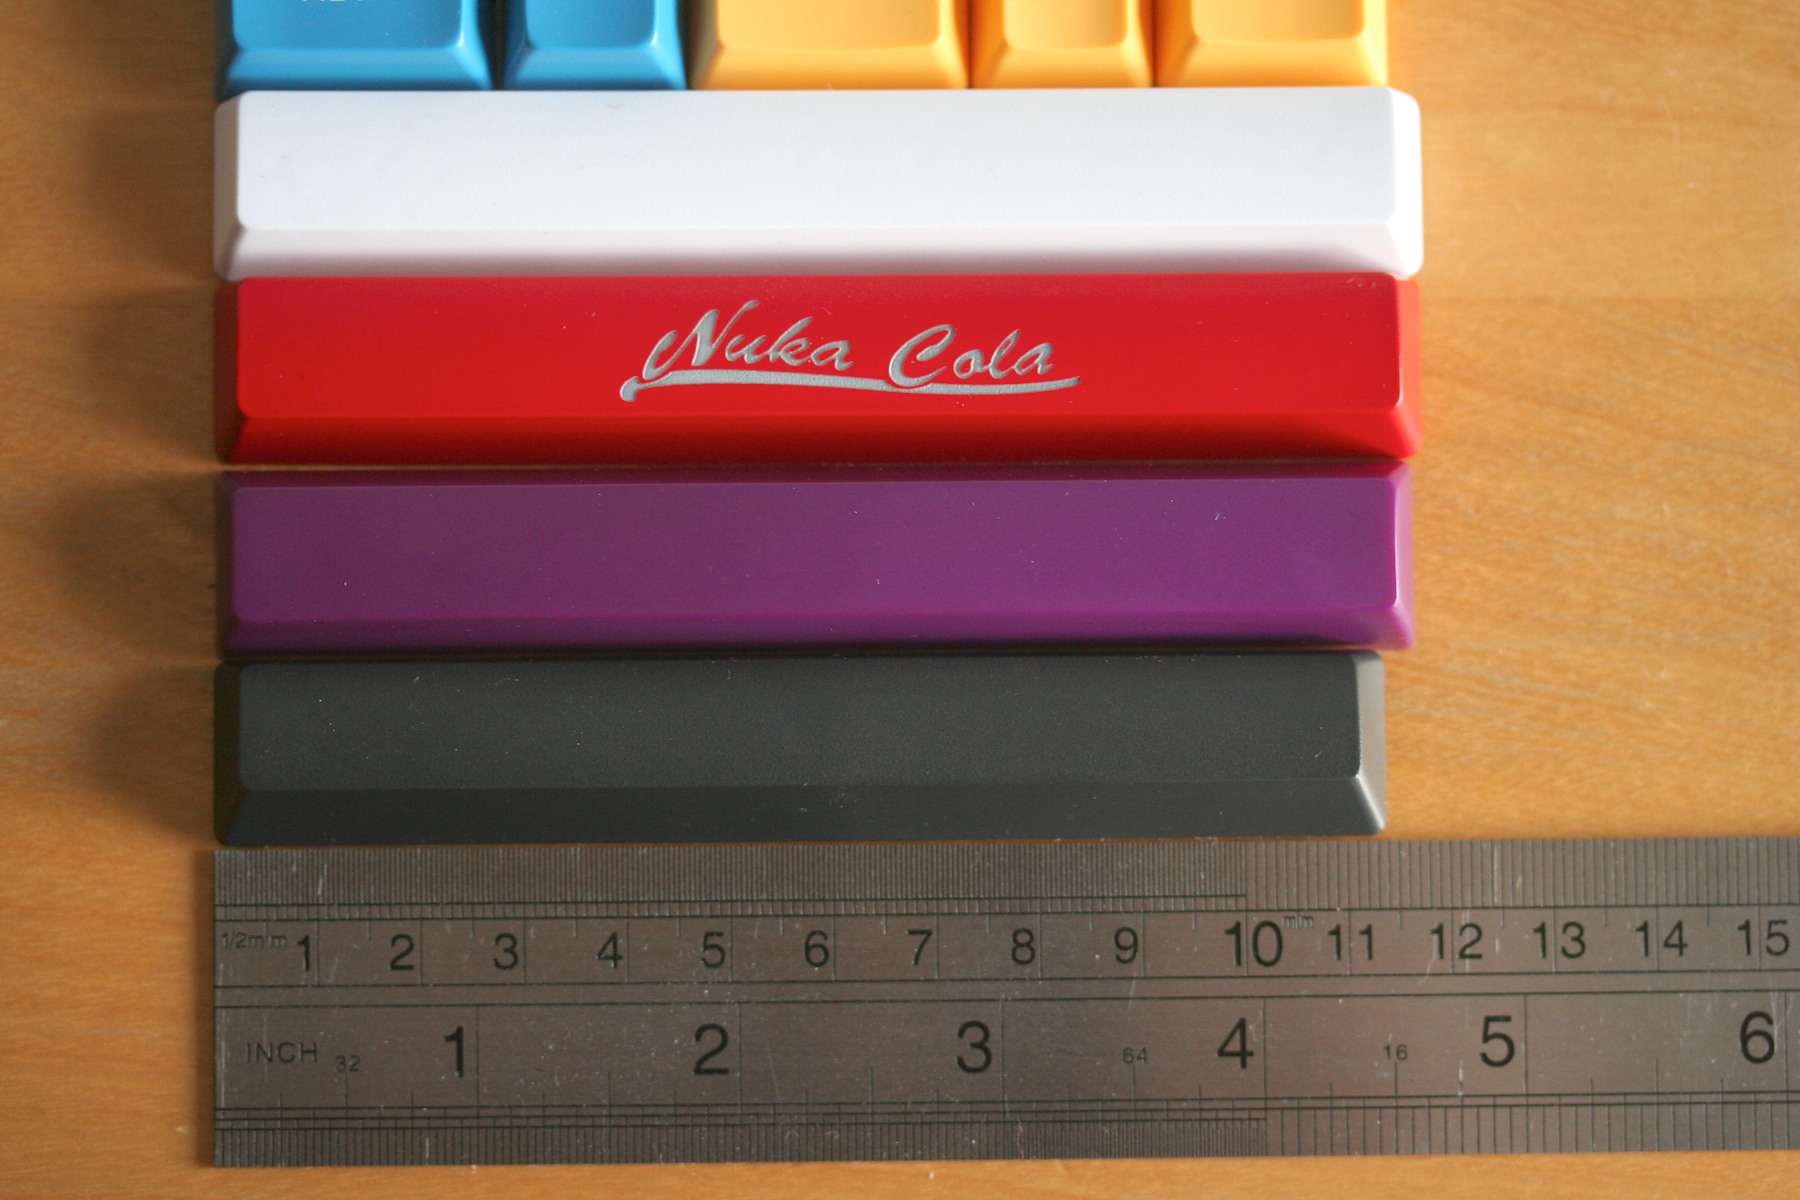
And I took the opportunity to compare caps. The blue caps are SA R4 SPH, the yellows are OEM profile Ducky PBT, and the black caps are the HHKB's.
- IMG_9918.JPG (998.86 KiB) Viewed 10364 times
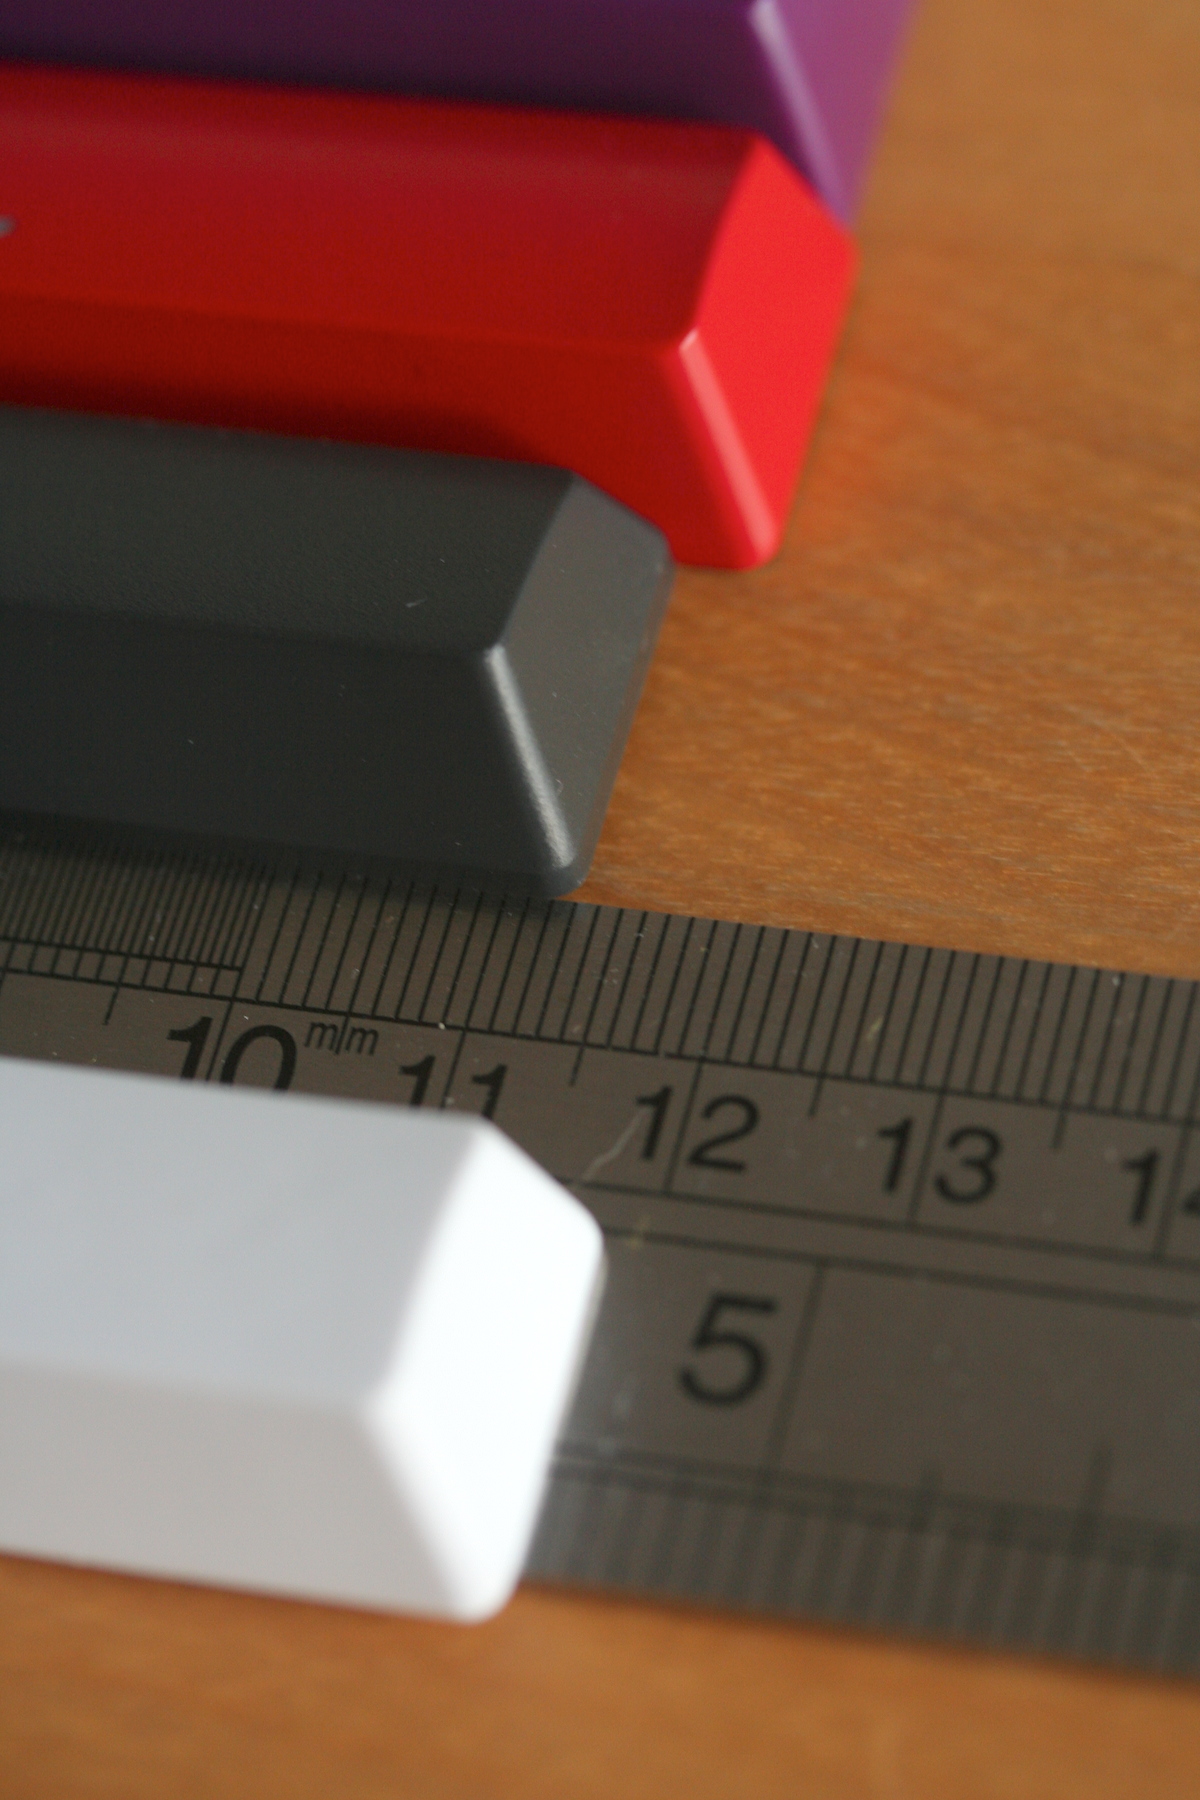
The little ones are fine, they seem to be based on the same units. But look at the space bars. The purple one is Round 4 SPH and the red is a custom creation of Kayvee's, presumably OEM profile. All are 6.25 units.
- IMG_9936.JPG (780.54 KiB) Viewed 10364 times
The white one is another Ducky PBT space bar. It's visibly longer than all the rest of them, but not enough to be a problem in my Shine 3. But the HHKB's is a real outlier.
- IMG_9928.JPG (894.47 KiB) Viewed 10364 times
- IMG_9933.JPG (996.25 KiB) Viewed 10364 times
- IMG_9937.JPG (857.01 KiB) Viewed 10364 times
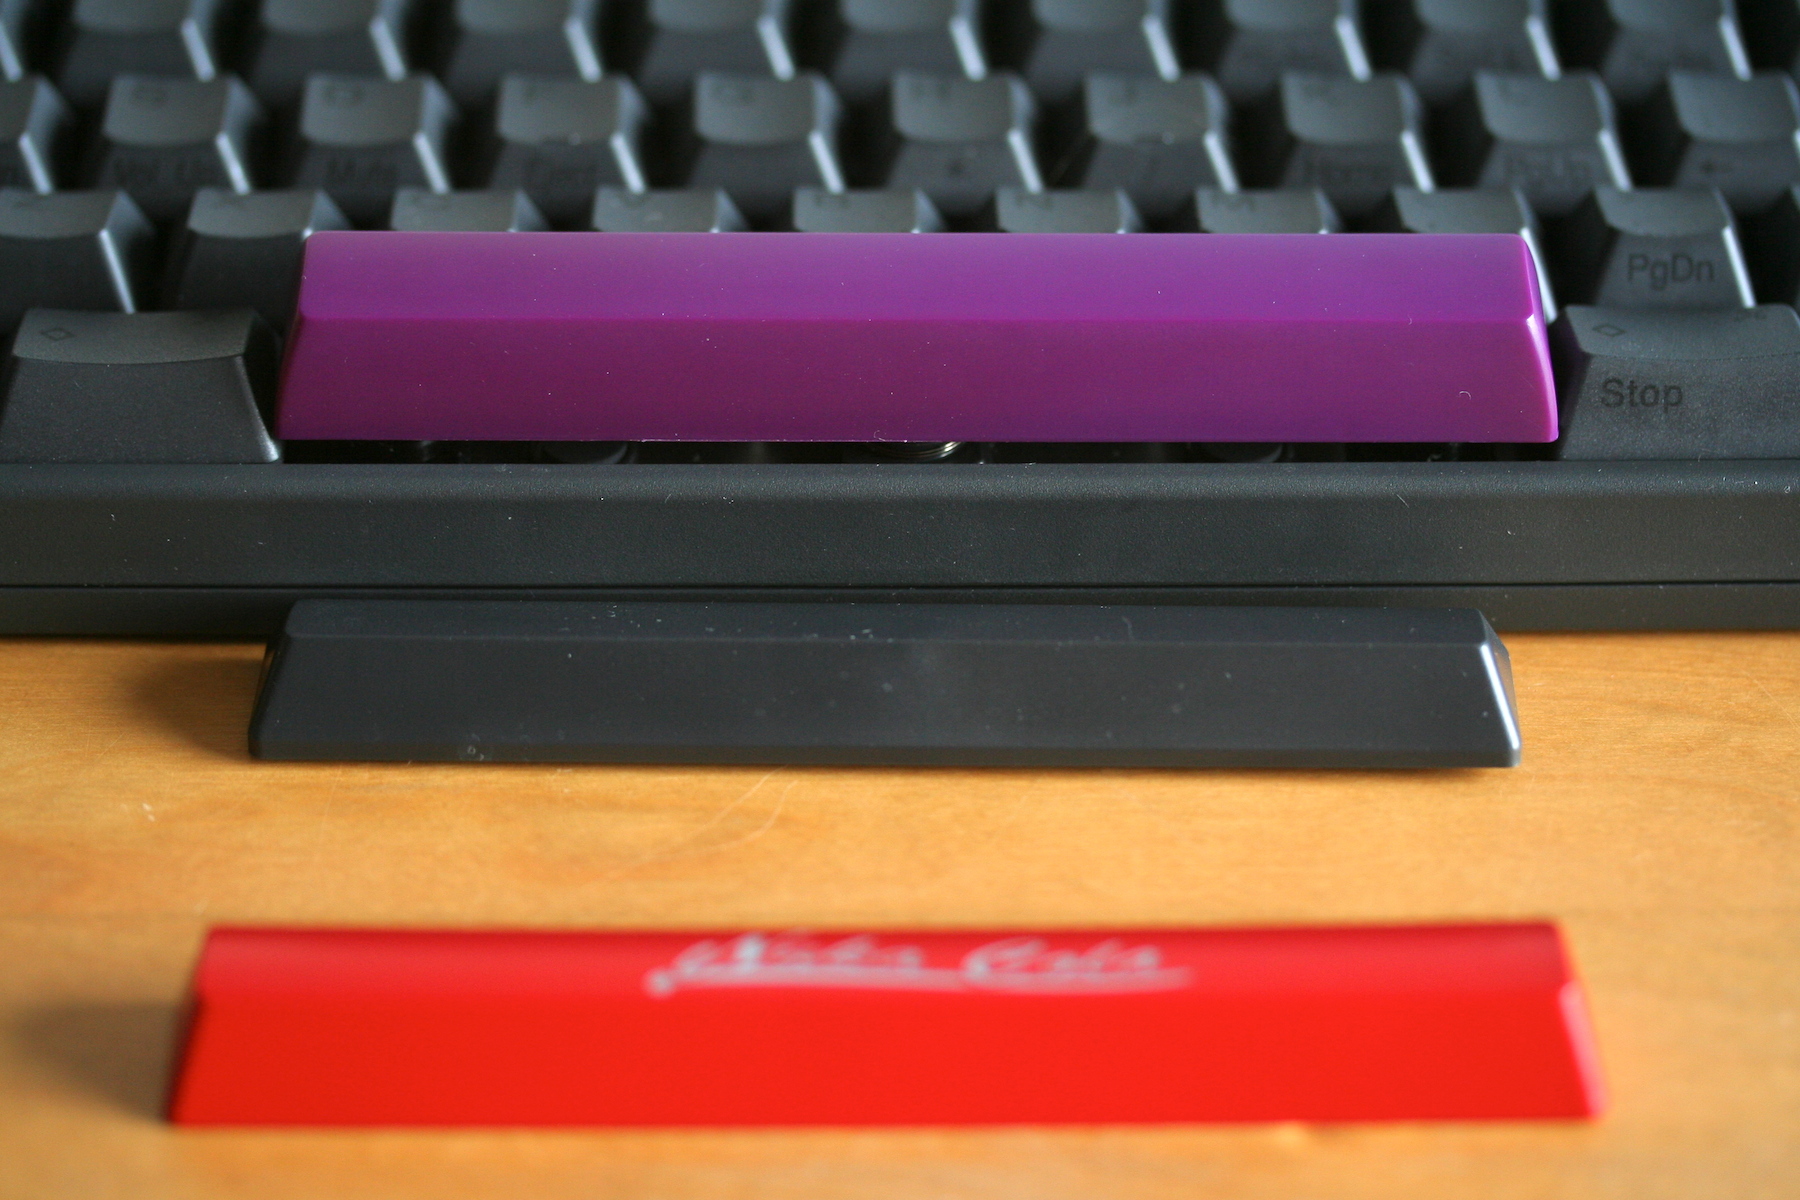
So what? Well, put a 6.25u MX space bar on the HHKB and…
- IMG_0005.JPG (879.48 KiB) Viewed 10364 times
Not. Gonna. Happen.
- IMG_0001.JPG (805.82 KiB) Viewed 10364 times
This seems to be a significant problem. 6.0u space bars and unsightly gaps might be the answer. But there are no 6.0s in Round 5. Anyone else with an HHKB and some space bars to try? Especially a 6.0u DSA.
Posted: 18 Feb 2014, 17:52
by matt3o
I would state the obvious but... HHKB is 6u, you can't fit a 6.25 in a 6u
That's why you need Skull Squadron set
(or DSA retro)
SP calls all its spacebars 6.2u (not 6.25) I don't know if it's just for brevity or if the spacebars are really a pinch smaller, but from your pictures it seems they are actually smaller. Anyway the bottom line is, if you see a DSA set with a 6u spacebar you should take it. Just saying...
Posted: 18 Feb 2014, 17:54
by ماء
Really nice translucent stems

matt30 are ahead CM now

i want see plugged on RF...

may with DSA retro
Posted: 18 Feb 2014, 17:56
by Muirium
matt3o wrote:I would state the obvious but... HHKB is 6u, you can't fit a 6.25 in a 6u
That's why you need Skull Squadron set
(or DSA retro)
Oh right! Whoops. Call off the alarm, folks. I just didn't realise. The variation in my own 6.25u space bars fooled me.