I've tried the one in my lab at work for cleaning especially filthy keycaps and the like and found that it works wonders on both ABS and PBT, but I'm only using it when the task of cleaning individual cpas seem too daunting. For the record, the ultrasonic cleaner in our lab is an Elmasonic S40H, so not a very powerful one, maybe yours is beefier? Then just try it with something that has little or no value to you and see whats what...Chyros wrote: ↑I've thought about using the ultrasonic cleaner from the lab but it's kinda of powerful so I'm afraid of shattering my caps, especially the PBT ones xD .
What's the best way to clean keycaps?
-
Khers

- ⧓
- Location: Sweden
- Main keyboard: LZ CLSh
- Main mouse: Logitech MX Ergo
- Favorite switch: Buckling Springs | Topre | Nixdorf Black
- DT Pro Member: 0087
-
zslane

- Location: Los Angeles, California, USA
- Main keyboard: RealForce RGB
- Main mouse: Basic Microsoft USB mouse
- Favorite switch: Topre
- DT Pro Member: -
Actually, this may all be somewhat moot. According to the badge on the underside, this is a model 1370477 from 1993, which means the keycaps aren't detachable (according to Wikipedia). If so, then pulling them off to clean them is not an option.
It also means it has a standard PS/2 connector which will make it easy to test.
I see some small hex bolts keeping the case together but I'm sure there's a lot more to it than that. Any advice for disassembling the case?
It also means it has a standard PS/2 connector which will make it easy to test.
I see some small hex bolts keeping the case together but I'm sure there's a lot more to it than that. Any advice for disassembling the case?
-
Crazy Canadian XXIV

- Location: Victoria, Canada
- Main keyboard: IBM 122-key Model F, circa 1985
- Favorite switch: Capacitive buckling spring
- DT Pro Member: -
That just means the keys are single piece, stem and keycap in one package. In some Model Ms the keycaps are separate from the stems. You can still remove them, it's just a slightly more/less elegant design (depends on how you look at it, really).
The hex bolts really are pretty much all there is to it, just take them out and you can pop it open. Basic disassembly of a Model M is pretty damn straightforward; just take out some screws, pop it open, and bob's your uncle. One thing to note, though, is that the hex screws are a really oddball size; 7/32". You might need to buy a nut driver of that size specifically for removing the hex screws.
The hex bolts really are pretty much all there is to it, just take them out and you can pop it open. Basic disassembly of a Model M is pretty damn straightforward; just take out some screws, pop it open, and bob's your uncle. One thing to note, though, is that the hex screws are a really oddball size; 7/32". You might need to buy a nut driver of that size specifically for removing the hex screws.
-
fohat

- Elder Messenger
- Location: Knoxville, Tennessee, USA
- Main keyboard: Model F 122-key terminal
- Main mouse: Microsoft Optical Mouse
- Favorite switch: Model F Buckling Spring
- DT Pro Member: 0158
A 5.5mm socket will work, it is almost identical, but the socket must be "deep" and "thin-walled" to fit down into the well.Crazy Canadian XXIV wrote: ↑ the hex screws are a really oddball size; 7/32". You might need to buy a nut driver of that size specifically for removing the hex screws.
-
XMIT

- [ XMIT ]
- Location: Austin, TX area
- Main keyboard: XMIT Hall Effect
- Main mouse: CST L-Trac Trackball
- Favorite switch: XMIT 60g Tactile Hall Effect
- DT Pro Member: 0093
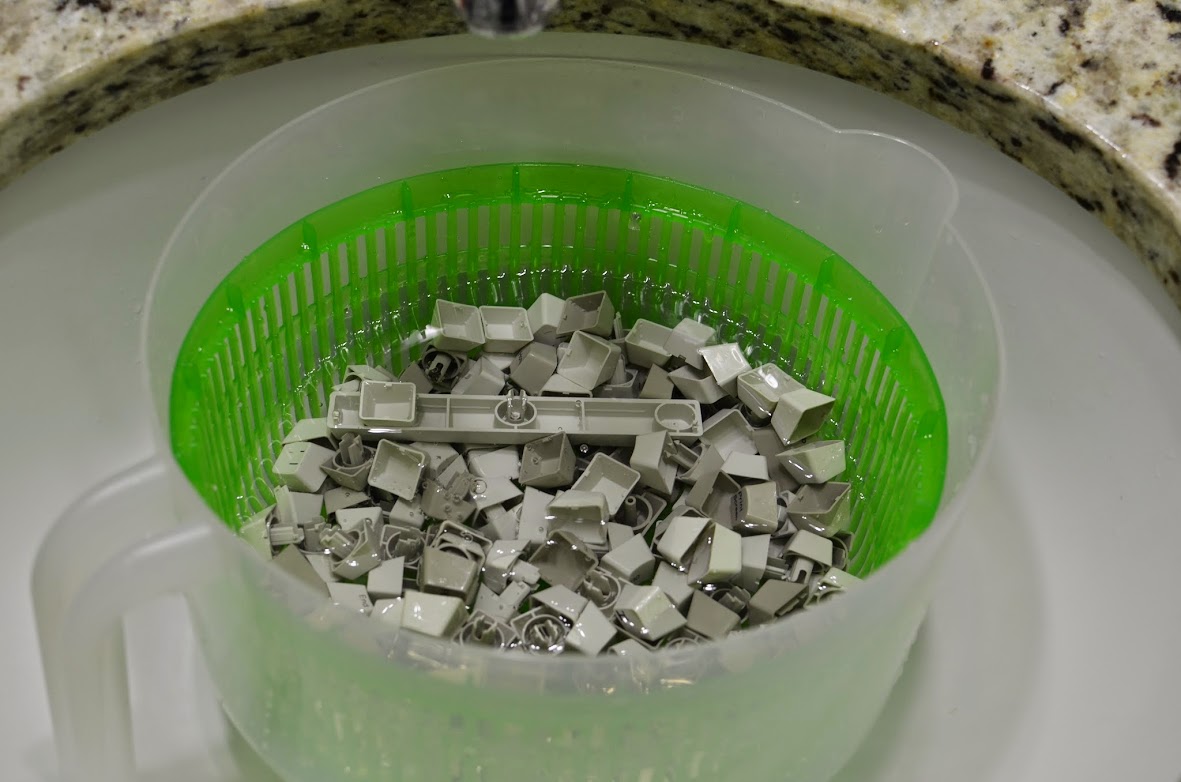
My procedure for cleaning keys with dishwashing soap and a salad spinner is documented here:
http://deskthority.net/post221302.html? ... er#p221302
I will repeat it here.
Tools and supplies needed:
salad spinner
6 cups or 1.5L hot water (212F or 100 C for PBT key caps only, 160F or 70 C for all others)
1T or 15mL dishwasher soap (ideally unscented and no added color. I use Seventh Generation Natural Dishwasher Detergent Gel, available at H-E-B, the local grocery store. Powder should work here too, I have not tried it.)
Combine water, dish soap and key caps in salad spinner.
Spin for 10 seconds to mix soap thoroughly.
Let sit for 15 minutes. Maybe clean other parts of the keyboard while waiting.
Spin for a couple of minutes, slowly. There may be no suds especially with hard Texas water, this is okay.
(EDIT: Use distilled, deionized, or reverse osmosis water if possible.)
Drain.
Rinse 5 times.
Spin to dry.
Let keycaps dry on a towel and/or dry with a blow dryer until no moisture remains.
-
XMIT
- [ XMIT ]
- Location: Austin, TX area
- Main keyboard: XMIT Hall Effect
- Main mouse: CST L-Trac Trackball
- Favorite switch: XMIT 60g Tactile Hall Effect
- DT Pro Member: 0093
Also - I do have a cheap-o Chinese ultrasonic cleaner at home. I'll give it a go with key caps. I was disappointed at what it could do with bicycle components. Lab grade ones are much more powerful.

-
XMIT
- [ XMIT ]
- Location: Austin, TX area
- Main keyboard: XMIT Hall Effect
- Main mouse: CST L-Trac Trackball
- Favorite switch: XMIT 60g Tactile Hall Effect
- DT Pro Member: 0093
From this we can conclude that I am in fact a cyborg.Muirium wrote: ↑Fun fact: people browse, only computers dig deep into the database.
If the salad spinner trick helps someone, great. If others aren't annoyed that I've re-posted it here, even better.
I'd like to try the salad spinner trick with a denture tab instead of (or in addition to?) the dishwasher fluid.
Most of the keyboard dirt I've seen is finger grime, food, or dirt. These approaches should cover most of them. There are some forms of grime that these approaches may not cover. In elecplus's warehouse, where the attic would get up to about 55 C, the rubber pads on the undersides of some lesser keyboards would melt, leaving a mess of sticky black tar everywhere.
After having bent enough space bars I'm still superstitious about these and will clean them separately unless I know for sure they are PBT.
-
Chyros

- Location: The Netherlands
- Main keyboard: whatever I'm reviewing next :p
- Main mouse: a cheap Logitech
- Favorite switch: Alps SKCM Blue
- DT Pro Member: -
Indeed. I also hand-clean caps with contact parts or LED windows or anything special in. I've ruined the LED window on my Peerless caps with tepid water once, and similarly washed the lube off contact parts once too.XMIT wrote: ↑ After having bent enough space bars I'm still superstitious about these and will clean them separately unless I know for sure they are PBT.
-
zslane
- Location: Los Angeles, California, USA
- Main keyboard: RealForce RGB
- Main mouse: Basic Microsoft USB mouse
- Favorite switch: Topre
- DT Pro Member: -
So I finally took apart the case and removed the board with the curved metal plate. The black plastic surface between all the switches is filthy but I'm not sure what the best/safest way to clean that is. It is grimy and dirty and covered with grit. I need to really get between the switches and scrub it clean.
Suggestions?
Suggestions?

-
Muirium

- µ
- Location: Edinburgh, Scotland
- Main keyboard: HHKB Type-S with Bluetooth by Hasu
- Main mouse: Apple Magic Mouse
- Favorite switch: Gotta Try 'Em All
- DT Pro Member: µ
A big old pain in the arse:
http://deskthority.net/workshop-f7/ibm- ... t9169.html
My least favourite thing about Model Ms. Model F never had destructive fasteners when you went inside…
http://deskthority.net/workshop-f7/ibm- ... t9169.html
My least favourite thing about Model Ms. Model F never had destructive fasteners when you went inside…
-
zslane
- Location: Los Angeles, California, USA
- Main keyboard: RealForce RGB
- Main mouse: Basic Microsoft USB mouse
- Favorite switch: Topre
- DT Pro Member: -
Oh! Geez, no. I'm way too lazy for that.
I had no intention of detaching the plastic board from the metal plate. I just want to clean the plastic surface between all the switches. I don't really even know why I'm going to all the trouble to clean this beast. Some inexplicable curiosity I guess. But there's a line (of effort and tedium) I won't cross for this. In removing the keycaps, opening the case, and removing the board I've pretty much reached that line. Doing any more than simply cleaning what is now exposed would cross it and send me tumbling down a rabbit hole I'd rather avoid.
I had no intention of detaching the plastic board from the metal plate. I just want to clean the plastic surface between all the switches. I don't really even know why I'm going to all the trouble to clean this beast. Some inexplicable curiosity I guess. But there's a line (of effort and tedium) I won't cross for this. In removing the keycaps, opening the case, and removing the board I've pretty much reached that line. Doing any more than simply cleaning what is now exposed would cross it and send me tumbling down a rabbit hole I'd rather avoid.
-
Muirium
- µ
- Location: Edinburgh, Scotland
- Main keyboard: HHKB Type-S with Bluetooth by Hasu
- Main mouse: Apple Magic Mouse
- Favorite switch: Gotta Try 'Em All
- DT Pro Member: µ
Stay out of the barrels. Those springs can rust, and the innards are pretty exposed within. Deep inside lies the membrane, you definitely don't want that getting wet.
So yeah, take it easy and simply scrub what you can see. I use a toothbrush on the barrel frame when I'm IBM cleaning. Dry, then a little wet and detergent if needs be. Let everything get dry thoroughly at the end before putting caps back on.
So yeah, take it easy and simply scrub what you can see. I use a toothbrush on the barrel frame when I'm IBM cleaning. Dry, then a little wet and detergent if needs be. Let everything get dry thoroughly at the end before putting caps back on.
-
fohat
- Elder Messenger
- Location: Knoxville, Tennessee, USA
- Main keyboard: Model F 122-key terminal
- Main mouse: Microsoft Optical Mouse
- Favorite switch: Model F Buckling Spring
- DT Pro Member: 0158
Now that I have done a couple of dozen of each, I would say for sure that a Model M bolt-mod is considerably faster and easier than a Model F rehab.Muirium wrote: ↑A big old pain in the arse:
My least favourite thing about Model Ms. Model F never had destructive fasteners when you went inside…
After the 1st time it is much easier, and after about the 3rd it is far easier than that. Provided that you have the proper tools!
However, that may be because I completely disassemble the thing into almost all of its constituent pieces, clean them thoroughly, and put it all back together.
But while the M pretty much just goes back together, the F almost always requires considerable refurbishing, including cutting a new mat (90% of the time) sanding and painting the front plate (100% of the time for me), and doing whatever you choose to do to make it work on a modern computer.
-
fohat
- Elder Messenger
- Location: Knoxville, Tennessee, USA
- Main keyboard: Model F 122-key terminal
- Main mouse: Microsoft Optical Mouse
- Favorite switch: Model F Buckling Spring
- DT Pro Member: 0158
True. The AT is a very nice little keyboard.Muirium wrote: ↑That would be plugging into an AT adapter for some of them!
However, my AT is climbing toward the top of my project list for an ANSI mod including ALT keys, so, back to the full monty!
-
SDS604

- Location: Canada
- Main keyboard: Velocifire VM01WS | IBM Model M 122
- Main mouse: Logitech Master MX 2S
- Favorite switch: Buckling Spring!
- Contact:
I recently pulled the key caps and stems from my Model M 122 key.
Cleaning them was a breeze thanks to this thread!
This was my process:
- Pulled all key caps and stems from the keyboard.
- Separated the stems from the key caps.
- 1 plastic container for stems.
- 1 plastic container for key caps.
- Fill each container with approx. 1L warm (not too hot!) water + a few drops of pure unscented castile soap. Just enough water to fully submerge the caps and stems.
- 6 denture tablets (Polident retainer dailys) per container.
- Agitate the water gently every 5 minutes to ensure all surfaces are exposed.
- Drain and rinse, and rinse, and rinse. The salad strainer was great for this.
- 20 minutes later they were better than new! No gunk, all clean, no faded markings.
- Dry with cloth.
- Let further air dry on a plastic sheet for a week. (This is a weekend hobby after all!)
- Go over them with a dry microfibre cloth and compressed air.
- Let sit for a week again.
- Dry cloth again for finishing polish.
- Complete!
-
Waxwood
- Location: Canada
- Main keyboard: Cougar mechanical
- Main mouse: CST trackball
- Favorite switch: buckling, Cherry Blue
- DT Pro Member: -
I noticed that a lot of the caps on my Model F XT keyboards have stained caps- probably from smokers typing on them for years.
I washed the caps in a vinegar and water solution in fairly hot water (not at all near boiling) then scrubbed them with a toothbrush and dish detergent.
Interestingly, even after washing the caps, some are still disoloured by a faint greenish-yellow stain. The printing on the keycaps is also slightly streaked- as if the printing has smeared.
Any idea what caused this or how I might clean them more thoroughly?

-
Waxwood
- Location: Canada
- Main keyboard: Cougar mechanical
- Main mouse: CST trackball
- Favorite switch: buckling, Cherry Blue
- DT Pro Member: -
I tried the denture tablets last night.
The greenish-yellow tinge on the keycaps has not faded at all. I'm guessing its from smoking and typing on the keyboard.
I'll try to post a photo of these oddly discoloured keycaps and the blurriness of the printing on many of them.
I noticed this problem on several of the keyboards I'm rebuilding.
Do they need retrobrighting? Would that take care of the discoloration?