SAMPad - Sundstrand Adding Machine - Numpad that is usable on right &

mohitgarg

31 Mar 2016, 14:14

This is a custom numeric pad that is designed to be usable on the right side of the keyboard or on the left (With a mirrored layout if required). There is a gap in the top row and the second row of 1.25U. The top row can be broken off by simply scoring the two brifges and snapping. The bottom 5 rows can then be used in conjunction with a 60%/65% keyboard.

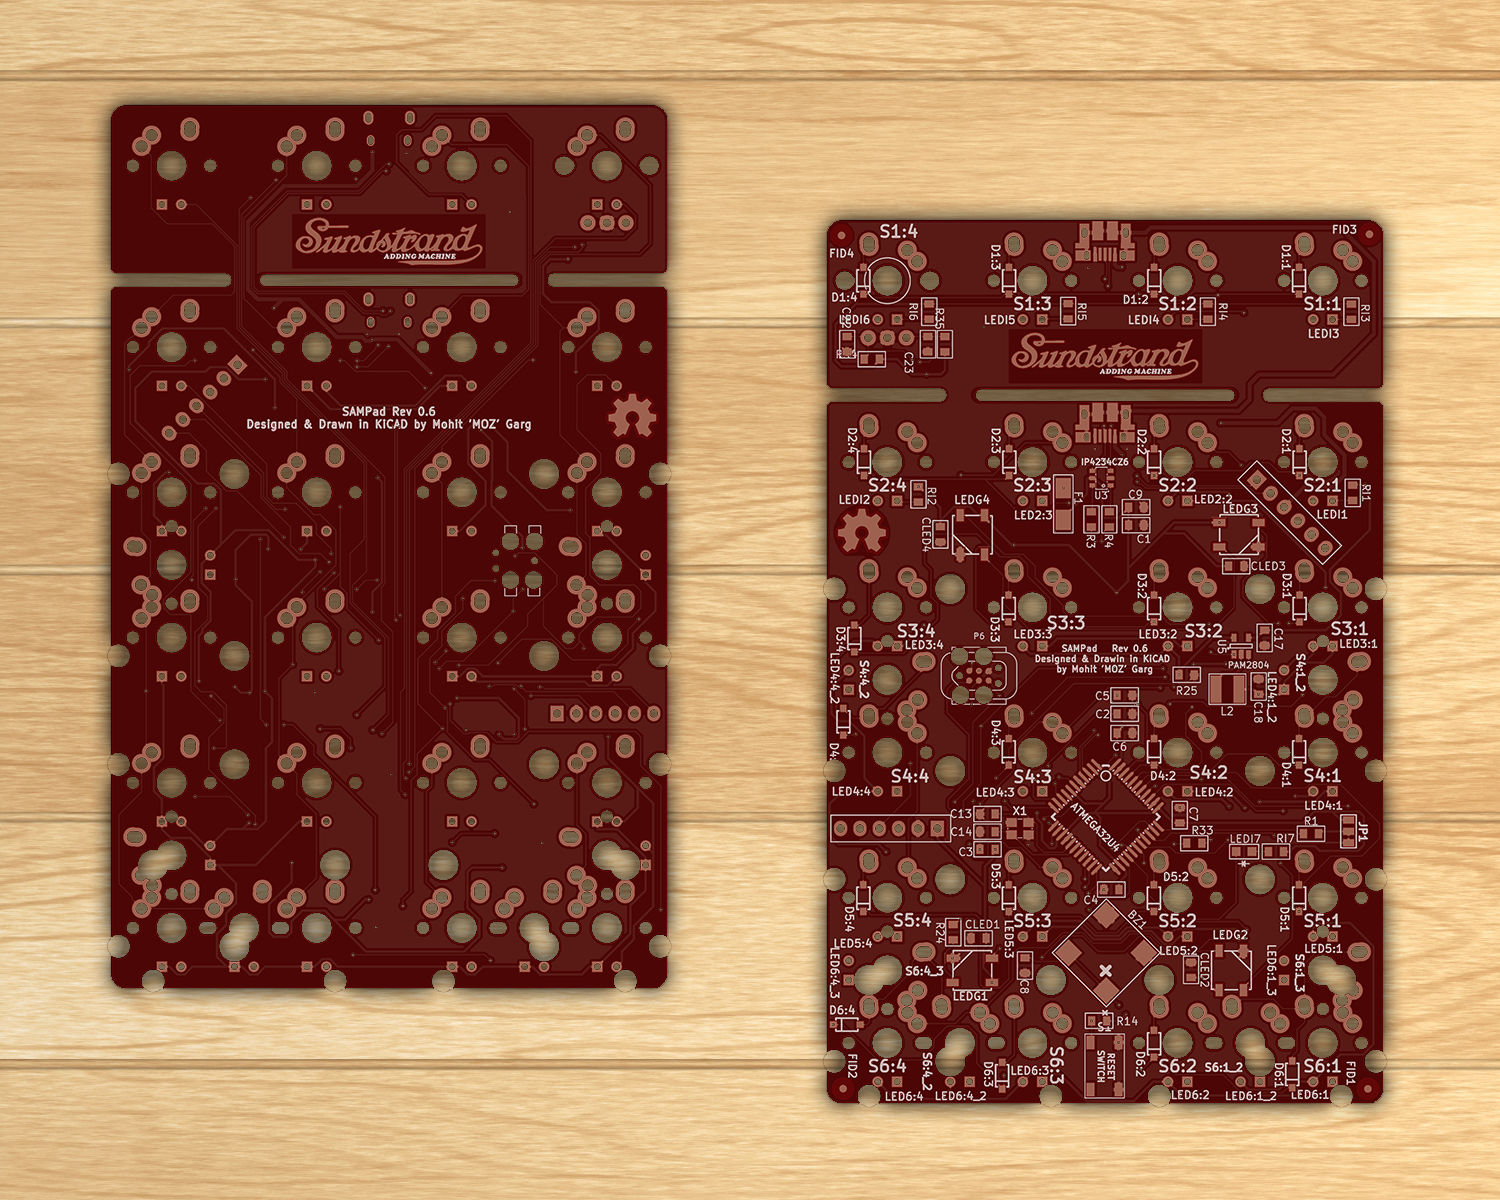
SAMPad stands for Sundstrand Adding Machine. David Sundstrand was the inventor of the 10-key adding machine, the layout of which is used till date on most numeric pads. This is a humble dedication to the great man.

Features:
-- Open Source Design
-- Fully Programmable Keys
-- Numpad can be mirrored for use on the left side of the main keyboard.
-- Multiple layers
-- Alps/Cherry (PCB/Plate) support
-- PCB mount stabs supported
-- Backlight, LED on bottom for windowed keycaps
-- 6 Indicator LEDs, 4 on the top row and one on either Num Lock positions (Regular and mirrored)
-- 4 SMD RGB LEDs on the bottom of the PCB for under/side glow
-- SMD (SOD-123) diodes only
-- Individual resistors for the LEDs not required as it uses a dedicated LED driver
-- Using large (0805) capacitors and resistors so it is easier to hand-solder
-- Possibility to add a buzzer
-- Possibility to add a rotary dial on the top-right most key position for changing volume, LED brightness, etc.
-- PCB compatible with Winkeyless.kr case

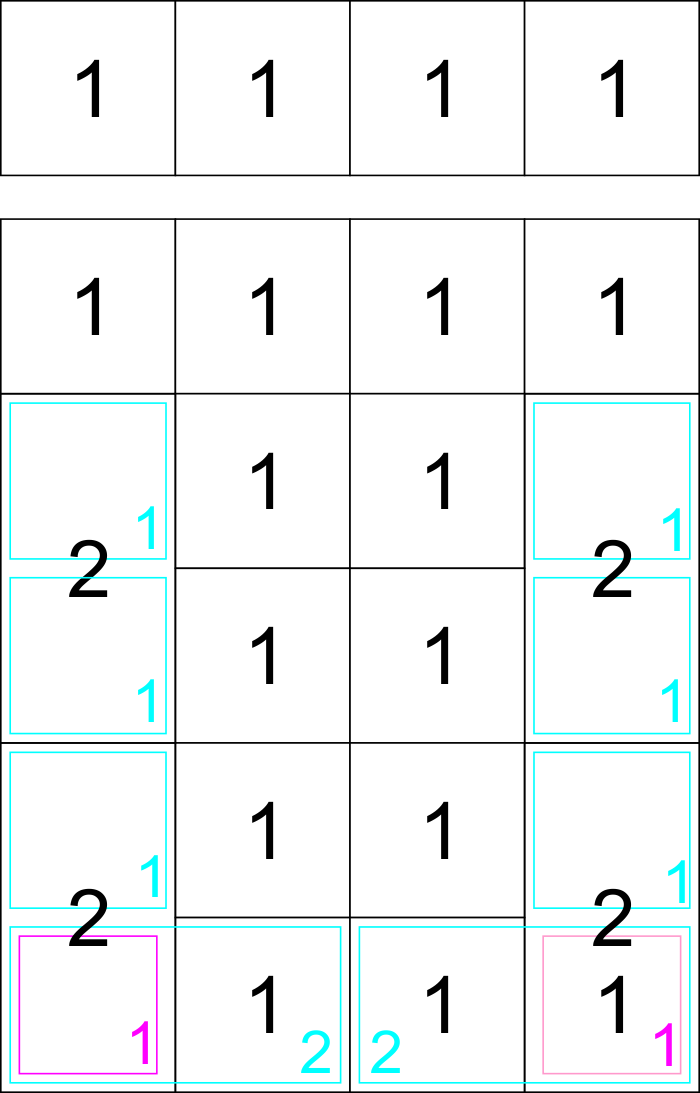
Layout options decided/implemented:
-- Standard numpad with extra row on top with a 1.25U vertical offset that matches most TKL boards.
-- Possibility for upto 5*4 + 4 keys layout
-- Mirrored numpad layout for use on left side of main keyboard

Image

To Do (immediate):
-- Add RGB support to EasyAVR
-- Add rotary encoder support to EasyAVR
-- Add buzzer support to EasyAVR

GitHub Link: https://github.com/mohitg11/SAMPad

Current PCB design:
Image

NOTE: This is an open-source project and in the future anyone can get the PCB made if interested. I have _NO_ interest in running a GB in the future as I am not keen on handling the associated shipping and finances.
Last edited by mohitgarg on 24 Apr 2016, 16:57, edited 4 times in total.

KRKS

01 Apr 2016, 08:17

Github link 404s, but other than that nice project!

User avatar
Ratfink

01 Apr 2016, 13:47

Until the OP is fixed, here's the link that was supposed to be in it:
https://github.com/mohitg11/SAMPad

mohitgarg

01 Apr 2016, 14:49

Thanks. Fixed the OP.

mohitgarg

15 Apr 2016, 13:47

Updated the PCB on GitHub. I feel it is now complete and will move onto designing the acrylic case and in parallel I've been working on adding support for RGB LEDs to Easy AVR.

User avatar
gogusrl

20 Apr 2016, 14:34

that rotary encoder made me wet. I've been wanting something like this for a while now.

Charger

20 Apr 2016, 16:12

gogusrl wrote: that rotary encoder made me wet. I've been wanting something like this for a while now.
Agreed it has me interested in this project. I have been waiting for someone to add that to tmk but that doesn't seem to be happening

mohitgarg

24 Apr 2016, 18:06

Completed the case and uploaded it onto GitHub.

I've gone with a slightly different case to the ones I've done before. There is only one thick middle layer this time, a top/plate layer and a bottom layer along with a diffuser layer.

One would have to file the USB part that protrudes from the middle layer. Just cutting it would result in an unnecessarily large cavity, thus I've left it to the user to file to get the right height, it can easily be ammended in any vector software to be cut if required.

There is a diffuser layer that sites inside the middle layer and above the bottom layer. The purpose of this layer is to diffuse the RGB LEDs to the sides. It has cutouts for the thicker components.

Image


I've also been working on the firmware side of things. I've added support for EasyAVR, so the basic keyboard should be usable with EasyAVR. I've got the UI for the RGB LED done as well as LEDs working with colors set via the firmware code. Now have to link the two.

Image
Image
Image

mohitgarg

02 May 2016, 22:18

Corrected a minor issue on the PCB with the MCU UCAP connection. Comit pushed to GitHub

mohitgarg

13 May 2016, 11:32

BOM updated on Github

mohitgarg

25 May 2016, 16:17

Updated to Rev 0.6. Changes,
-- Changed how the HWBE pin is pulled. Default is pull-down but you can cut the track and then have it pulled-up
-- Changed board outline so that corners are rounded for routing if panelized

I'm waiting for feedback from help-14 before placing an order for components and PC

Matt_

25 May 2016, 17:43

Wow, have you been adding support for WS2812s to easyAVR? :shock:

Since I've dropped my analog numpad project (no need for the analog switches anymore) I'm searching for a mirrored-layout numpad PCB to use with my left hand, and the SAMPad seems to fit the bill perfectly. If you don't plan on selling PCBs, I'll probably have one made once it's confirmed to work as expected.

mohitgarg

25 May 2016, 19:01

Regarding the WS2812B, I've got the GUI done as well as LEDs working (Simple on off at this stage, no fancy effects) via Easy AVR firmware, still got to link the two. I've been really busy with work and getting the hardware settled as getting the PCBs will take time.

As far as features working, basics, LEDs should work fine with EasyAVR. With TMK you can have the RGB LEDs work as well. Still ahve to add support for the rotary encoder. As you are well aware, my programming skills are abysmal.

mohitgarg

14 Jun 2016, 21:36

So, here's my first batch of PCBs from EasyEDA. I found the quality to be excellent along with the great service and splendid pricing.

Image
Image

mohitgarg

18 Jun 2016, 10:39

Yeay, first test build was successful! Hot air soldering is so much faster!

I used Easy AVR to program the board, all keys registering, indicator LEDs working as they should. I haven't got my switches yet, so I just shorted the switch pins to test and it's working.

Also, I forgot the backlight LEDs are current controlled from the driver, so to test the LED I just put one in through the holes and it was BRIGHT! In two seconds it died, 200mA going through a single LED can't be good. THis was the 2x3x4mm LED off ebay, rated for 20mA

Will now try to program it using QMK, and test the audio and RGB LEDs (Still waiting to receive the RGB LEDs as well). Already discovered that to use the buzzer, I'll have to swap the buzzer pin (B4) with another pin (C6) as the Timer 3 is used for the buzzer in QMK. Oh well, will get to it soon.

Post Reply

Return to “Workshop”