
This is a long introduction where I only ramble about my own experiences of getting into 60% boards. You can skip it and go to the tutorial if you like.
Spoiler:
To offset their obvious disadvantage of having less keys, they use function layers to provide these key functions.
- keyboard-layout (3).jpg (69.08 KiB) Viewed 14002 times
But even on non-compact keyboards, which don't need function layers, layers can make you more efficient because function keys will always be in reach, you will have to move your hands less, and stay on the home row most of the time.
In order for the layers to be intuitive, they have to make sense for you.
They need to be close to or on the home row so you can reach them quickly.
They need a FN modifier that is close and easy to reach so you can actuate those keys fast and without thinking about it.
(no menu-key or right-alt bullcrap)
Layers on the alphas only make sense if you can make them up yourself.
For this reason I want to introduce this program so that you may try and test any FN layout quickly.
DISCLAIMER
This is a subjective post and this method was not discovered by me, nor it is new.
I just want to present this information in an easy tutorial for those who want to experience the increased functionality of keyboard layers, without having to buy or modify any keyboard.
1. Use Touchcursor*
* Kudos to Lunatique for advocating the use of this program on DT and GH.
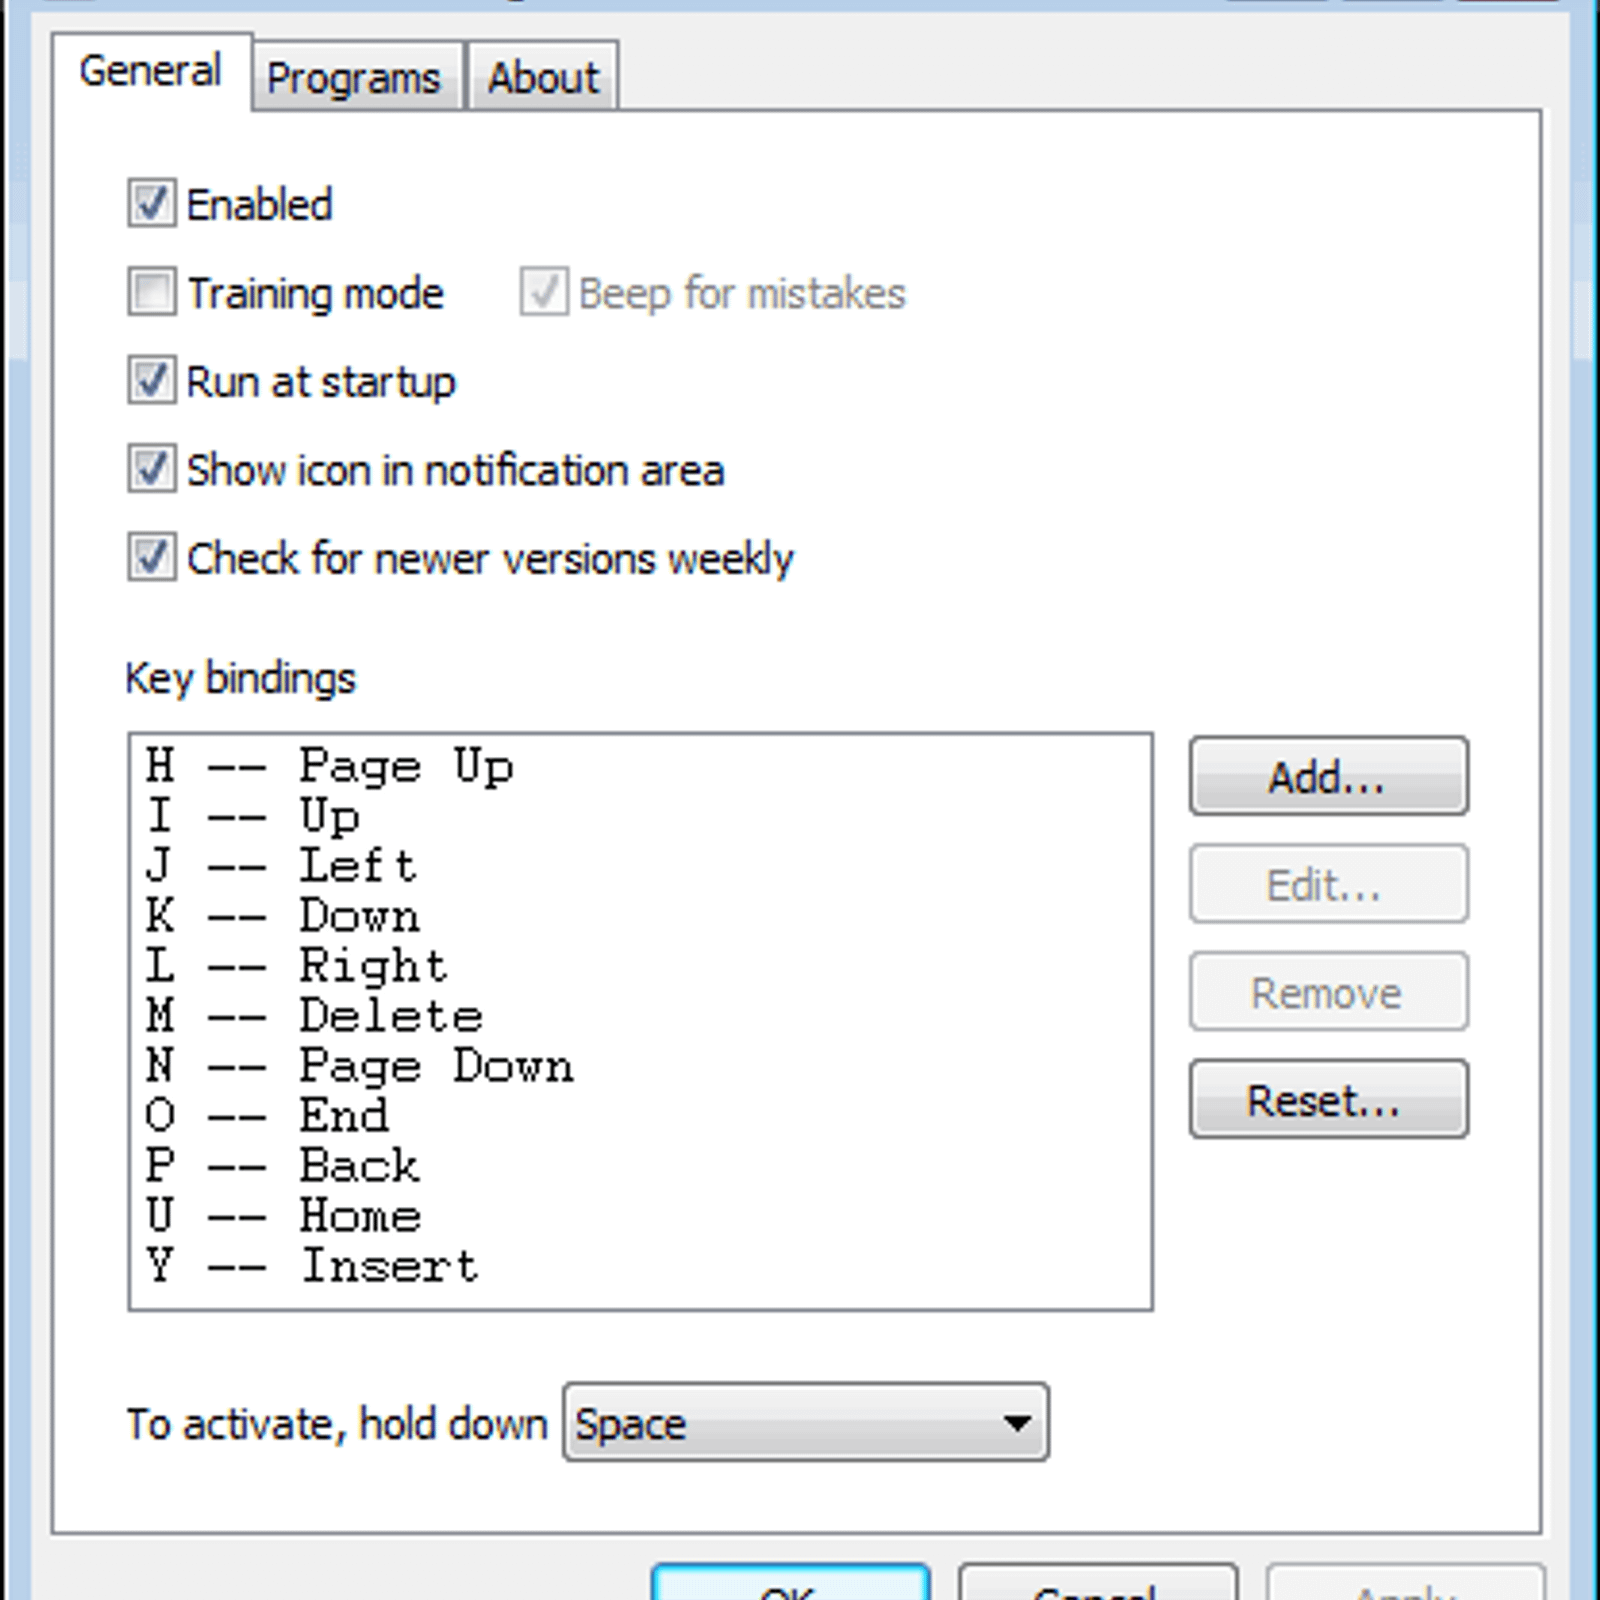
TouchCursor is an amazingly simple program (unfortunately Windows only) that can add a function layer to your keyboard that you can customize yourself. It is easy and intuitive to use and works very reliably.
Why not Autohotkey?
Spoiler:
These are keys which are always in reach while typing, but usually stay well behind their potential functionality:
- CAPSLOCK (HHKB users please move on)
- holding SPACEBAR (also called SpaceFN) <-- default
The former is an annoying key that nobody ever needed or asked for. The latter is an all-important key that everybody uses all the time, but can be used in a different way.
Personally I use Capslock for FN because it is on the home row, and I never needed its original function.
In the past few weeks, my Caps key went from least to most used key on my keyboards.
For SpaceFN, the spacebar behavior can be changed so that spacebar only actuates when you press and release it quickly.
When you hold it down, the FN layer is toggled and you can use all the secondary functions under your alphas until you release it again.
Personally I did not get used to this, because it means that space gets triggered only on key release (looks and feels weird on screen) and it introduces some delay to typing. Also it is not practical for gaming (though you can define exceptions in the program, but still too much hassle for me).
But your mileage may vary (especially if you don't play games) and it makes a lot of sense from a functionality standpoint, because it removes the need for a dedicated FN key. (check out this post for more on SpaceFN)
You can now change add your functions which is pretty self-explanatory, but you can also do it in any way that makes sense to you. Some people use arrows on IJKL and some on WASD. I like both. Some want the HHKB diamond pattern of [ ; , / or vim HJKL. You can use whatever makes sense to you.
I used letters that made sense for me, for the other functions. Some only make sense in German, and some in English. For example, H is home and N is eNd. FN+V is insert because CTRL+V is paste which uses the same word in German. R is scroll lock because in German it is "Rollen". F stands for "Foto" which is Print Screen. Then I have B for Pause because it is also called Break. M means mute.
These are just some examples of how easy it can be to come up with a system of placing your function keys. You will never have to print those functions on the front of the keys, because you made them up in such a way that they made sense to you, so after a few days you intuitively know where they are.
2. Use Capslock for FN (optional)
Now, SpaceFN is a great idea, but can be weird because it changes the way the spacebar works, and in turn will change the way your thumbs have to work. The pinky finger on the other hand is a key that is used to finding and holding a modifier key. Therefore it makes sense to me to give it one more modifier to play with. And a very powerful one, at that. Only fair, given its prominent position on the home row. Not only that, but on ISO keyboards, Capslock is actually bigger than Shift!
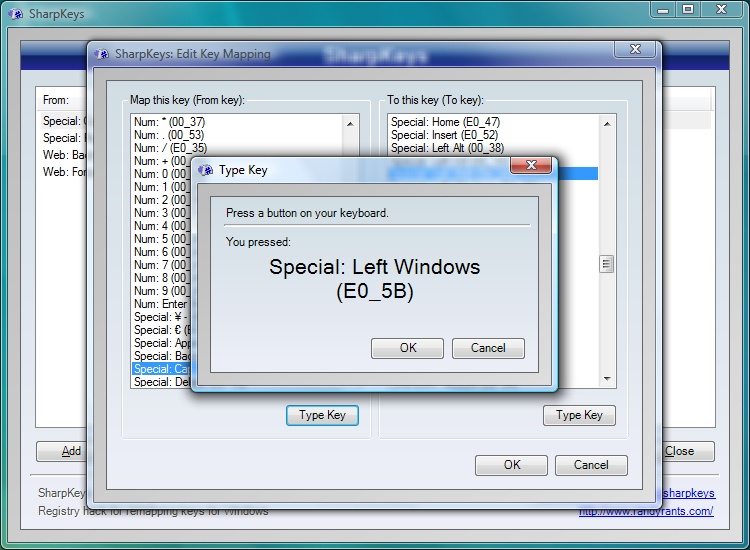
In order to do this, you have to tell your operating system to interpret the Caps key inputs as something else. This can be done manually in the registry but is a lot more intuitive when done with a GUI program, such as Sharpkeys or Keytweak.
Personally, I recommend the former because it has worked perfectly from Windows XP to Windows 10.
https://sharpkeys.codeplex.com/
This program is incredibly useful and allows you to re-interpret any keypress on your standard keyboard as something else.
Before TouchCursor, I used this program to add Menu or Windows keys in place of Capslock to keyboards that lacked them. But now, I need this for CapsFN.
In order to avoid accidental keypresses while getting used to CapsFN, it is good to use a key that has absolutely no function on a modern keyboard and operating system.
For this reason, I chose F13. Only a few old terminal keyboards even have this key and AFAIK it does not have any function in a modern Windows system.
So you simply press caps on the left Window in Sharpkeys and then select F13 from the list on the right. Then let the program write the changes to the registry.
You can reboot or simply re-login to Windows to load the changes made to the registry.
After it has done this, the change will always be present in the operating system and Sharpkeys does not need to be running ever again until you reinstall Windows.
Then, open TouchCursor to use F13 as it's "activation key".
Ta-Da. Now you can have a Fn key in Windows with any keyboard on any modern Windows operating system.
That way, you can experiment and get used to having a function layer for any keyboard that you created.
I used Touchcursor for a few hours and then bought my first 60%. I was immediately won over by the speed and comfort gained by having all the functions and arrows right under my fingers.
Pros:
- You could add FN layers to your IBM keyboards without buying a custom controller
- You could add FN layers to your laptop or work computer with its crappy keyboard that you cannot re-program, so you don't lose this comfort when using a different keyboard
- You can use this to try many different FN layouts without having to re-program your keyboard every time.
- Use and get used to FN layers for speedy, comfortable, and intuitive keyboarding
Cons:
- You lose capslock (is that really a disadvantage though?), or you'll have to change the way your spacebar works
- Your pinky might grow from excessive modifier use
- You cannot change hard-coded function keys on keyboards. Such as those on a Poker or Pure keyboard, where the FN functionality is built in. (fortunately, you can still use Caps or Space to create your own second, independent function layer if you can't change the default one)
- There is a slight delay to Touchcursor that is not present with a hard-coded function key on programmable keyboards. If you are very quick to press FN+arrows you might be too fast for the program to change to the FN layer. However, I have found this problem to be negligible when using F13-caps instead of space or any other key.
The last two cons can only be remedied by getting a fully programmable keyboard or controller.
However, TouchCursor and Sharpkeys provide a free way to test and get used to the functionality of FN layers, that is very simple and has no risk.
For me, it was a gateway drug to 60% keyboards and it's a great help for getting more use out of keyboards that are not programmable.
Typed this on a SSK with Touchcursor and FN for caps.