Page 1 of 1
A solution for cracked Hi-Tek switches (VT100, Hazeltine, HP, etc.)
Posted: 05 Dec 2018, 04:07
by afan
I'm restoring my Hazeltine terminal, which has
Hi-Tek High Profile keys which are known to be fragile. And I think I've found a good solution on making these cracked keys work with a small modification.
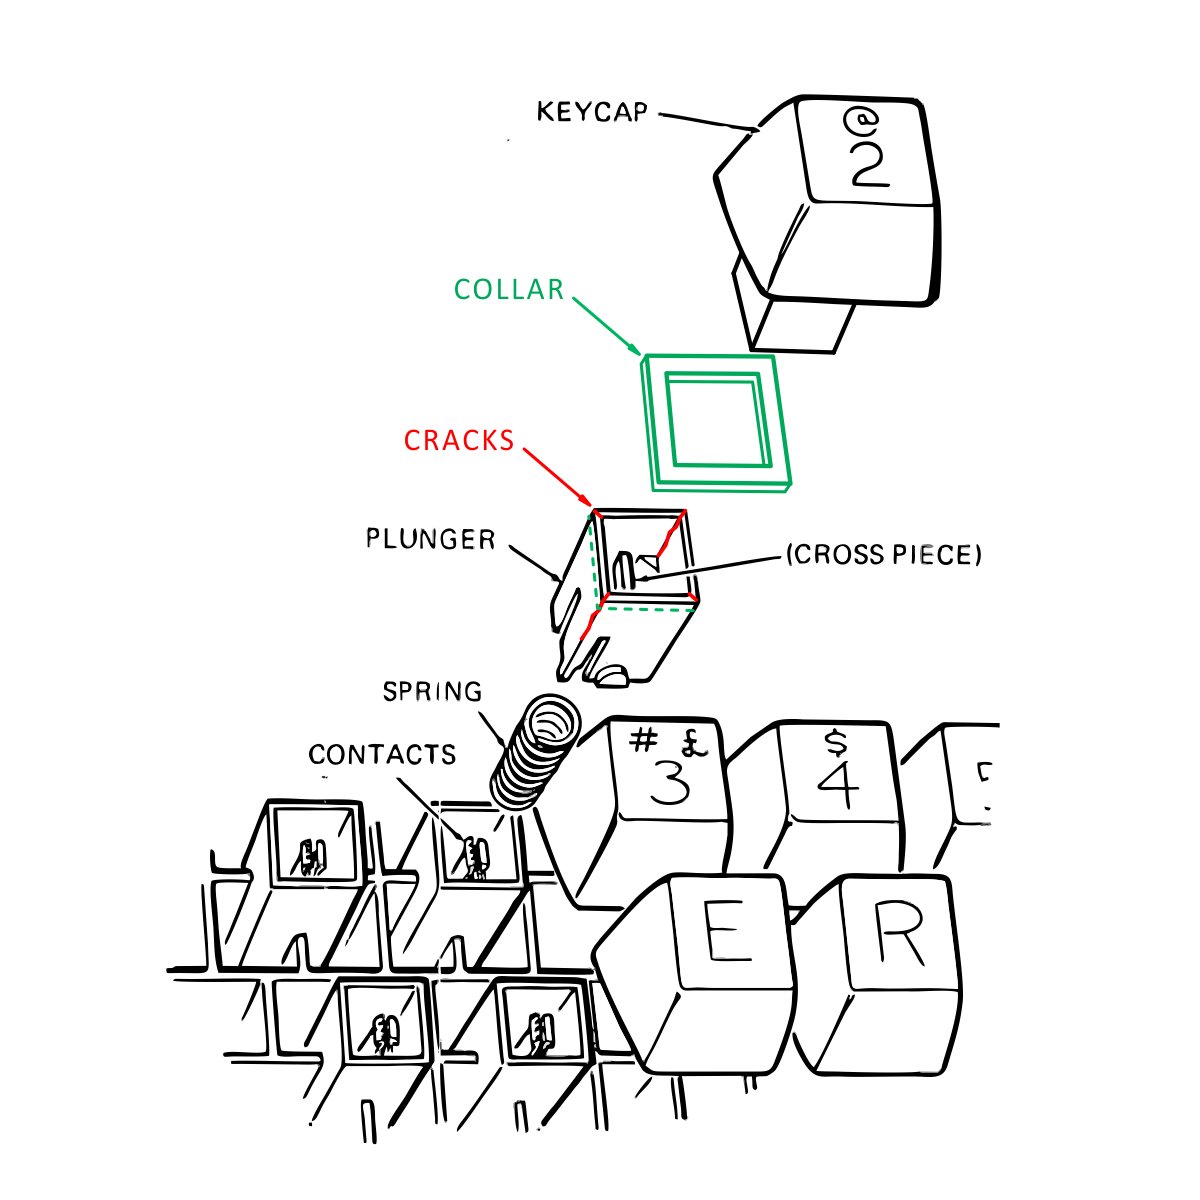
- RiDAf12mRTyE1TaNFA3GEg.jpeg (122.37 KiB) Viewed 24496 times
Here I posted my illustrated story on how to fix them:
https://imgur.com/gallery/lgZZZJ5
And here's the video:
Hope this will help others in bringing old terminal keyboards back to life.
Posted: 05 Dec 2018, 04:49
by Darkshado
Neat solution, do you plan on sharing the source files or selling these yourself?
Posted: 05 Dec 2018, 05:25
by afan
I don't mind sharing them for free.
Designs I made are suitable to be printed on ponoko.com. When printing, choose either white or black Delrin plastic, 0.8mm thick, P1 size sheet (181x181mm).
Option 1: 64 collars on one 181x181mm sheet:
https://www.dropbox.com/s/zj1z1xpnik11j ... 4.eps?dl=0
Making them on Ponoko will cost you $16.10 + shipping.
Option 2: 144 collars on one 181x181mm sheet:
https://www.dropbox.com/s/ag78jvzme8mrj ... 4.eps?dl=0
Making them on Ponoko will cost you $30.63 + shipping.
You can also edit the file and leave just the right number of pieces on the sheet, which can shave off a few dollars from your order.
If you find them useful and if using these will save you some money (on e.g. buying a donor keyboard), feel free to donate me whatever you feel reasonable:
https://www.paypal.me/iafan
Posted: 12 Dec 2018, 08:14
by afan
Just a quick update: after picking the right size, I ordered a full set of laser-cut collars for all the keys, and had the keyboard fully restored. The process of installing keycaps and collars turned out to be a very easy one, and I was spending just 10 seconds per key (to put the collar and install the keycap). I did have to remove the top part of the shell to work with the keyboard and then put it back on.

- N2Qfv2YZR1q1WuseMR4Dmg.jpeg (140.78 KiB) Viewed 24399 times
The keyboard now works flawlessly. I'm very pleased with the result and with the fact that you can fix even severely cracked key sliders with no keyboard disassembly and without using any donor keys.
Posted: 12 Dec 2018, 20:13
by Hypersphere
Nicely done! Just the sort of thing that ought to be well archived on DT per the recent thread on the future of DT.
Posted: 12 Dec 2018, 20:51
by Engicoder
Smart idea. The slight loss in travel seems very acceptable to have a functioning key.
Posted: 13 Dec 2018, 06:56
by afan
Hypersphere wrote: ↑Nicely done! Just the sort of thing that ought to be well archived on DT per the recent thread on the future of DT.
Do you think it makes sense to add the link to this topic on Hi-Tek switch wiki page?
wiki/Hi-Tek_High_Profile
I could add it, just don't know what the policy is around editing the wiki and linking back to forum posts.
Re: A solution for cracked Hi-Tek switches (VT100, Hazeltine, HP, etc.)
Posted: 02 Feb 2019, 05:33
by caseybea
Well.... CRAP.
I have a vintage VT100 I literally pulled back into service last week, and came across this post!
Aha! Cool solution. But, I have a problem.
It seems that EITHER:
(A) the hi-tek posts on the VT100 are ever so smaller by a hair than on the hazletine terminal,
OR
(B) There's a flaw in the cutting process at ponoko and
....whatever the cause, the collars are too big. I cannot put them on and have them stay put.
In the video, it appears that the collars fit nice and SNUG. TIGHT almost. Which would be awesome.
In my version, the collars are loose: in some cases they sort of stay on top, but with the SLIGHTEST touch they fall down. In other cases they don't stay at all and just slide down to the bottom.
Super frustrating. I'm trying to discern what to do. glue them on? SOMEHOW get a new pattern? Have them printed elsewhere (where)?
My first thought is to use loc-tite and glue them on.
Re: A solution for cracked Hi-Tek switches (VT100, Hazeltine, HP, etc.)
Posted: 03 Feb 2019, 02:22
by caseybea
What are the exact measurements of the collars supposed to be? Going to measure what I have as soon as i can find my measuring tools
Re: A solution for cracked Hi-Tek switches (VT100, Hazeltine, HP, etc.)
Posted: 05 Feb 2019, 03:27
by afan
caseybea, just measure one side of the rectangle (the stem) with a caliper, and make the collars with the same size of the opening. In my case, the outer size of the stem was 8.2x8.2mm on each side, and this is exactly how the inner rectangle hole of the collar measures for me. You may want to find one non-cracked switch to get a better measurement. When you put these collars, they are not really a snug fit, they fit pretty easily on top and require almost no pressure. But they for sure don't fall down the stem. As you put the key cap on top, it will try to push the sides of the stem outwards, thus securing the collars. It may take a bit of practice to put them on. Feel free to post pictures (here or in a private message) of it doesn't work, since your key caps / stems might just be different.
Also, if you're 3d-printing the collars, its actual dimensions might be a bit off from the original design. If so, adjust your design to account for this. In my case, I made the collars laser-cut, so they all have exact dimensions, and clean edges.
Re: A solution for cracked Hi-Tek switches (VT100, Hazeltine, HP, etc.)
Posted: 05 Feb 2019, 23:52
by caseybea
Did you print YOURS at ponoko?
Sorry, got distracted from making measurements. Hopefully tonight.
I'm also going to experiment with the glue. I ordered a 2-part plastic bonding system (loctite), and will experiment with one key. The collars (once set) DO seem to work, but without any adhesive, at lest for me they move and in some cases fall.
The measurements I come up with will tell all..........
Re: A solution for cracked Hi-Tek switches (VT100, Hazeltine, HP, etc.)
Posted: 06 Feb 2019, 03:37
by afan
Yes, I ordered mine at Ponoko.
Re: A solution for cracked Hi-Tek switches (VT100, Hazeltine, HP, etc.)
Posted: 06 Feb 2019, 06:12
by caseybea
The dec VT100 hitek posts (white, main keyboard) seem to be averaging 8.1mm
The black hitek posts (keypad) seem to be averaging 8.2mm
The inner width of my collars seems to be about 8.25mm
Looks like I have to glue them.
There appears to be some variance in the hi-tek posts (white vs black).
The collars are not a tight fit (they should be in my opinion?)
Re: A solution for cracked Hi-Tek switches (VT100, Hazeltine, HP, etc.)
Posted: 07 Feb 2019, 06:38
by afan
I experimented with different options, and found that the best fit is when the sizes match exactly. So in your case you'd need collars with 8.1x8.1mm opening for the keyboard and 8.2x8.2mm for the keypad. Making them a tighter fit will just result in keycaps being too hard to put onto the stem.
Re: A solution for cracked Hi-Tek switches (VT100, Hazeltine, HP, etc.)
Posted: 14 Feb 2019, 06:11
by caseybea
I ended up just gluing the collars in the proper position with loctite plastic bonding system. A pain to do, but it actually did work. While the collars weren't exactly perfect for some keys, once held in place they still do the job keeping the crack from opening, and voila- no sticky keys.
I actually like the reduced travel of the keys, makes for easier typing on the vt100 keyboard.
Thanks ton for such a creative solution, as there's just NO donor keyboards out there these days!
Wish I had bought a few of the terminals tho. When I got it, it was at a garage sale of sorts at my uncles' GE plant where he worked. They had racks of them for sale. 30 bucks.
Re: A solution for cracked Hi-Tek switches (VT100, Hazeltine, HP, etc.)
Posted: 14 Feb 2019, 06:28
by afan
Glad it worked out for you!
$30, wow, I'd definitely buy a few as well!
Re: A solution for cracked Hi-Tek switches (VT100, Hazeltine, HP, etc.)
Posted: 25 Oct 2020, 19:49
by twylo
This is an old post, but I just wanted to add a new bit of information.
I'm currently repairing the keyboard on an HP-85 computer that uses Hi-Tek High Profile key switches. I was impatient and I didn't want to wait for a batch to be laser cut, so I experimented with creating a 3D printable version in OpenSCAD. I printed a batch of these collars on a Prusa i3 MK3S with Prusament PLA, and they work great! If anyone is dying for the OpenSCAD or STL file, I'll be happy to share it, but you can also whip up your own in no time. I used an inner dimension of 8.1mm and it worked perfectly for the HP-85.
Re: A solution for cracked Hi-Tek switches (VT100, Hazeltine, HP, etc.)
Posted: 27 Oct 2020, 22:17
by hellothere
I have a Stackpole keyboard that's in need of this. Has anyone tested one?
Re: A solution for cracked Hi-Tek switches (VT100, Hazeltine, HP, etc.)
Posted: 10 Nov 2021, 19:50
by billdrom
I know this is an old post.
I recently had 144 of these collars made at Ponoko for an HP-85B computer.
The current price is more like $60.00
I used the recommended size of 181 mm x 181 mm.
All of the collars were too large with a center opening of 8.6 mm
I then had them remade using the default drawing size of 172.84 mm and got the correct 8.2 mm opening.
It turns out that the size of the part is scaled by the size you specify for the paper.
I guess I should have known but I am new to this.
Specifying 175 mm will get 8.3 mm, 177 mm will get 8.4 mm, 179.1 will get 8.5 mm etc.
I had to download a free trial copy of corel-draw to verify the sizes.
The people at Ponoko were very helpful to my understanding of this.
Thanks again to the original poster for the eps drawings.
Bill
Re: A solution for cracked Hi-Tek switches (VT100, Hazeltine, HP, etc.)
Posted: 10 Nov 2021, 22:09
by afan
@billdrom and others: thanks for sharing! Indeed, one needs to print them at the original size (exactly as in the EPS). The 181x181mm size is the minimal sheet size at Ponoko that will fit the EPS file; apologies for failing to explain this initially.
Re: A solution for cracked Hi-Tek switches (VT100, Hazeltine, HP, etc.)
Posted: 11 Nov 2021, 00:36
by jsheradin
Thanks for coming up with this fix!
A while back I remade this design in Autodesk Inventor and had them cut from 316 stainless with Laserboost. Price ended up at about $0.23/piece shipped. They work great but they're insanely loud. I chose 1mm thickness which has noticeably less travel. If anyone's planning on doing the same I'd recommend choosing a bit thinner material. I went with 8.07mm which ended up very snug but they still fit the particular variants I have.
There were a few that came out a bit weird but the vast majority of them were fine. Pretty sure LB sent me extras anyways.
Re: A solution for cracked Hi-Tek switches (VT100, Hazeltine, HP, etc.)
Posted: 12 Nov 2021, 09:53
by kbdfr
Previous post reported as spam as it contains an advertising link.
Re: A solution for cracked Hi-Tek switches (VT100, Hazeltine, HP, etc.)
Posted: 19 Nov 2022, 07:43
by zrrion
jsheradin wrote: ↑11 Nov 2021, 00:36
I chose 1mm thickness which has noticeably less travel. If anyone's planning on doing the same I'd recommend choosing a bit thinner material.
I am looking in to repairing a terminal of my own and I think I may have a solution to the reduced travel issue. The switch is only really as tall as it is for the sake of the contacts, there's a lot of the housing present that doesn't do all that much. I suspect you could shave a bit off the top of the housings, a little bit more than the thickness of whatever collar you are using, and you should end up with a switch that has the same functionality but without any sort of travel issues. And if you do take more off the top than the collar strictly needs you'll be bottoming the slider against the housing instead of the collar which avoids making them loud if you use metal collars.
I'll have to experiment with it to see if it's a good idea as well as how to actually achieve it consistently for the entire board.