Page 3 of 4
Posted: 07 Mar 2013, 20:14
by GordonZed
If one were to purchase the keycap converters only, would it be possible to just pop the C64 key caps on an ordinary Cherry MX board, like a Filco? There'd probably be issues with modifiers but would they at least fit without any conflicts?
Posted: 07 Mar 2013, 21:58
by tlt
Yes sure you can do that. In
this picture you can get an idea of how it would turn out, board in the back is a Qpad with some C64 caps.
Posted: 07 Mar 2013, 23:05
by GordonZed
Amazing, now I'm not so disappointed about missing that retro spherical cap group buy (DSA?).
And just in time for C64s 30th anniversary

Posted: 07 Mar 2013, 23:47
by tlt
GordonZed wrote:Amazing, now I'm not so disappointed about missing that retro spherical cap group buy (DSA?).
And just in time for C64s 30th anniversary
There are DSA kits that was not payed for still available I think, go look one in the
Marketplace
Edit: guess you just missed it

Posted: 08 Mar 2013, 04:09
by GordonZed
I ordered the keycap adapters, hopefully they come soon and I'll post pictures of my Filco C64 Ninja. I'll also make sure to carefully protect my soon to be keyless, beloved C64 from dust and the like.
[/derail]
Posted: 08 Mar 2013, 07:48
by tlt
Yes please post pictures of your crazy keyboard (hopefully crazy in a good way)

.As you mentioned yourself, the modifiers are not standard size and have strange stem positions so thay won't just fit but maybe you can get some of them on (with gaps).
Use a key puller, preferably filco style, when removing caps from your C64, the stems can be a bit fragile after 30 years.
Posted: 08 Mar 2013, 08:44
by GordonZed
Yeah I know there will be some form of strangeness, I just wanted to make sure the spacing would be fine. Let's hope I can make some arrangement that won't look too weird, seeing as I don't have a 60% board, so there will still be some Filco caps on the right side. Whatever, worth a try.
Posted: 10 Mar 2013, 23:04
by tlt
Assembly instructions
Here is some assembly tips, I'm jumping a lot of steps and describe mostly parts that are not obvious.
Just ask if there is any questions
- Solder all diodes, direct the side of the diode with the strip towards the square soldering pad
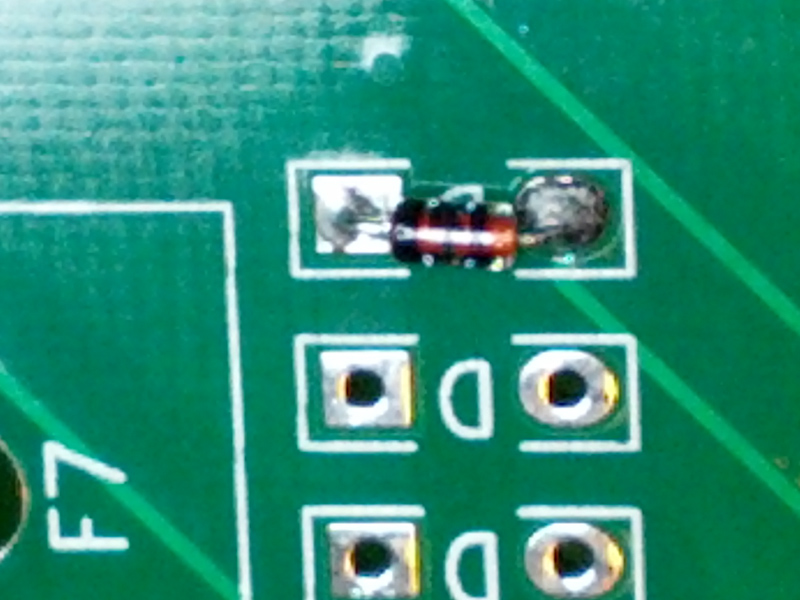
- solder.jpg (205.56 KiB) Viewed 10142 times
- Solder resistor for led
- Solder Contacts, one of the joystick sockets needs to be modified (PCB design mistake)
- solder-2.jpg (242.61 KiB) Viewed 10142 times
-Solder controller board or headers for it depending on if it should be removable.
not removable:
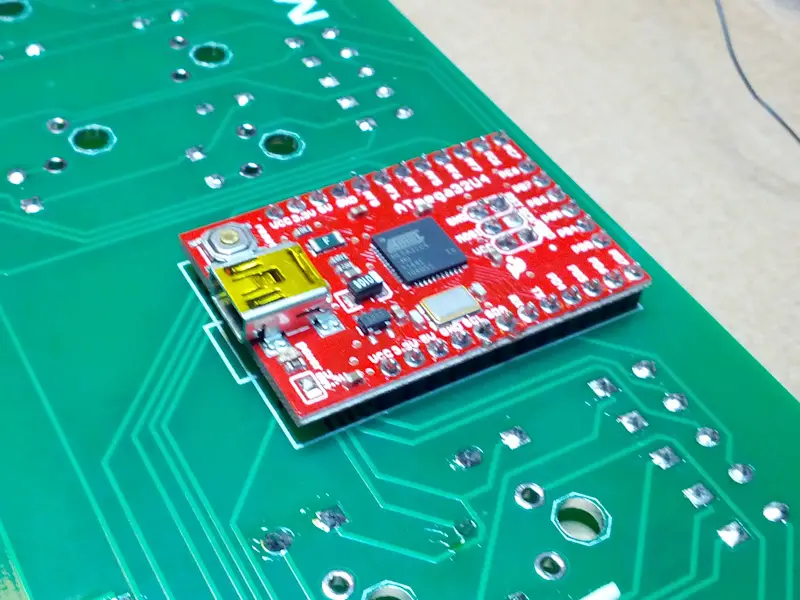
- solder-3.jpg (311.54 KiB) Viewed 10142 times
Put controller board and headers on PCB before you start to solder to get everything aligned.
removable:
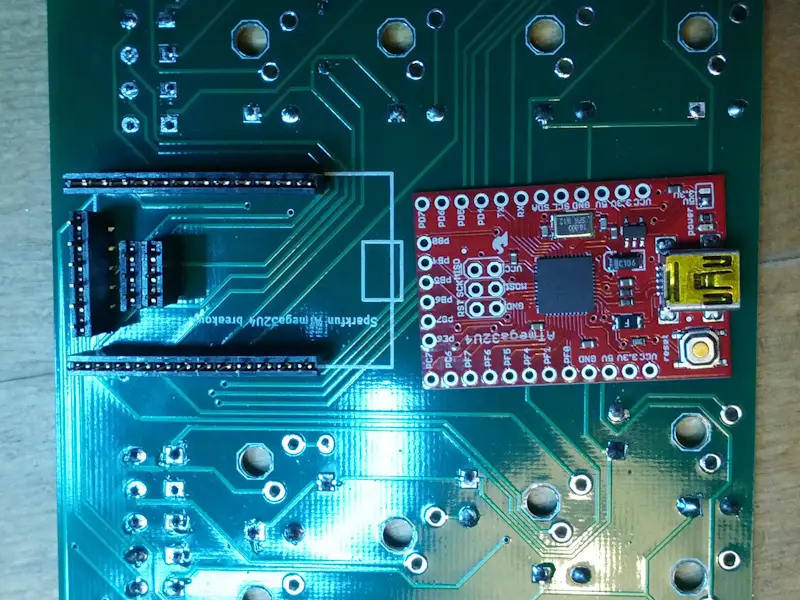
- solder-5.jpg (415.81 KiB) Viewed 10142 times
-Bolt the PCB to the mounting plate

- solder-4.jpg (209.37 KiB) Viewed 10142 times
-Put in the switches and solder them
Get the key caps on
-Gently open you C64, be careful not to break the plastic hocks holding it together in the back.
-Unscrew the old keyboard from the top part of the case and take it out.
-Pull off all the key caps with a Filco style key puller, space bar has got stabilizers so be careful not to break it , take it of last so you have more space.
-Put on new stabilizers for space and return on the MeC64 if it's not already there.
-Clean the hole in the adapter from plastic dust by scraping with something like a small screwdriver and knock it against the table to get it out.
- Put the adapter in the switch and the key cap on the adapter and use the cap to push the adapter all the way down over the switch. If you can't get it all the way down you need to take it off again and clean out some more plastic dust. Put on the space and return pretty early as they are the most fiddly to get on and need space around them to do it. There are support legs for the 1,5u keys(shift, control...), just put them in the unused hole of the key cap.
Pictures of how the adapters for the return (and space) should be positioned. (the stabilizer thingy should stick out towards the back of the keybaord)
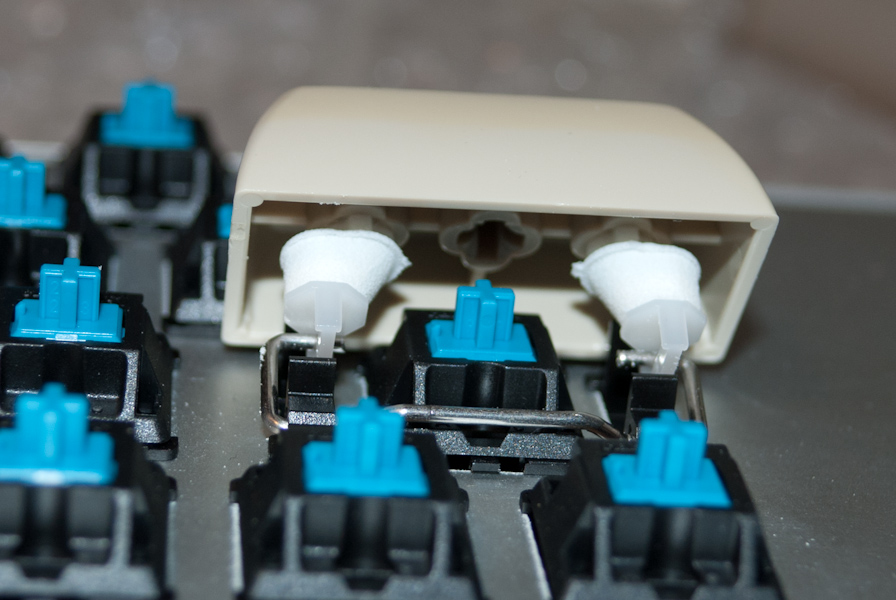
- return_key.jpg (225.46 KiB) Viewed 10142 times
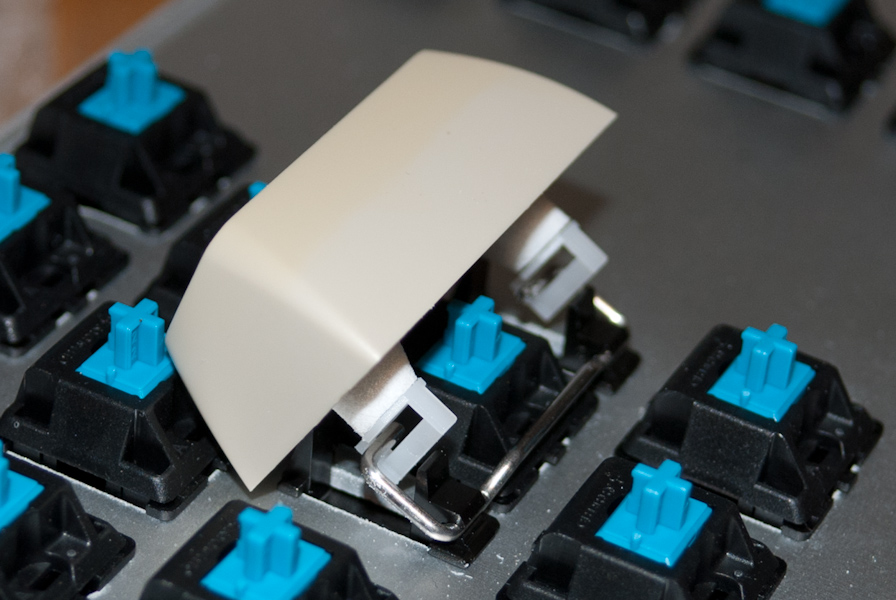
- return_key-2.jpg (238.22 KiB) Viewed 10142 times
-Put the keyboard into the case. If you are using USB, connect the power led board. If your using the C64 main board, connect the adapter cable, the first pin of the IDC contact (marked with an arrow) goes on the first pin of the header (the one closest the the front).
-
Make sure that the back of the keyboard does not come in contact with other electronics on for instance the main board and cause a short circuit! The original C64 has paper that shields it, put that or something else between the keyboard and other stuff to isolate it.
Post some picture of your board/setup when your done, I would really appreciate that!
Posted: 10 Mar 2013, 23:51
by tlt
Posted: 15 Mar 2013, 18:04
by GordonZed
Got my keycap adapters from Shapeways. I decided it would look best if I just fill out the QWERTY area and leave the modifiers alone; I might add the numbers later.
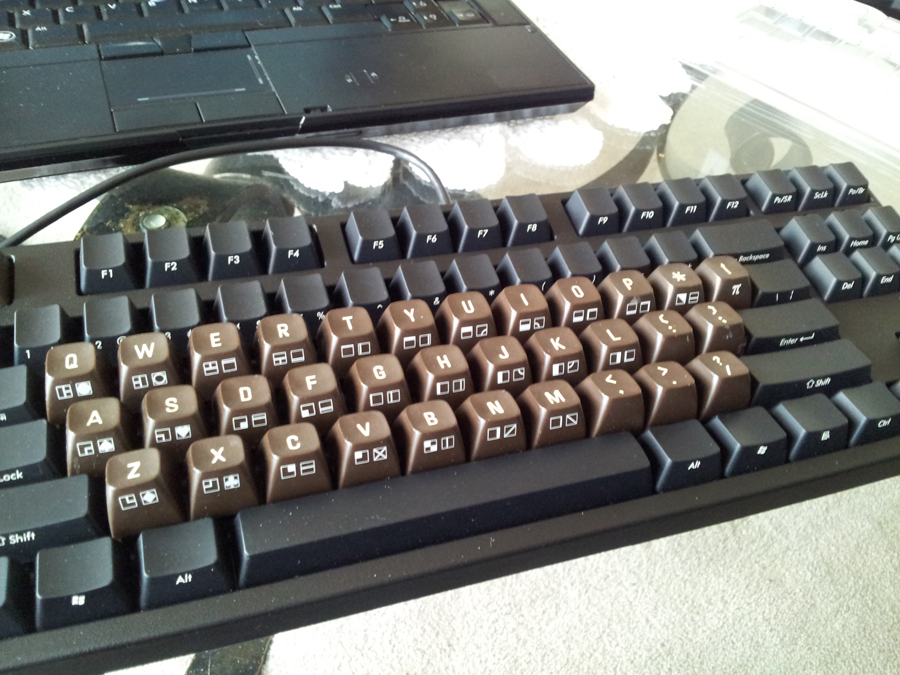
- 20130315_125811.jpg (449.8 KiB) Viewed 10073 times
I wanted to use the Commodore logo key as my ESC, but its profile makes it look too weird; so I used the RUN/STOP key, which I think has a great vintage computer appeal.
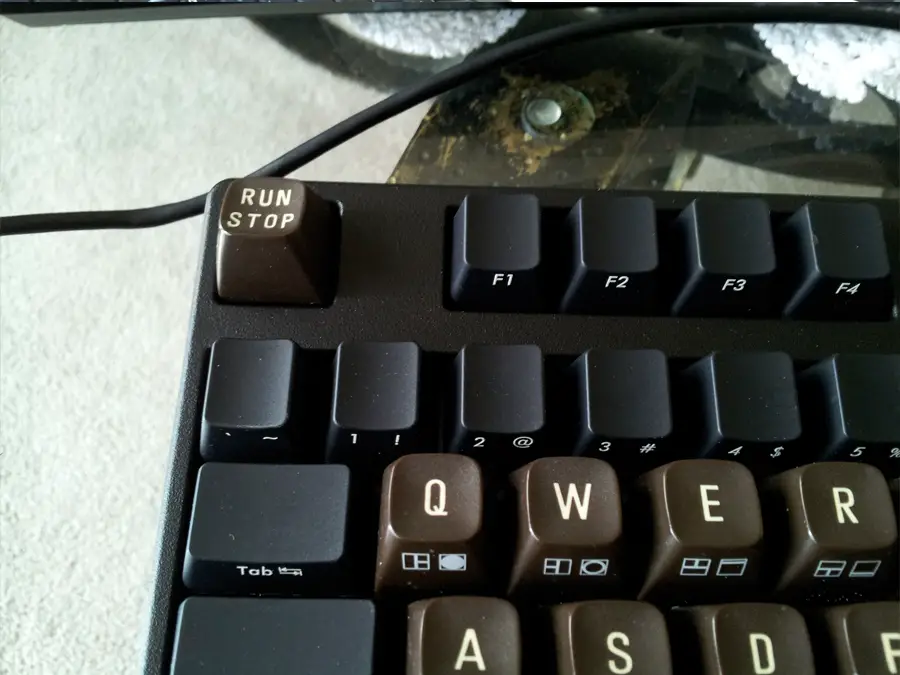
- 20130315_125818.jpg (381.48 KiB) Viewed 10073 times
Posted: 16 Mar 2013, 16:59
by tlt
Turned out OK I think, doesn't look to crazy and the escape looks good. How is it to type on?
Posted: 16 Mar 2013, 18:49
by GordonZed
Not bad, I've been using it for about a day now. My fingers can definitely tell that the profile is off, but I love the feel of the C64 keys. It's weird for shortcuts, like CTRL+C etc, but I'm thinking of adding some modifiers, just not sure how yet.
Posted: 17 Mar 2013, 00:03
by moijk
i got the keyboard and i'll see if i get time to set it up this weekend or sometime next week. feels great to type on the bare keyboard so it'll be rad once my breadbin is wired up with it. i'll do a comparison video given i got two breadbins.
Posted: 18 Mar 2013, 07:30
by tlt
Good, you received your package. Looking forward to the video.
Posted: 21 Mar 2013, 22:53
by Ascaii
Received mine. Still need to swap stuff with half-saint to get my c64 to put it in.
Posted: 05 Apr 2013, 13:35
by moijk
Just installed mine. I have it on a commodore 64.. but it is quite erratic behaviour. I'll put on the camera to show exactly whats going on later today. While it works, i get a lot of false positives. (as in keypresses). Espesially the <- left arrow up where ESC usually is on keybords.
Posted: 05 Apr 2013, 20:18
by moijk
Well, I think you can scratch anything regarding the keyboard and not insulate it towards the paper backing. because when i put a piece of paper behind the controller it works.

I'll post a video in a matter of days. i got a vic 20, c64 breadbin, c64c, 128d and sx64 for comparison.
Posted: 06 Apr 2013, 14:34
by tlt
Ok good, got a little worried there for a while

The original was a single layer PCB and didn't have any lane on the under side and the wires is covered with tape so there can't be any shorts. Put something that is sure to isolate under it, taping a pice of thick paper or plastic on it or something.
Posted: 06 Apr 2013, 19:41
by moijk
I think it is because the piece of paper behind has ventilation holes right under the controller. so apparently it is touching metal or something .. or the top gray layer of the paper conducts. in any case, the paper under works and next time i open it i'll have a useful tape to cover.
in any case, i'll be playing a lot of adventure games in the days to come.
Posted: 07 Apr 2013, 21:15
by moijk
It is bloody awesome. I must say I it feels very weird, but damn how wonderful it is to type on the keyboard now.
Posted: 07 Apr 2013, 21:16
by moijk
I'm signing up for a SX64 version
Only downside is the lack of registering multiple keys at the same time. so i write "LOD instead of load etc when typing a bit fast.
Posted: 08 Apr 2013, 07:38
by tlt
It should be the same on the original. It's a limitation of the C64, only one key pres at the time is registered to avoid ghosting. My guess is that you didn't (couldn't) type very fast on the old keyboard and didn't notice it
Posted: 17 Mar 2015, 13:26
by andrzejsliwa
its MeC64 is available some how to order?
Posted: 03 Oct 2016, 17:15
by trans
So I decided to try this myself. I bought some original C64 keycaps and the Shapeways converters. Unfortunately the tolerances on the converters are not very good, and the male ends are generally too thick. I tried to force one into a C64 cap with some WD40 but it cracked the key. Not sure what to do about it. Did you have trouble with this? If so what did you do about it?
Posted: 25 Jan 2017, 23:54
by tlt
My keycap adapters fits loosely.
Orders sometimes fail as the small bridges connection the adapters in the set are to thin and ShapeWays count them breaking as a failed printing even though they are meant to be broken off. I don't think they are needed any longer to get the set printed at a reasonable price. I haven't gotten around to update the 3d model but I just uploaded
all project files on GitHub if anyone wants to try to improve it.
Posted: 14 Apr 2017, 06:14
by au_chadl
Could you tell me the name of the programs that you used in this project.
For example the program that you used for the pcb and the plate.
Thanks.
Posted: 17 Apr 2017, 00:43
by tobsn
au_chadl wrote: ↑Could you tell me the name of the programs that you used in this project.
For example the program that you used for the pcb and the plate.
Thanks.
You want to get KiCad, Fusion 360 for the 3D stuff like the adapter, and use Swills builder to make the plate.
http://builder.swillkb.com
Posted: 27 Jan 2018, 19:13
by autoload -Uz
On Shapeways, should we choose "mm" or "in" for the units? And what material do you recommend? I see from the Shapeways comments that some materials don't work well with this.
Posted: 28 Jan 2018, 00:02
by OldIsNew
I hadn't seen this thread before - just had to say very cool tlt!
Re: MeC64 Keyboard
Posted: 12 May 2019, 16:07
by tlt
I recently found out about the
MechBoard64 project developed in 2018 by MtnBuffalo. It is very similar to the MeC64 but focuses on being used with the Commodore 64 and therefore doesn't have USB. It uses the MeC64 keycap adapters as far as I can tell and has a very similar mounting plate with bent sides. But the great thing about it is that it can be
purchased!