Sorry for the delay, I have been too busy/lazy.
Here is the full build log, for your viewing pleasure: http://imgur.com/a/sWuH1
I wanted to say thanks to everyone who helped me out in the original post. If it weren't for this awesome community, I don't think I could have finished the project.
Original post: http://deskthority.net/workshop-f7/hand ... t7615.html
Minimal Animal Complete Build Log

-
rklm

- Main keyboard: Minimal Animal 75
- Main mouse: Razer Naga Molten Core Edition
- Favorite switch: 65g MX Blue
- DT Pro Member: -
This is the layout: http://www.keyboard-layout-editor.com/# ... 8560b2e86e
I have been very happy with it for the past couple weeks.
The .25u shift on the top alpha row is a little weird to use for WASD though... In case anyone else wanted to use this layout.
I have been very happy with it for the past couple weeks.
The .25u shift on the top alpha row is a little weird to use for WASD though... In case anyone else wanted to use this layout.
-
Dubsgalore

- Location: USA
- Main keyboard: ESA-3000-HASRO
- Main mouse: Deathadder 2013
- Favorite switch: MX Blacks
- DT Pro Member: -
Amazing Work rklm. seriously, that imgur album is full of intense effort 
http://i.imgur.com/pyPabIi.jpg
something about that photo...so cool....
congrats on finishing it!
http://i.imgur.com/pyPabIi.jpg
something about that photo...so cool....
congrats on finishing it!
-
rklm
- Main keyboard: Minimal Animal 75
- Main mouse: Razer Naga Molten Core Edition
- Favorite switch: 65g MX Blue
- DT Pro Member: -
Thanks!
I spent a long time looking at all the other awesome custom mods on DT and the Korean forums, and the guy who runs the Maker Space at my local library was very helpful as well.
I would recommend a project like this to anyone, it was very fun.
I spent a long time looking at all the other awesome custom mods on DT and the Korean forums, and the guy who runs the Maker Space at my local library was very helpful as well.
I would recommend a project like this to anyone, it was very fun.
-
DanielT

- Un petit village gaulois d'Armorique…
- Location: Bucharest/Romania
- Main keyboard: Various custom 60%'s/HHKB
- Main mouse: MS Optical Mouse 200
- Favorite switch: Topre/Linear MX
- DT Pro Member: -
This is a real cool build. 
I'm also planning to build a custom 60% keyboard, also with acrylic plate. Read all sorts of opinions but never saw a finalized work. So I have a lot of questions
1. How thick is the switch plate ?
2. How is the stability of the plate, does it flex ? I saw the plate is only supported on the exterior, no central fixing points (I have the same design).
3. I see that you have plenty of space for wiring and teensy, how thick are the spacer plates ?
Because I have read that the plate might crack my first attempt was with a 5mm plate, it looked nice but the switches didn't clip in the slots and were very loose and did not want to glue them into place.
Now I plan to cut a plate 1.5mm thick and also maybe test with a 1mm aluminum one.
I'm also planning to build a custom 60% keyboard, also with acrylic plate. Read all sorts of opinions but never saw a finalized work. So I have a lot of questions
1. How thick is the switch plate ?
2. How is the stability of the plate, does it flex ? I saw the plate is only supported on the exterior, no central fixing points (I have the same design).
3. I see that you have plenty of space for wiring and teensy, how thick are the spacer plates ?
Because I have read that the plate might crack my first attempt was with a 5mm plate, it looked nice but the switches didn't clip in the slots and were very loose
Now I plan to cut a plate 1.5mm thick and also maybe test with a 1mm aluminum one.

-
matt3o

- -[°_°]-
- Location: Italy
- Main keyboard: WhiteFox
- Main mouse: Anywhere MX
- Favorite switch: Anything, really
- DT Pro Member: 0030
- Contact:
welcome to the hand-wiring club, rklm. Now you know what it means 
-
mzero

- Location: Madrid, SPAIN
- Main keyboard: Korean Mini Duck 1.3 Round 5
- Main mouse: Logitech MX master 2s
- Favorite switch: brown
- DT Pro Member: -
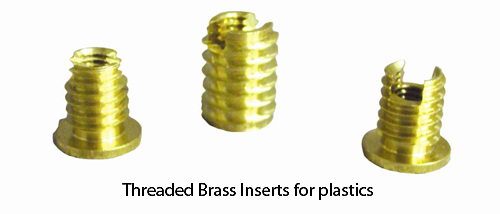
Really nice build! Do you know about screw inserts? I haven't work with them, but when I see a sandwich case I always wonder how it could be changed to hide nuts
http://www.designworldonline.com/upload ... -brass.jpg
http://www.designworldonline.com/upload ... -brass.jpg

-
Findecanor
- Location: Stockholm, Sweden
- DT Pro Member: 0011
Nice work.
Whoa. PBT DSA on Clears... Super tight. Be careful when/if you need to take them off.
Whoa. PBT DSA on Clears... Super tight. Be careful when/if you need to take them off.
-
rklm
- Main keyboard: Minimal Animal 75
- Main mouse: Razer Naga Molten Core Edition
- Favorite switch: 65g MX Blue
- DT Pro Member: -
The thickness of the acrylic I used for the plate was "1/16 inch" but for acrylic I think it varies. Mine was closer to 2mm, so I had to dremel down the top and bottom of the square to make the tabs that click the switches into place connect.DanielT wrote:This is a real cool build.
I'm also planning to build a custom 60% keyboard, also with acrylic plate. Read all sorts of opinions but never saw a finalized work. So I have a lot of questions
1. How thick is the switch plate ?
2. How is the stability of the plate, does it flex ? I saw the plate is only supported on the exterior, no central fixing points (I have the same design).
3. I see that you have plenty of space for wiring and teensy, how thick are the spacer plates ?
Because I have read that the plate might crack my first attempt was with a 5mm plate, it looked nice but the switches didn't clip in the slots and were very loose
Now I plan to cut a plate 1.5mm thick and also maybe test with a 1mm aluminum one.
There is no flex on this plate. It is shocking how stable it is. I think this is because it is so well fastened to the middle layers and bottom of the plate.
My design does have middle supports (three actually, in the middle) and I used nuts wrapped in electrical tape to separate the top and bottom. You can see it pretty well in the pictures. [EDIT] Here is a link: http://i.imgur.com/4rg4yfu.jpg
And also, there was actually very little room for the components. I used 1/8 inch acrylic for the middle slices, so I actually only had about 9mm to work in. However, I insulated the bottom of the teensy and was very careful about making the connections to the switches underneath them.
There ended up being so little space for the Teensy that I had to dremel out the bottom plate in multiple places to make room for the solder joints and the female mini USB connector head.
I describe that whole part in the album.
Let me know if you have any trouble, I can probably find my measurements somewhere if you need them.
Last edited by rklm on 10 Apr 2014, 21:24, edited 1 time in total.
-
rklm
- Main keyboard: Minimal Animal 75
- Main mouse: Razer Naga Molten Core Edition
- Favorite switch: 65g MX Blue
- DT Pro Member: -
My local library is the James B. Hunt library on the NC State campus.hargon wrote:Very nice. Where did you order the lasered plates? How expensive was it?
Since I am an employee (students have access too), I have access to the Maker Space there which has 3d printers and laser cutters. They charge by the hour and for the material, so it is pretty inexpensive.
Here is a link: https://www.lib.ncsu.edu/huntlibrary
-
rklm
- Main keyboard: Minimal Animal 75
- Main mouse: Razer Naga Molten Core Edition
- Favorite switch: 65g MX Blue
- DT Pro Member: -
Thanks!matt3o wrote:welcome to the hand-wiring club, rklm. Now you know what it means
If it wasn't for your posts I would never have had the inspiration, or the understanding to do it!
Someone on the reddit post recommended I check out "Sex bolts"... (that is actually what they are called).mzero wrote:Really nice build! Do you know about screw inserts? I haven't work with them, but when I see a sandwich case I always wonder how it could be changed to hide nuts
http://www.designworldonline.com/upload ... -brass.jpg
Here's a link: http://www.mscdirect.com/browse/tn/Fast ... d=12108778
Yeah! I didn't know that they were slightly thicker than other stems... I put the caps on once... and I don't think they will ever be coming off.Findecanor wrote:Nice work.
Whoa. PBT DSA on Clears... Super tight. Be careful when/if you need to take them off.
-
DanielT
- Un petit village gaulois d'Armorique…
- Location: Bucharest/Romania
- Main keyboard: Various custom 60%'s/HHKB
- Main mouse: MS Optical Mouse 200
- Favorite switch: Topre/Linear MX
- DT Pro Member: -
Thanks for all the info
The first time I looked on the gallery I missed some details, but looking now it is so clear It will help me a lot in my build.
The first time I looked on the gallery I missed some details, but looking now it is so clear
-
rklm
- Main keyboard: Minimal Animal 75
- Main mouse: Razer Naga Molten Core Edition
- Favorite switch: 65g MX Blue
- DT Pro Member: -
Thanks!
I got to play with a model M that was set up in an arduino demo while I was there... I will post some pictures on /r/mechanicalkeyboards later.
I found so many new hacker space resources at the fair. My keypad project is going to turn out awesome.
I got to play with a model M that was set up in an arduino demo while I was there... I will post some pictures on /r/mechanicalkeyboards later.
I found so many new hacker space resources at the fair. My keypad project is going to turn out awesome.