My F-122 just arrived, and it appears to be in excellent condition. It is PN 6110347, made in 1986. I almost started a new thread about it, because an F-122 is a brand new experience for me, but I suppose there are many F-122 owners on this Forum and merely unpacking another one would not be headline news.
When I can find some spare time, I look forward to doing what is necessary to do an ANSI mod and install Soarer's Converter, either internally or externally in a separate box. I am considering an external box like Muirium's, so that I would have a device that might be used with several different keyboards. Helpful hints on the selector switch and its wiring to the various different connectors would be most welcome!
My initial impression of the F-122 is that it feels much more solid than the M-122! It is also nice to have an M-sized spacebar instead of the mile-long variety on the XT.
The F-122 is going to be a lot of fun if I can get through the difficult bits of separating the plates and getting them back together after sanding/repainting the front plate, moving springs, and possibly replacing the foam layer.
There is an embarrassment of riches with respect to function keys. The top two rows of F-keys are not labeled as F1, F2, etc., but as Cmd1, Cmd2, etc., with subtitles and icons that look like everything from brightness controls to keyboard ID and "Multi Natn" -- does this somehow change the keyboard layout?
Edit: I have not yet tried Soarer's Converter on any of my keyboards. Is it really going to be possible to use/reprogram all the keys on the F-122? For example, the ten keys on the left of the main section are currently not F1 - F10 as they are on the XT, the 24 keys in the top section are a mystery, and some of the keys in the navigation cluster and num pad are currently unlabeled.
Mounting options for Teensy in IBM keyboards
-
Hypersphere

- Location: USA
- Main keyboard: Silenced & Lubed HHKB (Black)
- Main mouse: Logitech G403
- Favorite switch: Topre 45/55g Silenced; Various Alps; IBM Model F
- DT Pro Member: 0038
-
Muirium

- µ
- Location: Edinburgh, Scotland
- Main keyboard: HHKB Type-S with Bluetooth by Hasu
- Main mouse: Apple Magic Mouse
- Favorite switch: Gotta Try 'Em All
- DT Pro Member: µ
Any excuse is good for a photo thread…
I've really no idea about the Multi Natn key. My guess is it just sends a scan code like they all do, and remapping is down to the host computer. But the SSK's integrated numpad did surprise me: that particular remap is built into the controller, so Soarer's converter is powerless before it! Fortunately, that's a good one.
I've really no idea about the Multi Natn key. My guess is it just sends a scan code like they all do, and remapping is down to the host computer. But the SSK's integrated numpad did surprise me: that particular remap is built into the controller, so Soarer's converter is powerless before it! Fortunately, that's a good one.
-
quantalume
- Location: Houston, Texas
- Main keyboard: IBM Bigfoot
- Main mouse: CST trackball
- Favorite switch: IBM Model F
- DT Pro Member: -
Yes! There may be some limitations, but I can't think of any off the top of my head. The configuration file for my F and M 122s is around 300 lines. I have the left-hand cluster configured for various editing and menu commands, the numeric pad set up as an RPN scientific calculator (in conjunction with galculator) and Cmd13-24 set to launch frequently-used programs. You will love the F-122 and forget all about HHKB-optimized layouts. It's like being at the control panel for a nuclear submarine! Oh, and originally I thought I wanted to convert all my boards to ANSI, but now I actually prefer ISO. You are on a very slippery slope my friend.rjrich wrote:Edit: I have not yet tried Soarer's Converter on any of my keyboards. Is it really going to be possible to use/reprogram all the keys on the F-122? For example, the ten keys on the left of the main section are currently not F1 - F10 as they are on the XT, the 24 keys in the top section are a mystery, and some of the keys in the navigation cluster and num pad are currently unlabeled.
-
vivalarevolución

- formerly prdlm2009
- Location: USA
- Main keyboard: IBM Beam spring
- Main mouse: Kangaroo
- Favorite switch: beam spring
- DT Pro Member: 0097
Same happened to me. I love having all those keys at my command and I became a fan of the ISO because of the F122. But I could do without that short left shift. I take that off when I can.quantalume wrote:Yes! There may be some limitations, but I can't think of any off the top of my head. The configuration file for my F and M 122s is around 300 lines. I have the left-hand cluster configured for various editing and menu commands, the numeric pad set up as an RPN scientific calculator (in conjunction with galculator) and Cmd13-24 set to launch frequently-used programs. You will love the F-122 and forget all about HHKB-optimized layouts. It's like being at the control panel for a nuclear submarine! Oh, and originally I thought I wanted to convert all my boards to ANSI, but now I actually prefer ISO. You are on a very slippery slope my friend.rjrich wrote:Edit: I have not yet tried Soarer's Converter on any of my keyboards. Is it really going to be possible to use/reprogram all the keys on the F-122? For example, the ten keys on the left of the main section are currently not F1 - F10 as they are on the XT, the 24 keys in the top section are a mystery, and some of the keys in the navigation cluster and num pad are currently unlabeled.
-
Hypersphere
- Location: USA
- Main keyboard: Silenced & Lubed HHKB (Black)
- Main mouse: Logitech G403
- Favorite switch: Topre 45/55g Silenced; Various Alps; IBM Model F
- DT Pro Member: 0038
Thanks, quantalume and prdlm2009! I've always wanted to be at the helm of a nuclear submarine, and I find that the multiple banks of keys are beckoning to me.
I actually prefer short shift keys -- 1.25x is fine (although 1.00x is not; I need that extra 0.25 unit, but not more). I might put a Fn key next to the left shift, although a Fn key might be superfluous, given the abundance of extra keys on the F-122.
This particular board is in such good shape, if I could live with the stock layout, I don't think I would need to separate the plates. On the other hand, the front plate has picked up the characteristic white splotches of corrosion, so I am tempted to tear down the board to do a proper cleaning, sanding, and repainting of the front plate.
It is good to find a fellow RPN fan. My first calculator was an HP RPN, and I recently bought the new revival release of the HP-15C. I also use galculator, and I use qalculate as well because I like the way it handles complex numbers.
Really looking forward to getting a Soarer's Converter up and running. I've been a bit daunted by it, but I think once I have done it, it will be like a rite of passage into a new level of keyboardism. Not to mention it will be incredibly useful.
-
vivalarevolución
- formerly prdlm2009
- Location: USA
- Main keyboard: IBM Beam spring
- Main mouse: Kangaroo
- Favorite switch: beam spring
- DT Pro Member: 0097
Soarer's converter is not nearly as intimidating as it seems. The big problem with that long thread is the proper explanation for how to build and get things up and running is buried in various points of the thread. Really, it is a few simple steps:
1. Get the proper parts.
2. Figure out the proper wire connections.
3. Download the firmware onto the teensy.
4. Learn how to customize the layout using the instructions that are in the docs and instructions throughout the thread.
It can be intimidating for people that are not very computer savvy, but once you figure it out, you hit yourself in your head for not figuring it out earlier.
-
Muirium
- µ
- Location: Edinburgh, Scotland
- Main keyboard: HHKB Type-S with Bluetooth by Hasu
- Main mouse: Apple Magic Mouse
- Favorite switch: Gotta Try 'Em All
- DT Pro Member: µ
Hint: download Soarer's zip from the OP of his converter's forum thread, and take a look in the docs folder. That's the core documentation that should get you through: especially the pinouts for the supported sockets. No need to spelunk the whole thread, all questions are welcome.
I could do a pictures thread and howto for my multi-socket converter box. It's a bit messy inside thanks to my learning on the job, but it works.
Internal Soarer converters, meanwhile, are mysteries to me! I know where to put the wires but not how to artfully mount the Teensy.
I could do a pictures thread and howto for my multi-socket converter box. It's a bit messy inside thanks to my learning on the job, but it works.
Internal Soarer converters, meanwhile, are mysteries to me! I know where to put the wires but not how to artfully mount the Teensy.
-
Hypersphere
- Location: USA
- Main keyboard: Silenced & Lubed HHKB (Black)
- Main mouse: Logitech G403
- Favorite switch: Topre 45/55g Silenced; Various Alps; IBM Model F
- DT Pro Member: 0038
Many thanks for the helpful encouragement!prdlm2009 wrote:Soarer's converter is not nearly as intimidating as it seems. The big problem with that long thread is the proper explanation for how to build and get things up and running is buried in various points of the thread. Really, it is a few simple steps:
1. Get the proper parts.
2. Figure out the proper wire connections.
3. Download the firmware onto the teensy.
4. Learn how to customize the layout using the instructions that are in the docs and instructions throughout the thread.
It can be intimidating for people that are not very computer savvy, but once you figure it out, you hit yourself in your head for not figuring it out earlier.
-
Hypersphere
- Location: USA
- Main keyboard: Silenced & Lubed HHKB (Black)
- Main mouse: Logitech G403
- Favorite switch: Topre 45/55g Silenced; Various Alps; IBM Model F
- DT Pro Member: 0038
Muirium, it would be great if you would do a "How To" with pics for your multi-converter box. No one will mind that the insides are a bit messy; we all go through a learning phase. If you have time, the messy reality of the actual wiring could be explained with hand-drawn diagrams.Muirium wrote:Hint: download Soarer's zip from the OP of his converter's forum thread, and take a look in the docs folder. That's the core documentation that should get you through: especially the pinouts for the supported sockets. No need to spelunk the whole thread, all questions are welcome.
I could do a pictures thread and howto for my multi-socket converter box. It's a bit messy inside thanks to my learning on the job, but it works.
Internal Soarer converters, meanwhile, are mysteries to me! I know where to put the wires but not how to artfully mount the Teensy.
As for "artfully mouting" Teensies inside keyboards, I have seen all sorts of solutions, including double-sided tape. I suppose the main thing is ensuring that it works and that connections are protected from touching other conductive bits.
Thanks.
-
vivalarevolución
- formerly prdlm2009
- Location: USA
- Main keyboard: IBM Beam spring
- Main mouse: Kangaroo
- Favorite switch: beam spring
- DT Pro Member: 0097
For an internal mount, I wrap my Teensy in foam and just wedge it underneath the backplate. Not a great solution, but it has failed me so far.
-
Muirium
- µ
- Location: Edinburgh, Scotland
- Main keyboard: HHKB Type-S with Bluetooth by Hasu
- Main mouse: Apple Magic Mouse
- Favorite switch: Gotta Try 'Em All
- DT Pro Member: µ
Do you just plug in a USB cable to the Teensy and consider it a fixed cable? My trouble is that I like detachable cables, so I wind up wiring sockets leading to other sockets…
The most elegant way would be to mount a Teensy good and proper, so its own socket is exposed as the live one on the back of the keyboard. But that's a mechanical job I doubt I'd do right. I wanted to with my converter box, but I wound up with a second socket and a little hacked together jump cable even there!
The most elegant way would be to mount a Teensy good and proper, so its own socket is exposed as the live one on the back of the keyboard. But that's a mechanical job I doubt I'd do right. I wanted to with my converter box, but I wound up with a second socket and a little hacked together jump cable even there!
-
quantalume
- Location: Houston, Texas
- Main keyboard: IBM Bigfoot
- Main mouse: CST trackball
- Favorite switch: IBM Model F
- DT Pro Member: -
Here is how I build my Soarer's converters:
It is actually a Leonardo Pro Micro, and I cover it with heat shrink tubing so nothing can short out. I use wires that are the same colors as the IBM terminal wires; that way there is no risk of hooking it up wrong. Plus, the individual female socket leads allow me to connect it to either an XT or terminal controller. It has a micro-USB connector at the other end as compared to the mini-USB found on the Teensy.
This is how I have it installed in my F-122s:
I have a USB extension cable connected to the PC, so I don't really need to have the keyboard's cable be detachable. However, there are a couple of ways that I have made it detachable. First off, there are these little pigtail adapters you can get:
This has a male micro-USB on one end and a female mini-USB on the other. The micro end goes inside and gets clamped down just like before; the mini end hangs out the back.
Here is another option. This is a solid mini-to-micro adapter that I've cut some slots in.
It fits under the clamp found in Model Ms that come with non-detachable cables.
It makes for a custom, built-in look.
- P1020348.jpg (23.15 KiB) Viewed 6528 times
- P1020349.jpg (72.9 KiB) Viewed 6528 times
- P1020353.jpg (66.28 KiB) Viewed 6528 times
- P1020355.jpg (23.53 KiB) Viewed 6528 times
Here is another option. This is a solid mini-to-micro adapter that I've cut some slots in.
- P1020359.jpg (42.44 KiB) Viewed 6528 times
- P1020358.jpg (52.28 KiB) Viewed 6528 times
- P1020357.jpg (50.59 KiB) Viewed 6528 times
-
vivalarevolución
- formerly prdlm2009
- Location: USA
- Main keyboard: IBM Beam spring
- Main mouse: Kangaroo
- Favorite switch: beam spring
- DT Pro Member: 0097
Yea, I just have a fixed cable. I am the opposite of you: I like the fixed cable for my boards with Soarer's converter!Muirium wrote:Do you just plug in a USB cable to the Teensy and consider it a fixed cable? My trouble is that I like detachable cables, so I wind up wiring sockets leading to other sockets…
The most elegant way would be to mount a Teensy good and proper, so its own socket is exposed as the live one on the back of the keyboard. But that's a mechanical job I doubt I'd do right. I wanted to with my converter box, but I wound up with a second socket and a little hacked together jump cable even there!
Mine is definitely a hack job and not a great permanent solution. But it works for now!
-
Hypersphere
- Location: USA
- Main keyboard: Silenced & Lubed HHKB (Black)
- Main mouse: Logitech G403
- Favorite switch: Topre 45/55g Silenced; Various Alps; IBM Model F
- DT Pro Member: 0038
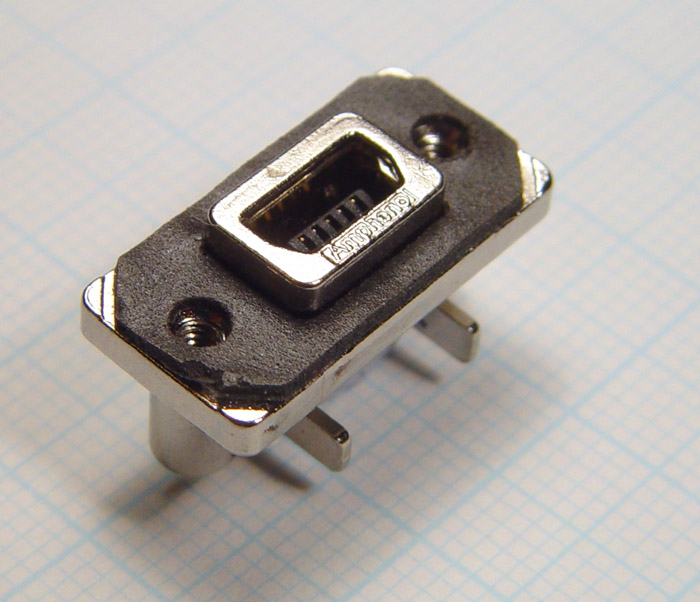
There are also panel-mount solutions like this one:
The Teensy (or other circuit board) can be enclosed in a box as shown or enclosed in shrink wrap. The short cable provides strain relief between the Teensy and the external connector. A USB B connector is shown, but it should be possible to find other types, such as micro USB.
- panelmount.jpg (99.2 KiB) Viewed 6449 times
-
Muirium
- µ
- Location: Edinburgh, Scotland
- Main keyboard: HHKB Type-S with Bluetooth by Hasu
- Main mouse: Apple Magic Mouse
- Favorite switch: Gotta Try 'Em All
- DT Pro Member: µ
I use one of these in my custom 60%:
Making the wire between it and the Teensy was one of the most annoying parts of the whole build. But it is pretty!
Quantalume's solid adapter looks like a winner, thanks for the pictures! Does the Teensy / clone fit nicely right on the end of it? If so, that's a hell of a lot more convenient than what I've considered so far. A link to the appropriate adapter would be most useful.
-
Ratfink

- Location: North Carolina, USA
- Main keyboard: IBM Displaywriter
- Main mouse: CST L-Trac
- Favorite switch: Beam Spring
- DT Pro Member: -
I had my Teensy mounted in my XT model F for a while. I put it between the pieces that held the original strain relief block in place and put enough hot glue around it to keep the board from moving at all. It worked wonderfully for about a year, but one day it cracked and broke. My new mounting solution is a 3D printed bracket that slides into the same place and holds the board by its back row of pads. Everything fits very tightly, which is great until I have to disassemble it some day.
Rendering of the Teensy mount:
Photo of the modifications:
Close-up of the mounted Teensy:
Rendering of the Teensy mount:
Spoiler:
Spoiler:
Spoiler:
-
Hypersphere
- Location: USA
- Main keyboard: Silenced & Lubed HHKB (Black)
- Main mouse: Logitech G403
- Favorite switch: Topre 45/55g Silenced; Various Alps; IBM Model F
- DT Pro Member: 0038
Nice work! However, I get nervous about connecting the detachable cable directly to the mini-USB receptacle on the Teensy. I think I will go for a solution that puts a strain-relief cable in between the Teensy and a panel-mount connector on the keyboard case. That way, if the case-mounted connector breaks or wears out, it could easily be replaced. All this aside, it is great to see people using 3D printing technology.Ratfink wrote:I had my Teensy mounted in my XT model F for a while. I put it between the pieces that held the original strain relief block in place and put enough hot glue around it to keep the board from moving at all. It worked wonderfully for about a year, but one day it cracked and broke. My new mounting solution is a 3D printed bracket that slides into the same place and holds the board by its back row of pads. Everything fits very tightly, which is great until I have to disassemble it some day.
Rendering of the Teensy mount:Photo of the modifications:Spoiler:Close-up of the mounted Teensy:Spoiler:Spoiler:
-
Muirium
- µ
- Location: Edinburgh, Scotland
- Main keyboard: HHKB Type-S with Bluetooth by Hasu
- Main mouse: Apple Magic Mouse
- Favorite switch: Gotta Try 'Em All
- DT Pro Member: µ
Smart stuff, Ratfink. RJ's got a point about strain relief, but your approach is so elegant I'm tempted either way. I must fire up a 3D printer someday.
-
quantalume
- Location: Houston, Texas
- Main keyboard: IBM Bigfoot
- Main mouse: CST trackball
- Favorite switch: IBM Model F
- DT Pro Member: -
Here's a link to the mini-to-micro adapter: http://www.ebay.com/itm/350927784352. You'll find that nobody makes a mini-to-mini adapter (why would they?), so that is what steered me to the Leonardo Pro Micro, in addition to the more favorable price. And yes, it slides on the end and seems to stay firmly in place.
Ratfink, did you have to make any modifications to the XT case? Preserving the original cable and avoiding modification of the case have been overriding considerations in all of my USB conversions.
Ratfink, did you have to make any modifications to the XT case? Preserving the original cable and avoiding modification of the case have been overriding considerations in all of my USB conversions.
-
Ratfink
- Location: North Carolina, USA
- Main keyboard: IBM Displaywriter
- Main mouse: CST L-Trac
- Favorite switch: Beam Spring
- DT Pro Member: -
I had to file the original cable hole slightly larger, but other than that there were no modifications made to the case. I haven't actually tried this, but it looks like if I were to put the original cable back in place, the larger hole wouldn't be noticeable at all.
-
Hypersphere
- Location: USA
- Main keyboard: Silenced & Lubed HHKB (Black)
- Main mouse: Logitech G403
- Favorite switch: Topre 45/55g Silenced; Various Alps; IBM Model F
- DT Pro Member: 0038
I surely thought I had seen some mini-to-mini adapters, and after a bit of searching, here are two varieties:quantalume wrote:Here's a link to the mini-to-micro adapter: http://www.ebay.com/itm/350927784352. You'll find that nobody makes a mini-to-mini adapter (why would they?), so that is what steered me to the Leonardo Pro Micro, in addition to the more favorable price. And yes, it slides on the end and seems to stay firmly in place.
Cable version:
http://www.amazon.com/YCS-Basics-Black- ... i+usb+male
Block version:
http://www.amazon.com/Mini-Female-Adapt ... emale+male
Perhaps someone would find these useful.
-
Muirium
- µ
- Location: Edinburgh, Scotland
- Main keyboard: HHKB Type-S with Bluetooth by Hasu
- Main mouse: Apple Magic Mouse
- Favorite switch: Gotta Try 'Em All
- DT Pro Member: µ
I would, but UK Amazon ain't no US Amazon…
http://www.amazon.co.uk/s/ref=nb_sb_nos ... emale+male
The same search here yields no such thing.
http://www.amazon.co.uk/s/ref=nb_sb_nos ... emale+male
The same search here yields no such thing.
-
Hypersphere
- Location: USA
- Main keyboard: Silenced & Lubed HHKB (Black)
- Main mouse: Logitech G403
- Favorite switch: Topre 45/55g Silenced; Various Alps; IBM Model F
- DT Pro Member: 0038
Just to be sure, is this a mini-usb connector like this one?Muirium wrote:I use one of these in my custom 60%:
Spoiler:
http://www.digikey.com/product-detail/e ... ND/1956304
I suppose it would be easier to use a connector that had a short cable with a mini-usb male connector on the inside to serve as an interface to the femaie mini-usb connector on the Teensy. However, I have not seen one of these that has a panel mount connector on the female mini usb end.
-
Muirium
- µ
- Location: Edinburgh, Scotland
- Main keyboard: HHKB Type-S with Bluetooth by Hasu
- Main mouse: Apple Magic Mouse
- Favorite switch: Gotta Try 'Em All
- DT Pro Member: µ
Yes, it's a nice wee Mini USB socket that's almost worth its price! But not the easiest thing to mount in an existing body. Plus you must make your own connections. Not so bad on the socket, but hellish on the male side.
-
Hypersphere
- Location: USA
- Main keyboard: Silenced & Lubed HHKB (Black)
- Main mouse: Logitech G403
- Favorite switch: Topre 45/55g Silenced; Various Alps; IBM Model F
- DT Pro Member: 0038
This leads to a question: What is the "best" connector to have on a modified keyboard? Currently, I suppose the commonest connector on keyboard cases is a mini-USB, although there are a few with micro-USB. However, the most readily available panel-mount connectors with short cables to the mini-usb connector on a Teensy 2 have a full-size USB-B connector on the female panel-mount end. There have been some interesting posts in this thread offering other alternatives; it would be good to see some additional thoughts on this.Muirium wrote:Yes, it's a nice wee Mini USB socket that's almost worth its price! But not the easiest thing to mount in an existing body. Plus you must make your own connections. Not so bad on the socket, but hellish on the male side.
-
bhtooefr

- Location: Newark, OH, USA
- Main keyboard: TEX Shinobi
- Main mouse: TrackPoint IV
- Favorite switch: IBM Selectric (not a switch, I know)
- DT Pro Member: 0056
- Contact:
USB C.
Barring that (seeing as it's not out yet), either B or Micro-B, I'd say. (Mini-USB is actually a deprecated standard.)
Barring that (seeing as it's not out yet), either B or Micro-B, I'd say. (Mini-USB is actually a deprecated standard.)
-
Muirium
- µ
- Location: Edinburgh, Scotland
- Main keyboard: HHKB Type-S with Bluetooth by Hasu
- Main mouse: Apple Magic Mouse
- Favorite switch: Gotta Try 'Em All
- DT Pro Member: µ
USB C's the one with some of the good ideas from Apple's Lightning connector, if I'm not mistaken. Orientation neutral, tough, and tiny. It'll be great, eventually…
Micro USB is a bit tougher feeling than Mini USB. The NovaTouch prototype was my first keyboard with it, and I liked the connector but loathed the supplied cable (which always manages to get in the way). So I got with the program and bought some Micro USB cables of my own. Not bad. I'd go with that over all the bigger ones. Counterintuitively, smaller connectors are often stronger.
Micro USB is a bit tougher feeling than Mini USB. The NovaTouch prototype was my first keyboard with it, and I liked the connector but loathed the supplied cable (which always manages to get in the way). So I got with the program and bought some Micro USB cables of my own. Not bad. I'd go with that over all the bigger ones. Counterintuitively, smaller connectors are often stronger.
-
Game Theory

- Mr. Despair
- Location: Madison WI US
- Main keyboard: Majestouch Convertible 2 or Beam Spring 5251
- Main mouse: Logitech G900
- Favorite switch: MX Blue in terms of MX
- DT Pro Member: 0008
USB C for 3.1 its reversible. No side is top.
-
Hypersphere
- Location: USA
- Main keyboard: Silenced & Lubed HHKB (Black)
- Main mouse: Logitech G403
- Favorite switch: Topre 45/55g Silenced; Various Alps; IBM Model F
- DT Pro Member: 0038
Yes, I have heard that micro USB has a longer lifetime than mini USB, although as yet it seems less common.
I like the panel-mount connector cables apparently designed for Teensy (and similar circuit boards); more's the pity they do not seem to come with a panel-mount micro USB.
I guess I might go with a home-made panel mount using a micro USB cable fitted into a grommet.
Looking forward to seeing more availability of the new USB C with C2 rotational symmetry!
-
bhtooefr
- Location: Newark, OH, USA
- Main keyboard: TEX Shinobi
- Main mouse: TrackPoint IV
- Favorite switch: IBM Selectric (not a switch, I know)
- DT Pro Member: 0056
- Contact:
Not only is it reversible, but USB C will make OTG support at some level standard for all USB hosts and devices, because both ends are the same. No more special OTG cable for plugging into a smartphone or tablet, just use the ordinary USB C cable. (Some devices will be hardwired as devices, some hosts will be hardwired as hosts, but the point is that special OTG cables will be a thing of the past.)