6x4 MacroPad from scratch with ProMicro and QMK

katamari

06 Jul 2019, 12:55

Hello everyone,
I am in the process of making myself a 6x4 macropad from scratch. All the hardware part is done, and also first shot on the Firmware.

However I am unable to set up the dev environment properly. I followed the instructions on the QMK website, installing the MSYS2 tool, however, I am unable to update it, and cant find help on the issue I am facing on the official website. Here is the error I get:

Code: Select all

# pacman -Syu
:: Synchronizing package databases...
error: failed to update mingw32 (unable to lock database)
error: failed to update mingw64 (unable to lock database)
error: failed to update msys (unable to lock database)
error: failed to synchronize all databases
If anyone has a lead on solving this, I'd be glad to hear from you.

Cheers! ;)
Last edited by katamari on 23 Aug 2019, 14:31, edited 1 time in total.

User avatar
Menuhin

06 Jul 2019, 14:35

Did you elevate the windows (to admin) that you're running pacman?

katamari

06 Jul 2019, 21:25

Thanks for the answer. Yes I did. I found the answer, had to delete /var/lib/pacman/db.lck. Now it works.

Also, new issue: managed to compile some avalaible firmware (so my toolchain is okay), but not my own.
here what happens:

Code: Select all

Compiling: keyboards/handwired/6x4/6x4.c                                                            [OK]
Compiling: keyboards/handwired/6x4/keymaps/default/keymap.c                                        keyboards/handwired/6x4/keymaps/default/keymap.c:28:1: error: excess elements in array initializer [-Werror]
 [0] = LAYOUT(
 ^
keyboards/handwired/6x4/keymaps/default/keymap.c:28:1: error: (near initialization for 'keymaps[0]') [-Werror]
cc1.exe: all warnings being treated as errors
 [ERRORS]
 |
 |
 |
make[1]: *** [tmk_core/rules.mk:360: .build/obj_handwired_6x4_default/keyboards/handwired/6x4/keymaps/default/keymap.o] Error 1
Make finished with errors
make: *** [Makefile:544: handwired/6x4:default] Error 1
And here is keymap.c just copy-pasted from the 5x5, and removed the useless stuff.

Code: Select all

#include QMK_KEYBOARD_H

// #define PAD 0

// Readability keycodes
#define _______ KC_TRNS

const uint16_t PROGMEM keymaps[][MATRIX_ROWS][MATRIX_COLS] = {

/* Single 6x4 board only
 * .---------------------------------------------------.
 * |        |       |       |        |        |        |
 * |--------+-------+-------+--------+--------+--------|
 * |        |       |       |        |        |        |
 * |--------+-------+-------+--------+--------+--------|
 * |        |       |       |        |        |        |
 * |--------+-------+-------+--------+--------+--------|
 * |        |       |       |        |        |        |
 * |--------+-------+-------+--------+--------+--------|
 * |        |       |       |        |        |        |
 * '---------------------------------------------------'
 */

[0] = LAYOUT(
  KC_ESC, KC_0,   KC_0,   KC_1,   KC_2,  KC_3,
  KC_A,   KC_B,   KC_C,   KC_D,   KC_E,  KC_F,
  KC_G,   KC_H,   KC_I,   KC_J,   KC_K,  KC_L,
  KC_M,   KC_N,   KC_O,   KC_P,   KC_Q,  KC_R,
  KC_S,   KC_T,   KC_U,   KC_V,   KC_W,  KC_SPC
  ),
};

const uint16_t PROGMEM fn_actions[] = {

};

const macro_t *action_get_macro(keyrecord_t *record, uint8_t id, uint8_t opt)
{
  // MACRODOWN only works in this function
      switch(id) {
        case 0:
          if (record->event.pressed) {
            register_code(KC_RSFT);
          } else {
            unregister_code(KC_RSFT);
          }
        break;
      }
    return MACRO_NONE;
};


void matrix_init_user(void) {

}

void matrix_scan_user(void) {

}

bool process_record_user(uint16_t keycode, keyrecord_t *record) {
  return true;
}

void led_set_user(uint8_t usb_led) {

}
Any ideas?

User avatar
swampangel

06 Jul 2019, 23:55

You should have a #define LAYOUT( ... statement somewhere, can you share it?

For example, https://github.com/qmk/qmk_firmware/blo ... t/keymap.c uses the macro LAYOUT_all, which is #defined in https://github.com/qmk/qmk_firmware/blo ... h60/gh60.h

katamari

07 Jul 2019, 10:36

Hi There

yep, it's defined in 6x4.h which is included into 6x4.c.
Here is my 6x4.h

Code: Select all

#pragma once

#ifndef SIXX4_H
#define SIXX4_H

#include "quantum.h"
#define ___ KC_NO

// This a shortcut to help you visually see your layout.
// The first section contains all of the arguments
// The second converts the arguments into a two-dimensional array

#define LAYOUT( \
    K00, K01, K02, K03, K04, K05, \
    K10, K11, K12, K13, K14, K15, \
    K20, K21, K22, K23, K24, K25, \
    K30, K31, K32, K33, K34, K35, \
    K40, K41, K42, K43, K44, K45 \
) \
{ \
    { K00, K01, K02, K03, K04, K05}, \
    { K10, K11, K12, K13, K14, K15}, \
    { K20, K21, K22, K23, K24, K25}, \
    { K30, K31, K32, K33, K34, K35}, \
    { K40, K41, K42, K43, K44, K45} \
}

#endif
I think I'll start over, from a working template, making sure the code compiles after every step. Gonna take some time :roll:

Btw, where are the .hex files to be found once the compiling is done?

User avatar
SirHobo

09 Jul 2019, 21:41

If I recall correctly it should just be in the top directory, eg qmk_firmware.

User avatar
purdobol

09 Jul 2019, 21:49

katamari wrote:
07 Jul 2019, 10:36
Btw, where are the .hex files to be found once the compiling is done?
Successful compilation should create "build" folder in top directory. On Linux it's hidden, on Windows have no clue ;)
Matrix size is defined properly in config.h ?

katamari

12 Jul 2019, 02:29

Thanks for your help guys!!
Found the files in .build

And regarding the programming issues, there were serverals.
First I wanted to build a 6x4 matrix, and defined the number of rows and columns as suche but then defined a 6x5 keymap :facepalm:
Another problem was regaring some of the outcommented sections. Apparently you should use /* */ instead of // for commenting out longer sections.

Now everything compiles fine. Still need to clean out some stuff I don't need, especially from rules.mk and keymap.c.

katamari

22 Jul 2019, 02:00

Hey guys, I'm Proud to announce that I have my first iteration of My Macropad up and Running! B) B)

Now I need your help for more complicated stuff with QMK: I want to programm macros that require user input to finish. Here's the context: I use AUTOCAD using the key commands a lot. Most of them are simple macros such as "cp " for copy etc. some however need a second input for instance :
MESURERGEOM ask me for a second input that can be D, R, A, AI or V. However theses keycodes are not available on the current configuration of my keyboard. So my first idea was to define a new layer where theses KC would be available, and to which the first macro would latch to. However it seems a bit overkill (and maybe a lot of work) to define a new layout for each of these commands that require such a user input.
So I would like to know if there is a possibility to momentarily alter the keycodes sent by a key within the switch case of the first macro.

FYI : I use the "new way" of QMK macro definition with the following synthax:

Code: Select all

bool process_record_user(uint16_t keycode, keyrecord_t *record) {
  switch (keycode) {
    case MG:
      if (record->event.pressed) {
        // when keycode MG is pressed
        SEND_STRING("MESURERGEOM ");
      } else {
        // when keycode MG is released
      }
      break;

  }
  return true;
};

btw: yes, my autocad is set to french! ;)

User avatar
Muirium
µ

22 Jul 2019, 09:59

Does that send_string command work? Does the macro type that out when you use it on a text editor? First time I’ve seen it done that way!

Anyway, my macro knowledge is from Soarer’s converter and Xwhatsit’s controller, but I believe this applies generally. Every keyboard “device” is a full sized keyboard, capable of sending make and break codes for all keys, even if your physical keyboard does not have them. That’s how layers work. But you don’t even need layers to send them. You just put them straight in your macro.

Something to bear in mind: timing. Autocad may be a bit slow when you fire these at it. Keyboard controllers can type much faster than humans. So if you wind up with mysterious ignored keys, try adding small delays inside the macro.

katamari

22 Jul 2019, 12:30

Yes workd like a charm, as well as text as in Autocad.
QMK even a special function for macros that acts as press-release-delay. Useful to type all the non-caracter keys that cannot be formatted to string.

katamari

23 Aug 2019, 15:38

First off: yes, I changed the threads title, since I didn't see any need to open a new one.

Update on my project:

First prototype is running well after a lot of trial and error and digging through the QMK wesite.
Finally I went for the multiple layers solution I had initially in mind, and as I expected, it is a lot of work.

I tried using "oneshotlayers" in the macro definition, as recommended on QMK website, but it doesn't exactly react as expected. It does switch to the desired layer on key press, but doesnt switch back on the second key press. So I went for using layer_clear() instead.

Since I still have some pins available, I add some status LEDs, (or a 7 segment, if I can find a way to make a clean rectangular cut in the board) to indicate the active layers.

As the board should also be used as a numpad I tried to look for a way to read the numlock activation satus using QMK, but haven't been lucky yet. Any clues? :?:

Now on the Hardware side, and user experience

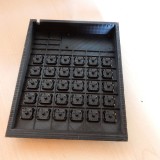
As I (may have) mentioned before, I went for clicky mathias switches since I had them lying around for years, and finally wanted to put them to good use. But since I didn't have any compatible keycaps, I 3D printed them as well. Altogether, with the open bottom case it makes for a very noisy experience. Here some pics:

Image
Image
Image

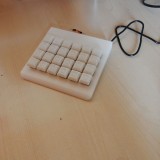
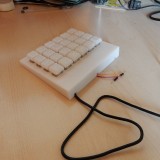
The two wires coming out of the back are there to enter bootloader mode by double tapping.

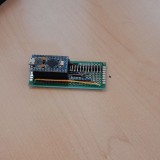
Also to make it all fit in I had to bend the header pins on the pro micro. And yes, some of the wires I use are too long and thick (please don't :roll: ).

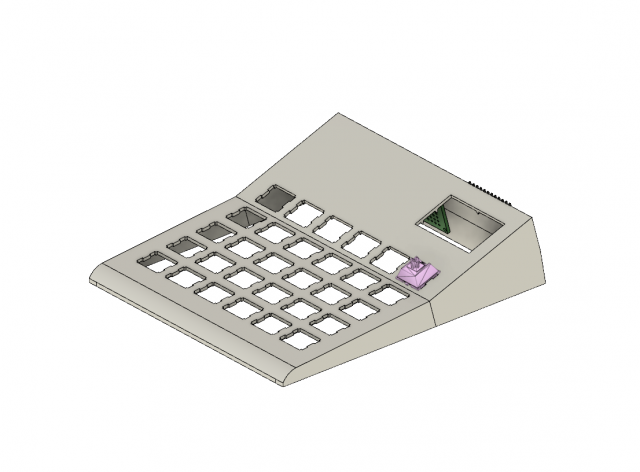
In the mean time I also designed a second version of the board with one more row, as i found that 24keys wasn't enough for all the usual macros I needed. So build it, and populated it with cherry clear (which are the only cherry type lying around), so I could use my typro relendable keycaps I also had lying around for years. This time I decided to break out the cable connections, so I could reuse the promicro for an eventual further version. Hence the larger top part of the board.

Image Image Image Image

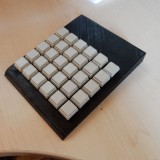
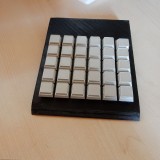
While typing around the board, without having it wired up I noticed that the clear switches are way to stiff for my liking. So I will order some lighter ones (still comparing options, but will probably go for reds or browns).

Anyway this board won't be wired up since I already went on and designed a third revision, with stronger angle on the top row as well as a cut out for an OLED screen. Un fortunately, since QMK only supports a limited number of OLED drivers, it also makes for a limited number of options for the available screens.

Image

See you soon ;)

katamari

24 Aug 2019, 00:36

SO I face the next problem. As stated in the previous psot I would like to add a screen in the next revision. QMK has built-in drivers for 2 different display driver IC:
- HD44780: usually used by 1602 and 2004 black on green or white on blue LCD screens. The screens have decent size but require an awful amount of pins.

- SSD1306 for 128x32 or 128x64 OLED displays which usually use a 4 or 7 pins SPI interface. Problem is the only screens that use this type of driver arevery small sized (0,96").

Bigger OLED screens (1,33" and higher) usually use different driver IC like ST7735 and ST7789.

I found some drivers librarys on github that could work, like Adafruit-GFX-Library , kc or https://ugfx.io/ (briefly referenced on QMKs webpage).
However as I only have little experience on hardware programming I have no clue how to integrate into my code. So, if you have heard of anyone having already done so, or could help me doing it, I would really appreciate :D

User avatar
kbdfr
The Tiproman

24 Aug 2019, 07:53

katamari wrote:
24 Aug 2019, 00:36
So, if you have heard of anyone having already done so, or could help me doing it, I would really appreciate :D
There's a similar Tipro device:
.
Tipro LCD-25.jpg
Tipro LCD-25.jpg (158.24 KiB) Viewed 6526 times

katamari

24 Aug 2019, 11:07

Looks nice!
If I had one of these, I probably wouldn't even have considered building my own keyboard.
Only problem is availability, and also the win 32bit only support for changeme.
When I first had the idea of using tipro MID boards as a split keyboard config, I was looking for 64 keys modules, but couldn't find any.

The option of reshaping a switch plate from one of my 96keys tipro by cutting it to a smaller size is still on the table though. however I don't think I 'll can apply the same resizing process to the PCB :P

Lanrefni

24 Aug 2019, 19:48

katamari wrote:
24 Aug 2019, 11:07
Looks nice!
If I had one of these, I probably wouldn't even have considered building my own keyboard.
Only problem is availability, and also the win 32bit only support for changeme.
When I first had the idea of using tipro MID boards as a split keyboard config, I was looking for 64 keys modules, but couldn't find any.

The option of reshaping a switch plate from one of my 96keys tipro by cutting it to a smaller size is still on the table though. however I don't think I 'll can apply the same resizing process to the PCB :P
Programming those old PS/2 Tipros isn't hard,just annoying. See my first post here.

User avatar
Muirium
µ

24 Aug 2019, 19:53

It is hard when you don’t have a machine with a PS/2 port on it anywhere in the house. That’s why I got rid of mine. Asking a PC gamer friend to install and configure ChangeMe turned out to be quite a favour! He was annoyed by the recursive hoops to run the thing, and I was appalled at the interface when we did get there.

Post Reply

Return to “Workshop”