Fujitsu 3rd Gen Leafspring Teensy Wired

User avatar
OldIsNew

30 Jul 2017, 00:41

I picked up a Fujitsu N860-2500-T111 board with 3rd gen leaf spring switches. I couldn't find out much about the protcol used (which seems to be common with a number of older terminal boards) and wanted to get the board usable so I traced out the matrix with a multimeter and soldered wires to the IC pads and connected the Teensy. I was concerned there might be problems with cross currents but it's working. Hasn't caught on fire yet either.


c_wired.jpg
c_wired.jpg (195.78 KiB) Viewed 5069 times
b_wired.jpg
b_wired.jpg (134 KiB) Viewed 5069 times
switches1.jpg
switches1.jpg (298.07 KiB) Viewed 5069 times
switches2.jpg
switches2.jpg (289.05 KiB) Viewed 5069 times
d_board.jpg
d_board.jpg (191.38 KiB) Viewed 5069 times

The switches are clicky linear and have a nice feel. I'm curious how people feel the 3 generations of leaf springs compare. I've never tried a 1st or 2nd generation board. This wiring job worked but is anyone aware of any protocol converters out there for the older Fujitsu boards?

User avatar
chip chop

06 Aug 2017, 18:26

Nice project, I imagine the switches are nice and smooth with that switch design, with the plunger directly pressing the contact instead of dragging past it. Think the earlier gen switches are found on more exotic boards, Sanyo MBC-2000 etc.

User avatar
seebart
Offtopicthority Instigator

06 Aug 2017, 18:34

Ohh how did I miss this ?!? :o :shock: Great job OldIsNew ! It happens I own almost exactly the same keyboard!

keyboards-f2/fujitsu-limited-n860-2505- ... %20T00201A

No, I am not aware of any protocol converters out there for the older Fujitsu boards. So how do you like those Fujitsu 3rd Gen Leafsprings?
chip chop wrote: Nice project, I imagine the switches are nice and smooth with that switch design, with the plunger directly pressing the contact instead of dragging past it.
That's the brilliance of this switch design, no friction!

User avatar
XMIT
[ XMIT ]

07 Aug 2017, 03:46

I have one of these boards too! Awesome to know that the mod is so easy.

Oh weird, you have the same inverted-Q looking 'O' key! I thought that was just mine. What's the deal with that?!

User avatar
OldIsNew

08 Aug 2017, 07:49

An update and some more info. While the board seemed to work fine at first with just soldering directly to the intact IC pads, as I used it more I started to notice extraneous keys registering with key presses from time to time. This seemed somewhat random and I began to suspect that there were issues with stray current - I guess not too surprising considering the direct wire job (I thought I had gotten away with it). Hoping this was it, I went ahead and desoldered the ICs I had soldered to, and the main one while I was at it, and resoldered directly to the pads. This appears to have solved the problem and I'm not getting any more extra key presses.
Desoldered1.jpg
Desoldered1.jpg (557.5 KiB) Viewed 4906 times
Desoldered2.jpg
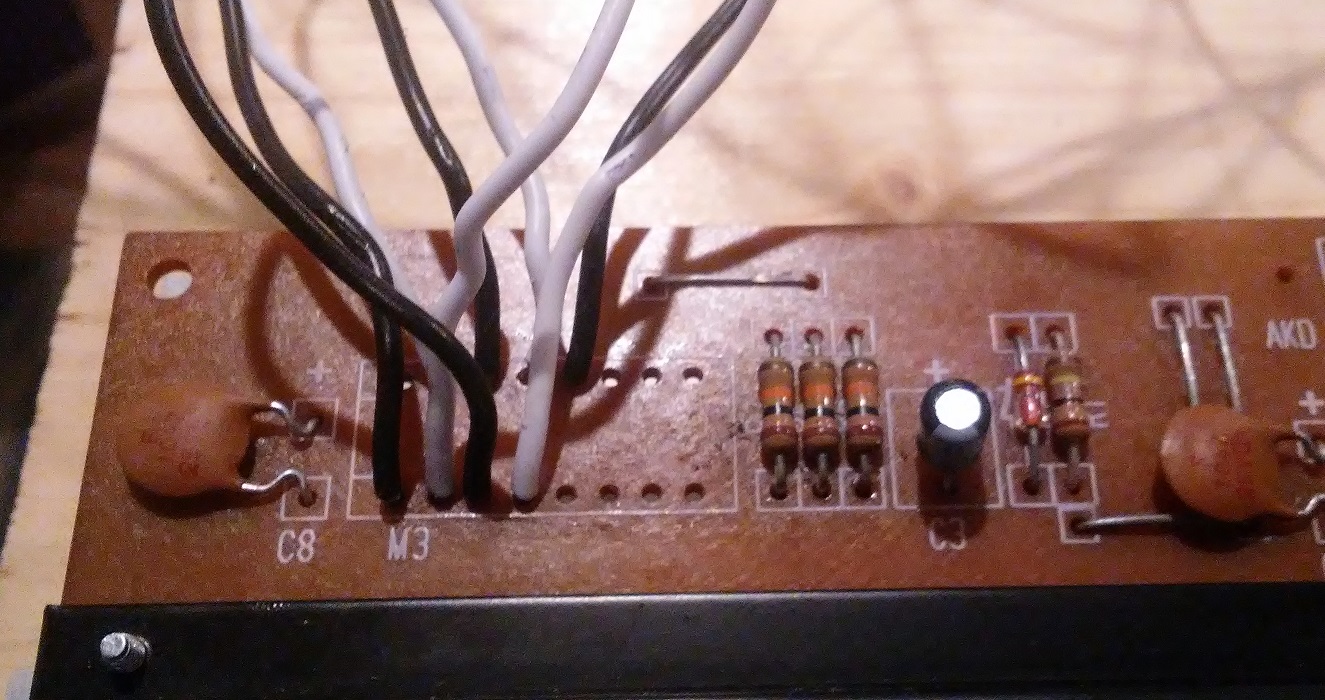
Desoldered2.jpg (352.08 KiB) Viewed 4906 times
I'm posting the keyboard matrix I came up with using the multimeter. The matrix is correct for my board so I would think it should be usable if you have the same board. The matrix also includes the Teensy++2.0 pins and the wire assignments used in firmware (so obviously only relevant to the software I'm using). For firmware I'm using Arduino C code that works but is far from elegant (e.g. lines of code for each key rather than using arrays). I just haven't gotten around to rewriting it and cleaning it up. If anyone wants a copy I'm happy to send it - just don't ridicule it too much! The coding was just part of the hobby for me - I would think TMK could be used as per matt3o's tutorial: workshop-f7/how-to-build-your-very-own- ... t7177.html for some professional style firmware.

Below are the key matrix and a pic with labels of the pins I used on the PCB:
jujitsu_matrixB.jpg
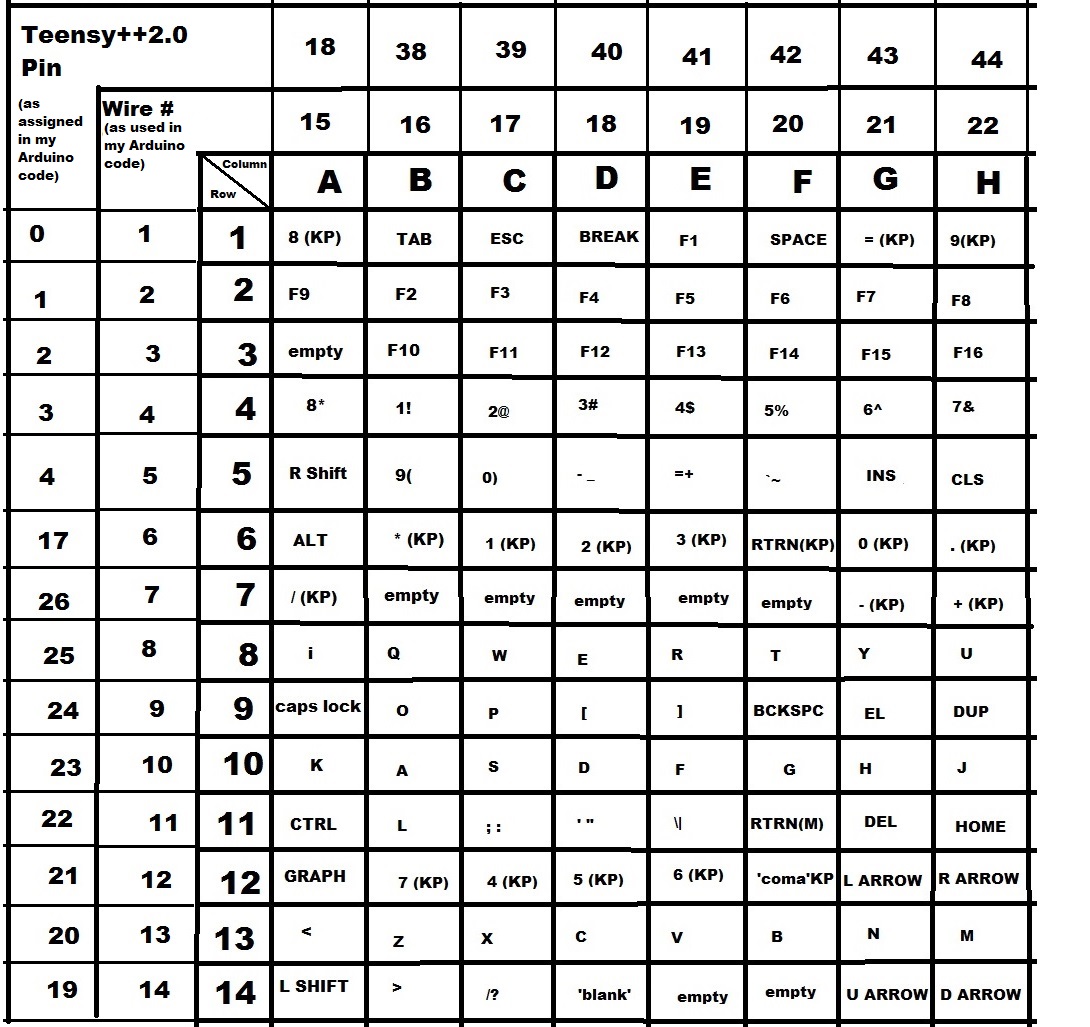
jujitsu_matrixB.jpg (283.6 KiB) Viewed 4906 times
Fujits_PCB_pinout.jpg
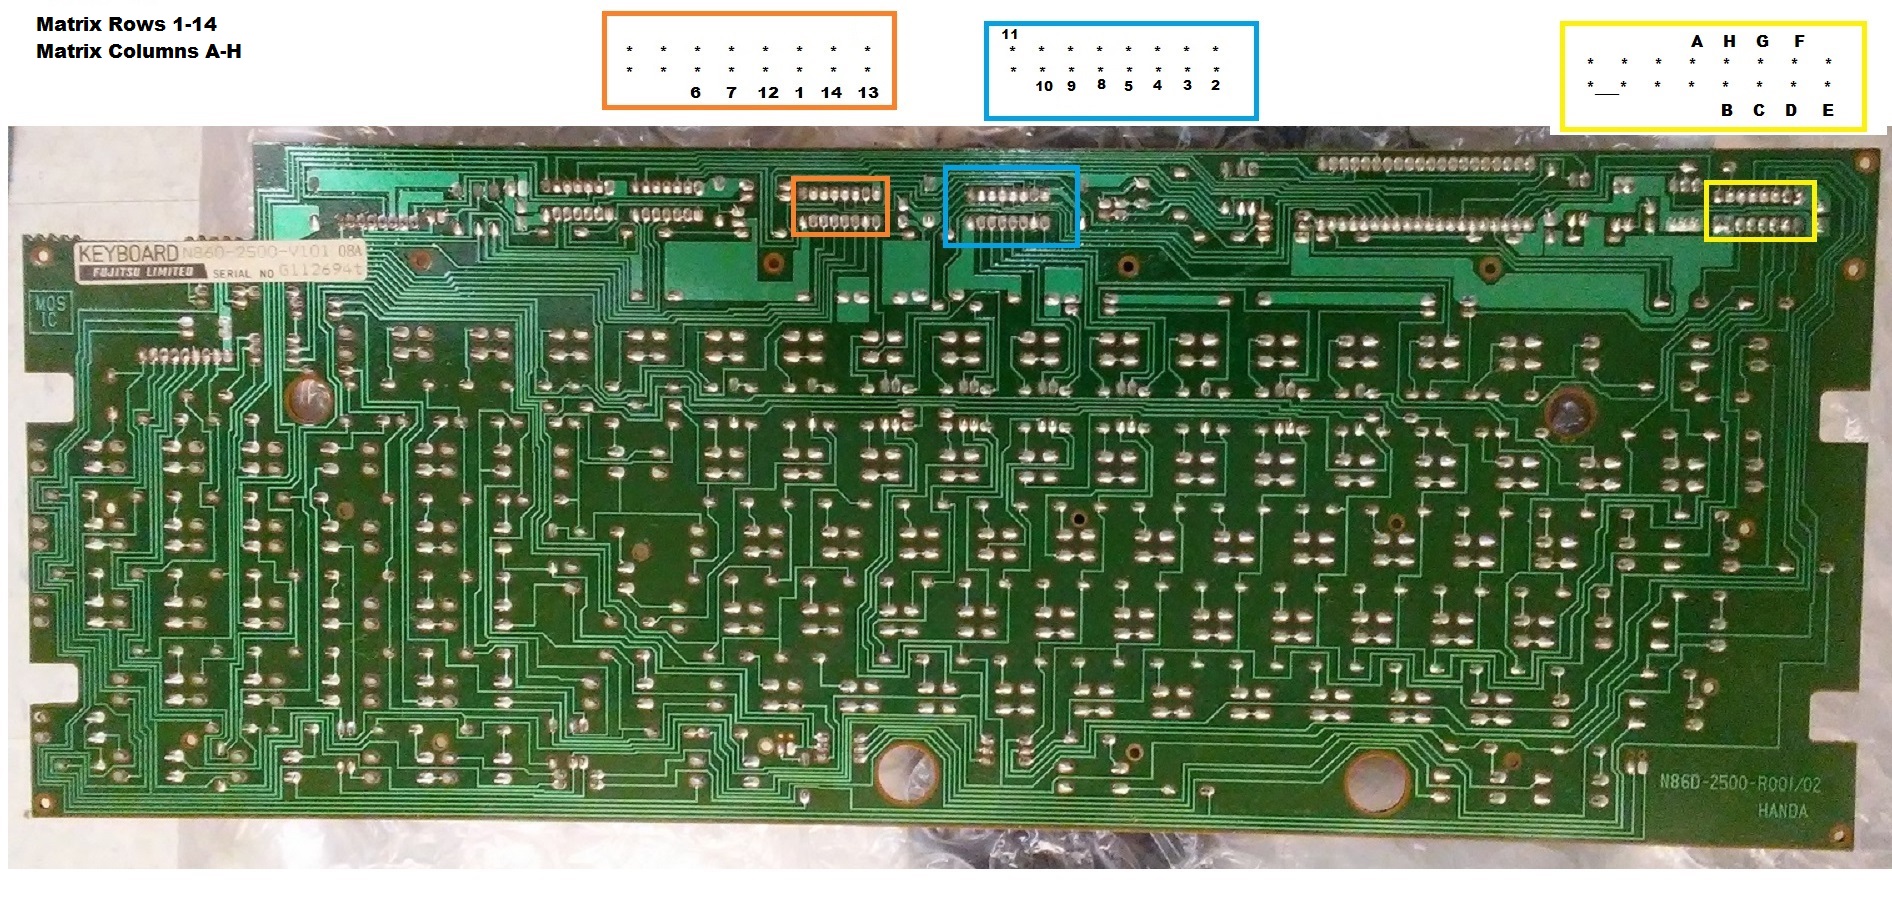
Fujits_PCB_pinout.jpg (701.52 KiB) Viewed 4906 times

User avatar
seebart
Offtopicthority Instigator

08 Aug 2017, 11:03

Thanks for sharing your details for the pins, great job with that picture for the Teensy++2.0.

User avatar
OldIsNew

10 Aug 2017, 07:09

Finished with the wiring. The Teensy++ fit nicely where the main IC was. Typing on the board now.
wired.jpg
wired.jpg (266.73 KiB) Viewed 4840 times
case.jpg
case.jpg (204.17 KiB) Viewed 4840 times

User avatar
seebart
Offtopicthority Instigator

10 Aug 2017, 07:25

Nice work and check out what a pretty version of this Halvar got:
Spoiler:
Fujitsu (Medium).jpg
Fujitsu (Medium).jpg (232.54 KiB) Viewed 4832 times
other-news-f47/stuff-you-just-bought-t12067-1080.html

User avatar
Halvar

10 Aug 2017, 08:28

Great project OldIsNew, and thanks for documenting it so thorougly! I'm really inclined to get my soldering iron out on the weekend.

User avatar
Quartz64

23 Sep 2020, 09:10

Image
Thanks, OldIsNew! I've used your matrix pinout info to run QMK on this beautiful keyboard.
QMK link
Album

Post Reply

Return to “Workshop”