Page 1 of 2
IBM AT (quasi)-restoration - Lot of pictures
Posted: 23 Dec 2014, 22:18
by idollar
Hi,
- In this post you can find a similar thread that shows the restoration of an IBM 122-Model-F that I did.
- Here there is a link tp a similar post on my IBM 1390120.
Today I am posting a (large) set of pictures of my IBM AT restoration process. It consisted actually in two basic things: new foam and a flipper replacement.
There is nothing here that cannot be found somewhere else, but I guessed that some people may be interested in having all these pictures together.
Special thanks go to
andrewjoy and
0100010, who kindly offered flippers after my post
here.
The index follows :
Attached you can find the compilation in a tar.bz2 file.
Posted: 23 Dec 2014, 22:25
by idollar
parts - 01 - Top Metal Plate
Back to index
Posted: 23 Dec 2014, 22:28
by idollar
parts - 02 - Barrel
Back to index
Posted: 23 Dec 2014, 22:32
by idollar
parts - 03 - Space Bar
Back to index
Posted: 23 Dec 2014, 22:35
by idollar
parts - 04 - Keycap with stabilizer
Back to index
Posted: 23 Dec 2014, 22:37
by idollar
parts - 05 - Keycap
Back to index
Posted: 23 Dec 2014, 22:39
by idollar
parts - 06 - Controller
Back to index
Posted: 23 Dec 2014, 22:41
by idollar
parts - 07 - Main PCB
Back to index
Posted: 23 Dec 2014, 22:44
by idollar
parts - 08 - Bottom Metal Plate
Back to index
Posted: 23 Dec 2014, 22:52
by idollar
parts - 09 - Foam
Back to index
Posted: 23 Dec 2014, 22:54
by idollar
parts - 10 - Stickers
Back to index
Posted: 23 Dec 2014, 22:57
by idollar
parts - 11 - Case
Back to index
Posted: 23 Dec 2014, 22:59
by idollar
parts - 12 - Screewdrive  Back to index
These are not 5,5. I do not have a screw-driver. A mechanical pencil helped here.
Posted: 23 Dec 2014, 23:03
by idollar
parts - 13 - LEDs PCB
Back to index
Posted: 23 Dec 2014, 23:03
by Madhias
Really a lot of pictures! It seems to be in a very good condition.
I made the mistake with my AT to put everything back together after disassembling, but did not mount the space bar first...
Posted: 23 Dec 2014, 23:05
by idollar
mount - 01 foam and metal plate
Back to index
Posted: 23 Dec 2014, 23:08
by idollar
mount - 02 - barrels
Back to index
Posted: 23 Dec 2014, 23:13
by idollar
mount - 03 - Empty Barrels
Back to index
I know, I missed the enter key paper. I was lucky to realise on the mistake before mounting back the back metal plate
Posted: 23 Dec 2014, 23:16
by idollar
mount - 04 - Flippers
Back to index
This is the flipper that I tried to repair. The glue would not hold !!
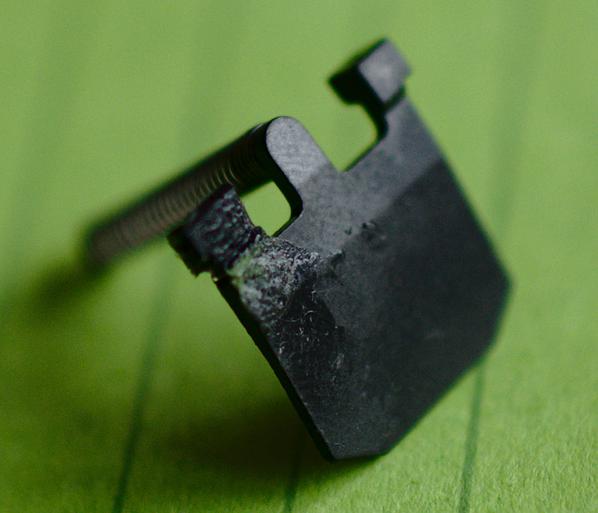
- DSC_7658_small.jpg (56.18 KiB) Viewed 14412 times
Posted: 23 Dec 2014, 23:18
by idollar
mount - 05 - Keycaps
Back to index
Posted: 23 Dec 2014, 23:21
by idollar
mount - 06 - Assembly
Back to index
Posted: 23 Dec 2014, 23:23
by idollar
mount - 07 - Final Result
Back to index
Posted: 23 Dec 2014, 23:24
by idollar
THE END

Posted: 23 Dec 2014, 23:52
by photekq
Thanks for the detailed gallery idollar!
Beautiful board you have there. I've wanted one for some time now..
Posted: 24 Dec 2014, 00:05
by Touch_It
Great photos. I really want one as well. I think if I did get one though I would mod the layout to as close to ansi as I could get. I really like giant enter keys but for whatever reason, IMO it feels out of place on a IBM board. On another note, what did you use for foam, and it looks like your mechanical pencil trick for a hex driver worked really well for you. Thumbs up for ingenuity.
Posted: 24 Dec 2014, 00:11
by idollar
The foam that I use was actually the plastic that the seller used to wrap up the keyboard !
It was not thick enough, so I simply fold it. You can see it
here. It is the last picture on this section. I also used to avoid scratches in the wooden floor
I punched bigger holes using a 16mm = 5/8 punch tool from the local hardware shop (Bauhaus).
It actually works very nicely.
I have collected another set of foam that was used to cover the screens of the new computers at work. It is very similar.
Posted: 24 Dec 2014, 01:53
by andrewjoy
Glad to see it working
Posted: 24 Dec 2014, 02:05
by idollar
andrewjoy wrote: Glad to see it working
" 0/Ins" is yours

Posted: 24 Dec 2014, 02:50
by andrewjoy
that parts xt has now saved 4 boards not bad for 12 GBP still have loads of parts left
122 ansi conversion
your AT
my other XT
another users XT
Posted: 22 Jan 2015, 07:51
by seebart
these are THE best lot of detail pictures on the IBM AT I have ever seen, excellent for reference!
Thanks idollar!