Page 1 of 2
Help with 1990s laptop keyboard.
Posted: 23 Jan 2015, 23:14
by ViciousPenguin
Hi,
I have a pair of old ICL NB386S laptops circa 1992 and I have managed to cobble together a single working machine from the pair. I wanted to cram a single-board-computer such as a raspberry pi and an lcd into the case of the non-functioning laptop and naturally I want to use the original keyboard.
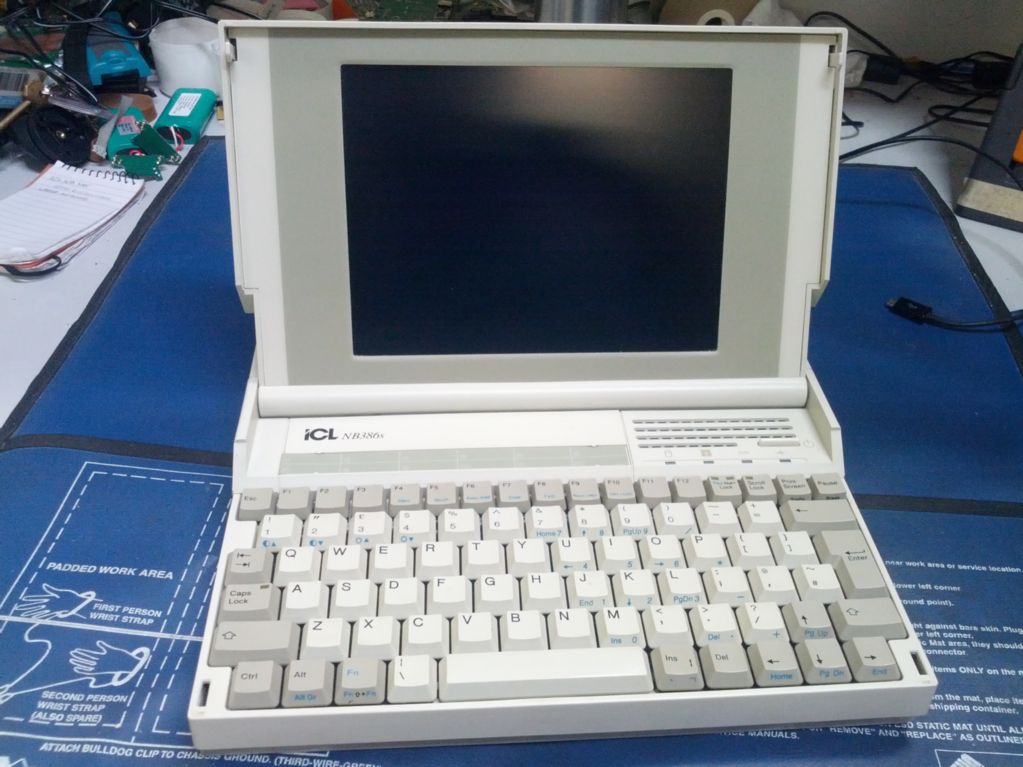
- laptop.jpg (113.51 KiB) Viewed 7016 times
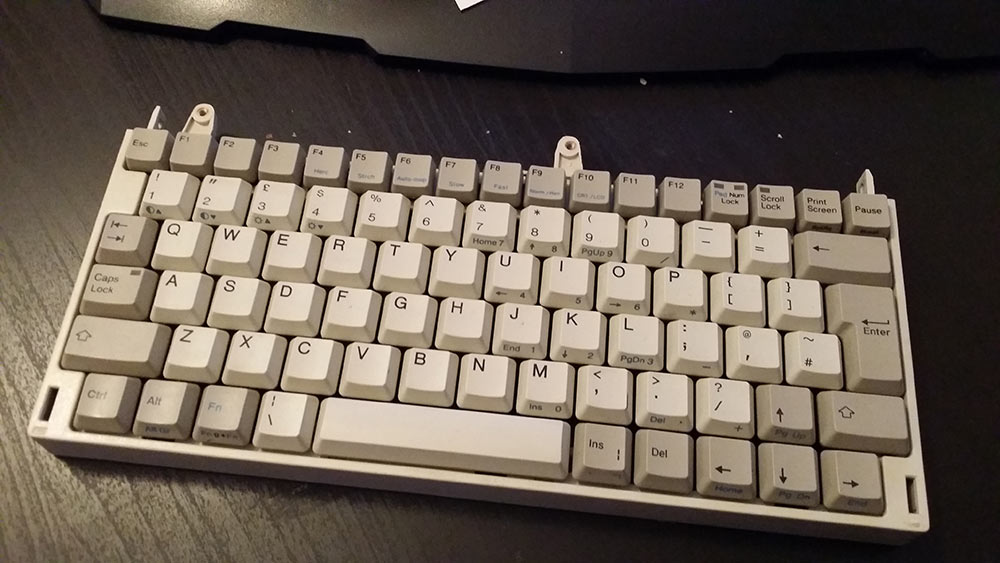
- keyboard.jpg (94.55 KiB) Viewed 7016 times
I'm somewhat of a novice when it comes to software and I have run into a dead-end trying to figure out what I need to do and how to program the keyboard.
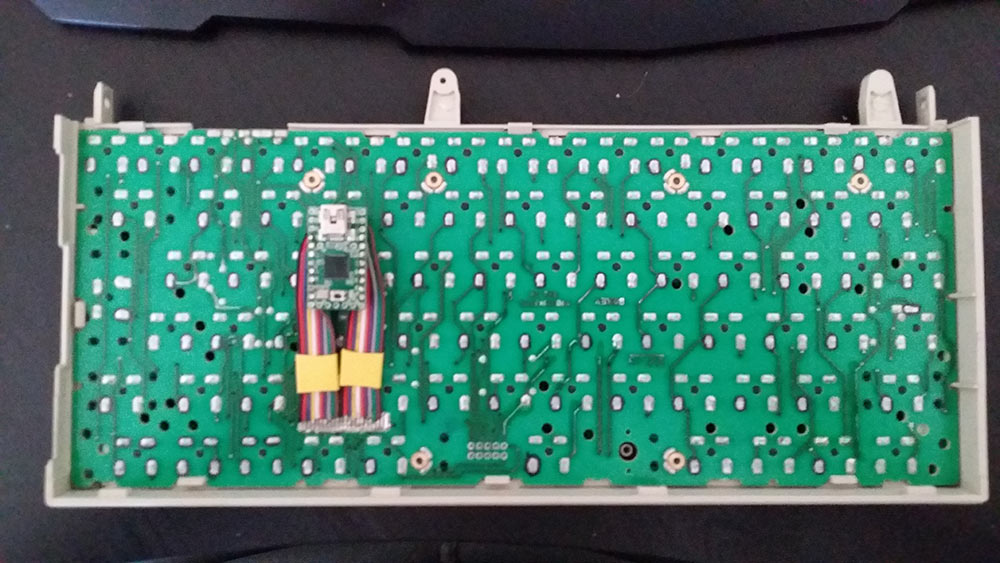
I have used a teensy 2.0 and connected it to the keyboard. I have mapped out the keyboard matrix so I know what all the connections are and how the connect to the teensy.
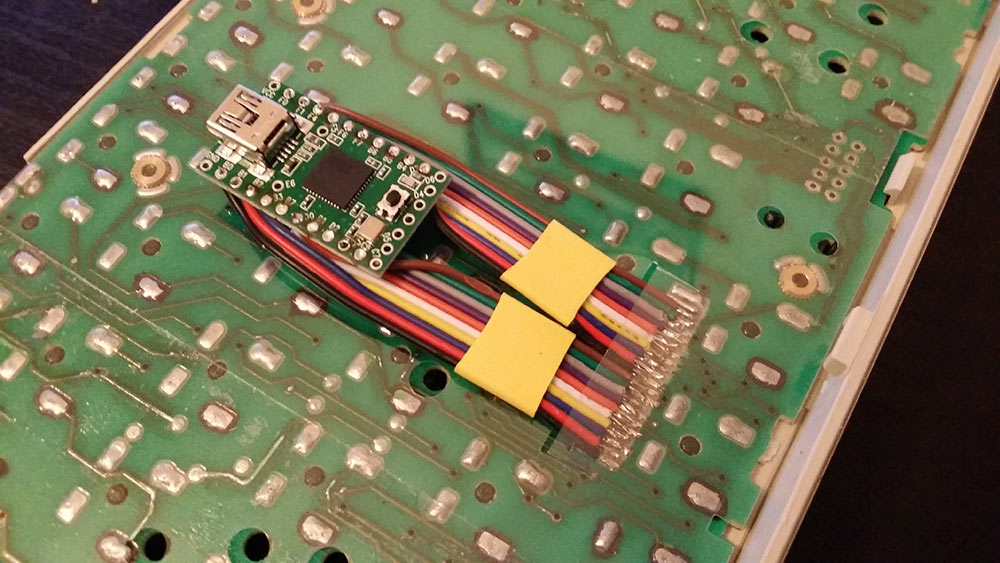
- teensy.jpg (124.45 KiB) Viewed 7016 times
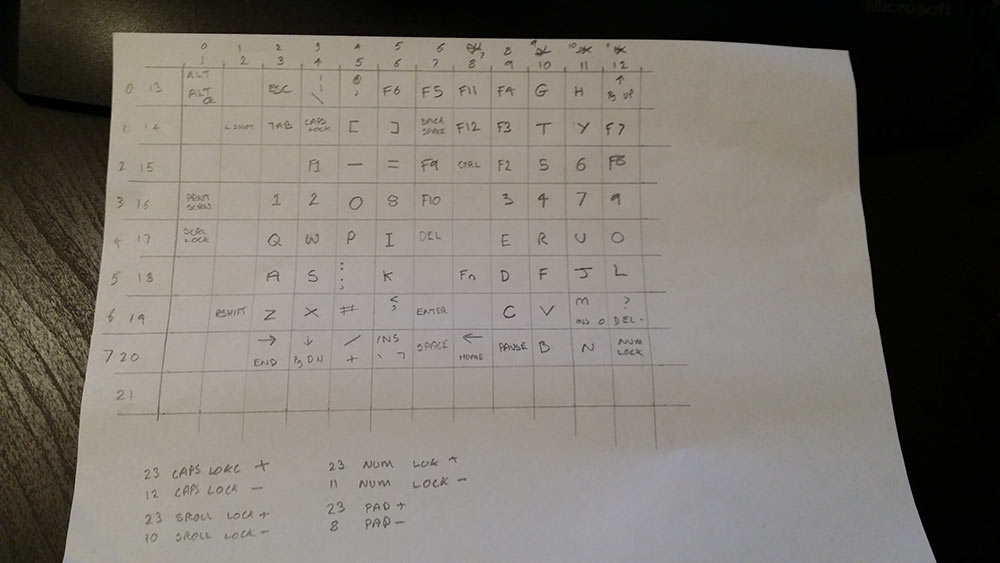
- matrix.jpg (55.47 KiB) Viewed 7016 times
I have been scratching my head about the software, there is plenty of information about the hardware side of things but when it comes to the software I'm a little lost.
I humbly ask for some assistance, I have a bucket of beer tokens to hand out in return

Thanks,
Greg
Posted: 23 Jan 2015, 23:17
by scottc
You seem to be pretty well on top of the hardware side, so I don't imagine the software will give you too much hassle. Check out TMK:
https://github.com/tmk/tmk_keyboard
Otherwise, Soarer's controller is good too -
http://deskthority.net/workshop-f7/soar ... t6767.html
Best of luck and let us know how it turns out!
Oh, and welcome to DT!
Posted: 23 Jan 2015, 23:46
by ViciousPenguin
Thank you sir,
I shall keep the thread updated......
Posted: 24 Jan 2015, 00:22
by Muirium
Looks like you know what you're doing. You even managed to avoid the demon pin D6! You should have this sweet wee board up and running in no time.
Posted: 24 Jan 2015, 00:33
by ViciousPenguin
I have read through quite a bit of documentation relating to the mechanical side and the wiring and avoiding the LED was a common point
I'm still scratching my head over the software side of things though.....
Posted: 24 Jan 2015, 00:58
by Muirium
I'm a bit of a simpleton when it comes to code, but
Soarer's Controller works nicely for me. Download his zip file (and the zip(s) for his
Converter, which it's a branch from) and read the docs. He does a nice job with those.
Here's a peek of what you can do:
Code: Select all
# Muirium's Shiny 60%

# Todo:
# Swap # and £ so I can keep UK layout in software but macth caps?
# Better layout of function and media keys, where my fingers expect them to be.
# Integrate full numpad on some layer for keyboard mouse control.
# Quick Ctrl+F-keys.

matrix
	scanrate 1
	debounce 5
	blocking 0

	sense			PF7			PB6		PB5		PB4			PD7			PC7		PC6			PD3			PD2			PD1		PD0			PB7			PB3			PB2			PB1				PB0
	strobe	PF0		esc			1		2		3			4			5		6			7			8			9		0			minus		equal		back_quote	system_power	UNASSIGNED
	strobe	PF1		tab			q		w		e			r			t		y			u			i			o		p			left_brace	right_brace	UNASSIGNED	backspace		UNASSIGNED
	strobe	PF4		fn1			a		s		d			f			g		h			j			k			l		semicolon	quote		UNASSIGNED	enter		UNASSIGNED		UNASSIGNED
	strobe	PF5		lshift		z		x		c			v			b		n			m			comma		period	slash		UNASSIGNED	rshift		UNASSIGNED	FN2				UNASSIGNED
	strobe	PF6		lctrl		lalt	lgui	UNASSIGNED	UNASSIGNED	space	UNASSIGNED	UNASSIGNED	UNASSIGNED	rgui	ralt		UNASSIGNED	rctrl		UNASSIGNED	pad_enter		UNASSIGNED
end

layerblock
	FN1 		1
	FN2 		1		# One for each hand, where available
	FN1 FN2		2		# Press them both for a hard to reach second layer
endblock

# Layerin' time
remapblock
layer 1

	# 	HHKB Arrows
	LEFT_BRACE 	UP
	SEMICOLON 	LEFT
	SLASH 		DOWN
	QUOTE 		RIGHT
	L 			PAGE_UP
	PERIOD 		PAGE_DOWN
	K 			HOME
	COMMA 		END
	H 			PAD_ASTERIX
	J 			PAD_SLASH
	N			PAD_PLUS
	M			PAD_MINUS

# 	ESDF Arrows
	E			UP
	S			LEFT
	D			DOWN
	F			RIGHT
	R			PAGE_UP
	V			PAGE_DOWN
	A			HOME
	G			END

	# 	Media keys across the number row
	1			F14					# Decrease Display Brightness
	2			F15					# Increase Display Brightness
	3			F10					# Exposé: All App Windows
	4			F12					# Dashboard
	5			F11					# Exposé: Show Desktop
	6			F9					# Exposé: All Windows in All Apps
	7			MEDIA_PREV_TRACK	# iTunes / media playback controls
	8			MEDIA_PLAY_PAUSE
	9			MEDIA_NEXT_TRACK
	0			MEDIA_MUTE			# Volume controls
	MINUS		MEDIA_VOLUME_DOWN
	EQUAL		MEDIA_VOLUME_UP

#	Maybe use the two function layer keys differently to resole this clash.

#	Specifically Shiny
	backspace		delete
	ralt			left			# The sneaky inerted T arrow cluster
	rshift			up				# Perhaps put this on layer zero?
	rctrl			down
	pad_enter		right
	system_power	f24				# To use macros against this key in layer 1
endblock

remapblock
layer 2
	# 	Don't forget the media keys. Contention here on what goes on layer 1.

	# 	Function row across the number row
	Esc			EUROPE_2
	1			F1
	2			F2
	3			F3
	4			F4
	5			F5
	6			F6
	7			F7
	8			F8
	9			F9
	0			F10
	minus		F11
	equal		F12
	back_quote	F13

endblock


macroblock
	# Command + Escape = Command + Section break (for app window cycling)
	macro ESC gui -ctrl -alt
	press EUROPE_2
	endmacro

	# Soarer's Double Shift Caps Lock
	macro lshift rshift
	press caps_lock
	endmacro

	macro rshift lshift
	press caps_lock
	endmacro

	# Apple style Control + Corner Arrow shortcuts for Shiny

	# Page Up
	macro up lctrl
	press page_up
	endmacro

	# Page Down
	macro down lctrl
	press page_down
	endmacro

	# Home
	macro left lctrl
	press home
	endmacro

	# End
	macro right lctrl
	press end
	endmacro

	# Fn + Power = Ctrl + Cmd + Opt + 8 (Negative / night colours mode)
 	macro f24 -shift
 	push_meta set_meta rgui ralt rctrl
 	press 8
 	pop_meta
 	endmacro

 	# Shift + Fn + Power = Ctrl + Cmd + Opt + I (Isolator darkness mode)
 	macro f24 shift
 	push_meta set_meta rgui ralt rctrl
 	push_meta clear_meta lshift rshift
 	press I
 	pop_meta
 	pop_meta
 	endmacro

endblock
You don't need to do *all* of that stuff, of course. Only the initial matrix part. The layer and macro functionality is inherited from his converter, and I'm already familiar with it so dive right in.
Posted: 24 Jan 2015, 12:12
by ViciousPenguin
Thanks,
I'll have a crack at it over the weekend
Posted: 24 Jan 2015, 13:03
by ViciousPenguin
Progress, of sorts..
I have the matrix detection working and everything has flashed to the teensy.
hid_listen seems to only pick up four key presses G, H, T & Y the rest don't seem to do anything.
T = \4E /4E
Y = \06 /06
G = \4D /4D
H = \05 /05
I took out a pair of resistor arrays when I was prepping the keyboard, should they go back in?
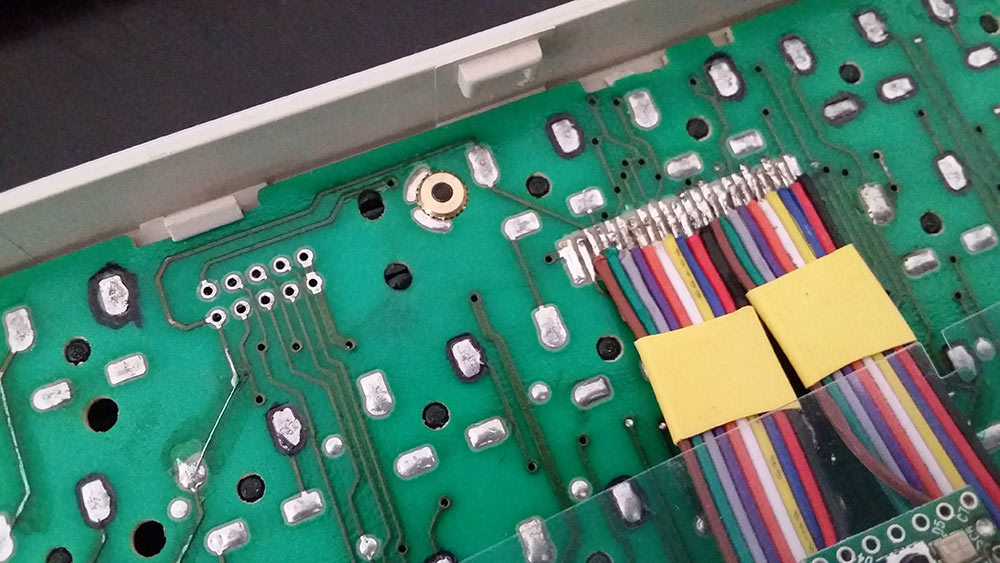
- array.jpg (125.32 KiB) Viewed 6929 times
- circuit.jpg (121.56 KiB) Viewed 6929 times
Posted: 24 Jan 2015, 13:16
by Muirium
Each switch has a diode paired with it. You might have polarity issues.
Also, if you're using Soarer's Controller: you need to define a matrix for those keys to show up on hid_listen. Or that's what I remember, anyway.
Posted: 24 Jan 2015, 14:23
by Daniel Beardsmore
Just curious — what switches are those? ICL switches?
Posted: 24 Jan 2015, 18:06
by ViciousPenguin
I presume so. I have some photos from when I took it all apart but they are on my workshop pc and I can't get at them until Monday.
Posted: 29 Jan 2015, 10:15
by ViciousPenguin
I've dug out a photo of the keys...
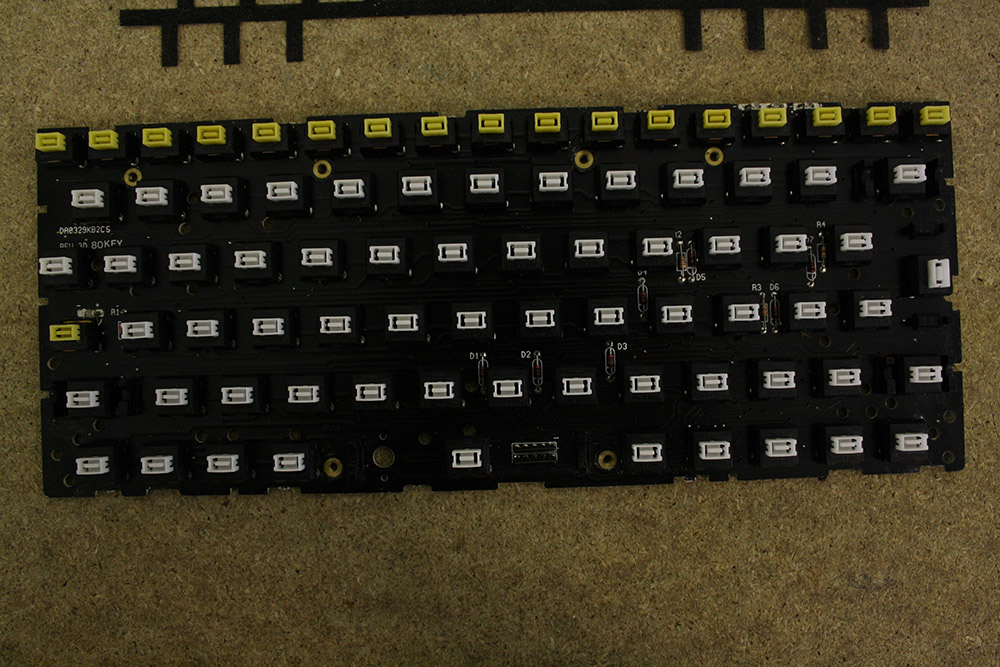
- keys.jpg (217.64 KiB) Viewed 6836 times
I'm going to undo the wiring I have done and reconnect it a row and column at a time and make sure it works with each new connection....
Posted: 29 Jan 2015, 16:39
by ViciousPenguin
So I have been doing some poking around and it would seem that the teensy is only recognising a few of the inputs even though the key-presses are happening.
Do the pins need to be enabled, or anything similar?
Posted: 29 Jan 2015, 16:54
by Muirium
Show us your configuration file!
Posted: 29 Jan 2015, 17:05
by ViciousPenguin
I'm using the kevex-blank file that comes as part of the archive. I have hid_listen.exe open listening for keypresses so Ic an build the matrix.
Code: Select all
# Blank matrix config for kevex ray 7000CM
# All keys UNASSIGNED to allow hid_listen output to be used to figure out the layout.
# http://geekhack.org/index.php?topic=17458.msg870218;topicseen#msg870218

matrix
	scanrate 1
	debounce 5

	sense			PB0			PB1		PB2			PB3		PB4		PB5			PB6			PB7
	strobe	PD7		UNASSIGNED	UNASSIGNED	UNASSIGNED	UNASSIGNED	UNASSIGNED	UNASSIGNED	UNASSIGNED	UNASSIGNED
	strobe	PE0		UNASSIGNED	UNASSIGNED	UNASSIGNED	UNASSIGNED	UNASSIGNED	UNASSIGNED	UNASSIGNED	UNASSIGNED
	strobe	PE1		UNASSIGNED	UNASSIGNED	UNASSIGNED	UNASSIGNED	UNASSIGNED	UNASSIGNED	UNASSIGNED	UNASSIGNED
	strobe	PC0		UNASSIGNED	UNASSIGNED	UNASSIGNED	UNASSIGNED	UNASSIGNED	UNASSIGNED	UNASSIGNED	UNASSIGNED
	strobe	PC1		UNASSIGNED	UNASSIGNED	UNASSIGNED	UNASSIGNED	UNASSIGNED	UNASSIGNED	UNASSIGNED	UNASSIGNED
	strobe	PC2		UNASSIGNED	UNASSIGNED	UNASSIGNED	UNASSIGNED	UNASSIGNED	UNASSIGNED	UNASSIGNED	UNASSIGNED
	strobe	PC3		UNASSIGNED	UNASSIGNED	UNASSIGNED	UNASSIGNED	UNASSIGNED	UNASSIGNED	UNASSIGNED	UNASSIGNED
	strobe	PC4		UNASSIGNED	UNASSIGNED	UNASSIGNED	UNASSIGNED	UNASSIGNED	UNASSIGNED	UNASSIGNED	UNASSIGNED
	strobe	PC5		UNASSIGNED	UNASSIGNED	UNASSIGNED	UNASSIGNED	UNASSIGNED	UNASSIGNED	UNASSIGNED	UNASSIGNED
	strobe	PC6		UNASSIGNED	UNASSIGNED	UNASSIGNED	UNASSIGNED	UNASSIGNED	UNASSIGNED	UNASSIGNED	UNASSIGNED
	strobe	PC7		UNASSIGNED	UNASSIGNED	UNASSIGNED	UNASSIGNED	UNASSIGNED	UNASSIGNED	UNASSIGNED	UNASSIGNED

	unstrobed -PD0	UNASSIGNED
	unstrobed -PD1	UNASSIGNED
	unstrobed -PD2	UNASSIGNED
Posted: 29 Jan 2015, 17:08
by Muirium
All those UNASSIGNED matrix points: assign them to something!
I assume you've set the pins to the appropriate values for your rows and columns, too.
Posted: 29 Jan 2015, 17:39
by ViciousPenguin
Err Nope, all I've done is upload the firmware, and then send the kevex.blank file to the teensy via scaswr.bat
This is what I am asking about....
Posted: 29 Jan 2015, 17:43
by Halvar
You can test your software configuration with a short piece of wire by connecting two pins directly on the teensy and looking if hid_listen turns out the expected result (row/column).
If you have a multimeter, you can also check your wiring by measuring the resistance between teensy pins when you press a key. It should go down to a few Ohms (from the diode) when a key is pressed.
The resistors are probably not part of the matrix, so I would leave them out.
Posted: 29 Jan 2015, 17:50
by Halvar
Oh, you have to edit the kevex file according to your matrix. You can leave the keys unassigned for first tests, but you have to edit the teensy pin names (PB0, PB1, ..., PB7, PC0, PC1 ... PC7, ...):
The columns are the pins that the current flows to. The diodes should have their cathodes (marked by the printed rings on the diodes) in the logical direction of these pins:
Code: Select all
sense PB0 PB1 PB2 PB3 PB4 PB5 PB6 PB7
Replace PBO PB1 etc. by the pins you're using for that.
These are the pins that the current flows from (rows of the matrix):
Code: Select all
strobe   PD7      UNASSIGNED   UNASSIGNED   UNASSIGNED   UNASSIGNED   UNASSIGNED   UNASSIGNED   UNASSIGNED   UNASSIGNED
   strobe   PE0      UNASSIGNED   UNASSIGNED   UNASSIGNED   UNASSIGNED   UNASSIGNED   UNASSIGNED   UNASSIGNED   UNASSIGNED
   strobe   PE1      UNASSIGNED   UNASSIGNED   UNASSIGNED   UNASSIGNED   UNASSIGNED   UNASSIGNED   UNASSIGNED   UNASSIGNED
   strobe   PC0      UNASSIGNED   UNASSIGNED   UNASSIGNED   UNASSIGNED   UNASSIGNED   UNASSIGNED   UNASSIGNED   UNASSIGNED
   strobe   PC1      UNASSIGNED   UNASSIGNED   UNASSIGNED   UNASSIGNED   UNASSIGNED   UNASSIGNED   UNASSIGNED   UNASSIGNED
   strobe   PC2      UNASSIGNED   UNASSIGNED   UNASSIGNED   UNASSIGNED   UNASSIGNED   UNASSIGNED   UNASSIGNED   UNASSIGNED
   strobe   PC3      UNASSIGNED   UNASSIGNED   UNASSIGNED   UNASSIGNED   UNASSIGNED   UNASSIGNED   UNASSIGNED   UNASSIGNED
   strobe   PC4      UNASSIGNED   UNASSIGNED   UNASSIGNED   UNASSIGNED   UNASSIGNED   UNASSIGNED   UNASSIGNED   UNASSIGNED
   strobe   PC5      UNASSIGNED   UNASSIGNED   UNASSIGNED   UNASSIGNED   UNASSIGNED   UNASSIGNED   UNASSIGNED   UNASSIGNED
   strobe   PC6      UNASSIGNED   UNASSIGNED   UNASSIGNED   UNASSIGNED   UNASSIGNED   UNASSIGNED   UNASSIGNED   UNASSIGNED
   strobe   PC7      UNASSIGNED   UNASSIGNED   UNASSIGNED   UNASSIGNED   UNASSIGNED   UNASSIGNED   UNASSIGNED   UNASSIGNED
Replace PD7 PE0 PE1 ... by the pins that you're using.
If you have that, you can test your wiring by pressing keys, and hid_listen gives you the row and column of the key that you pressed.
Posted: 29 Jan 2015, 17:55
by ViciousPenguin
Ah ok, I knew it would be something simple!
I'll have to carry on tomorrow and report back........
Posted: 29 Jan 2015, 18:07
by Muirium
Halvar knows better than me then. I never even tried an all UNASSIGNED config file, so I didn't realise hid_listen can see those. I always start with the final matrix!
Posted: 29 Jan 2015, 18:41
by Halvar
That function is a very nice goodie from Soarer, spares you a lot of time following traces ...
Posted: 29 Jan 2015, 19:13
by Daniel Beardsmore
Curses. Another SKFS keyboard with a non-Alps PCB.
The white switches are clicky, right? The series name for the yellow ones is unknown — SKFR is offically linear (per the 1994 Alps catalogue) but nobody knows whether the black ones are linear or not, only that the white ones are clicky and possibly also tactile. The yellow ones will be linear though.
Posted: 29 Jan 2015, 19:36
by ViciousPenguin
I have two of the keyboards if some poking around inside the keys is required.
Can you expand on 'clicky' they all feel pretty much the same to press.
Posted: 29 Jan 2015, 20:27
by Daniel Beardsmore
You must be new here … indeed! :)
"Clicky" means that if you press a key too slowly to hear any impact sound, it still emits a distinct click. Generally the pressure you feel against your finger disappears at the same time as you hear a click. In yours, there should be a small folded flat spring that is flexed and released, and it impacts on the inside of the switch after release with a sharp sound.
This is the switch series I'm thinking of: [wiki]Alps SKFR/SKFS[/wiki]
They're not widely documented, and your keyboards predate the only confirmed data on them, from 1994.
Posted: 29 Jan 2015, 20:30
by Muirium
Yup. Tactile switches are similar, but don't make an audible click, you just feel the bump instead. Linear switches, meanwhile, do neither; they just slide smoothly.
Posted: 29 Jan 2015, 20:40
by ViciousPenguin
Ah ok. I shall have a play again tomorrow and report back.....
Posted: 30 Jan 2015, 14:49
by ViciousPenguin
First off the white keys are clicky and the yellow are linear
Secondly I have rewired the keyboard and teensy together, and edited the configfile.
Code: Select all
matrix
	scanrate 1
	debounce 5

	sense			PC6			PD3			PD2			PD1			PD0			PB7			PB3			PB2			PB1			PB0			PD7 		PB4
	strobe	PB5		LALT		UNASSIGNED	ESC			BACKSLASH	BACK_QUOTE	F6			F5			F11			F4			G			H			UP
	strobe	PB6		UNASSIGNED	LSHIFT		TAB			CAPS_LOCK	LEFT_BRACE	RIGHT_BRACE	BACKSPACE	F12			F3			T			Y			F7
	strobe	PF7		UNASSIGNED	UNASSIGNED	UNASSIGNED	F1			MINUS		EQUAL		F9			LCTRL		F2			5			6			F8
	strobe	PF6		PRINTSCREEN	UNASSIGNED	1			2			0			8			F10			UNASSIGNED	3			4			7			9
	strobe	PF5		SCROLL_LOCK	UNASSIGNED	Q			W			P			I			DELETE		UNASSIGNED	E			R			U			O
	strobe	PF4		UNASSIGNED	UNASSIGNED	A			S			SEMICOLON	K			UNASSIGNED	FN1			D			F			J			L
	strobe	PF1		UNASSIGNED	RSHIFT		Z			X			BACKSLASH	COMMA		ENTER		UNASSIGNED	C			V			M			PERIOD
	strobe	PF0		UNASSIGNED	UNASSIGNED	RIGHT		DOWN		SLASH		INSERT		SPACE		LEFT		PAUSE		B			N			NUM_LOCK

	unstrobed -PD0	UNASSIGNED
	unstrobed -PD1	UNASSIGNED
	unstrobed -PD2	UNASSIGNED
end
There has been a massive improvement over the number of keys that now work!
It still isn't quite all of them but I have found a pattern to the fails, which I present below.

- matrix.jpg (60.54 KiB) Viewed 6680 times
The green ones work and the reds don't. The blue box is highlighted as the key assignment is set to BACKSLASH but it outputs #~. I need that key for PF1/PD0 for the # key which you will see BACKSLASH used twice in the matrix config file. I guess there is something wrong in the flashed hex file? I couldn't find anything in the docs for the #~ key apart from 3.
Am I right to assume that the errors are due to the polarities? Could it have something to do with the LEDs as the Num lock, Caps lock, Scroll lock and pad LEDs connect to the failing key columns?
Posted: 30 Jan 2015, 15:52
by Halvar
The thing about the LEDs is strange, they should not be connected to the matrix at all. There should be traces that go from the controller to each LED and from the LED through a resistor to GND, and they need their own output pins on the teensy, one for each of them.
Since most of the columns work I don't think there's a diode polarity problem.
Posted: 30 Jan 2015, 23:53
by Daniel Beardsmore
[FIN,ACK]