Difference between revisions of "Cherry G80-9009"
Jump to navigation
Jump to search
Ergomacros (talk | contribs) m (→Known variants) |
Ergomacros (talk | contribs) (→Pictures: added module compartment photo) |
||
| (7 intermediate revisions by the same user not shown) | |||
| Line 12: | Line 12: | ||
| interface = [[AT]] and [[PS/2]] | | interface = [[AT]] and [[PS/2]] | ||
| weight = | | weight = | ||
| − | | years = | + | | years = 1995 - 2005 |
| price = | | price = | ||
}} | }} | ||
| Line 18: | Line 18: | ||
==Features== | ==Features== | ||
| + | The Reuters model numbers for these are: AK-124 (older) and AK-125 (newer). | ||
| + | |||
The black legends are mostly double-shot (except for the LED window keys). Some legends are pad-printed. | The black legends are mostly double-shot (except for the LED window keys). Some legends are pad-printed. | ||
The space bar has the unusual length of 8 units (standard are 10, 7 or smaller). | The space bar has the unusual length of 8 units (standard are 10, 7 or smaller). | ||
| + | |||
| + | === Caps: === | ||
| + | |||
| + | Most are Double-shot ABS. "Super thick." | ||
| + | |||
| + | ===== The 11 caps with (LED) windows are pad-printed ===== | ||
| + | * Caps Lock | ||
| + | * Scroll Lock | ||
| + | * Num Lock | ||
| + | * (4) Scrn 1-4 | ||
| + | * Desk PC | ||
| + | * Calc | ||
| + | * Setup | ||
| + | * Wkst | ||
| + | |||
| + | * There are 2 more LEDs for the keys on either side of the space bar, but no windows for them to shine through. | ||
| + | |||
| + | |||
| + | === Case: === | ||
| + | |||
| + | * Top (51) keys are plate mounted | ||
| + | * Lower (main 98 keys) are PCB mounted | ||
| + | * Flip-out feet on bottom, at back | ||
| + | * Under the rectangular plate on the bottom (4 screws) is a 25 x 2 pin ribbon cable, connected to the main PCB, with one end loose. | ||
| + | |||
{{-}} | {{-}} | ||
==Pictures== | ==Pictures== | ||
[[File:G80-9009_001.jpg|640px|thumb|left|G80-9009.]] | [[File:G80-9009_001.jpg|640px|thumb|left|G80-9009.]] | ||
| + | [[File:Bottom_module_area.JPG|200px|thumb|left|G80-9009 module compartment]] | ||
{{-}} | {{-}} | ||
| Line 35: | Line 63: | ||
==How to disassemble== | ==How to disassemble== | ||
# Turn over, bottom side up. | # Turn over, bottom side up. | ||
| − | # Remove the 11 recessed screws in the bottom: 4 at the 'back' edge, 4 at the 'front' edge, one each on the left and right edge, and one dead-center. A couple may be under "Warranty voice if broken" stickers. All screws are the same size. | + | # Remove the 11 recessed screws in the bottom: 4 at the 'back' edge, 4 at the 'front' edge, one each on the left and right edge, and one dead-center. A couple may be under "Warranty voice if broken" stickers. All screws are the same size. |
| + | # Note: There is no need to remove the four screws securing a plastic, rectangular plate. | ||
# Turn the keyboard right-side-up, with its the back away from you. (Normal typing position) and pretending the back edge is hinged lift the front edge up. Watching the many wires between the top and bottom find a stable position for the top. | # Turn the keyboard right-side-up, with its the back away from you. (Normal typing position) and pretending the back edge is hinged lift the front edge up. Watching the many wires between the top and bottom find a stable position for the top. | ||
# Inside there are three PCBs: the main set of keys keyboard (0-9, A-Z, Num pad, etc.), the Function keys (F1-F24 and related), and finally the "main" PCB which contains more logic, ROMs, and the 3 DB ports that are exposed in the back. | # Inside there are three PCBs: the main set of keys keyboard (0-9, A-Z, Num pad, etc.), the Function keys (F1-F24 and related), and finally the "main" PCB which contains more logic, ROMs, and the 3 DB ports that are exposed in the back. | ||
Latest revision as of 17:41, 23 January 2018
This article is a stub. You can help Deskthority by expanding it.
| This article requires photographic illustration |
 | |
| Branding | Reuters |
|---|---|
| Manufacturer | Cherry |
| Features | 149 keys, n-key rollover, LC-display |
| Layouts | G80-2000/2100 plus extra function keys |
| Keyswitches | Cherry MX |
| Interface | AT and PS/2 |
| Years of production | 1995 - 2005 |
Contents
Features
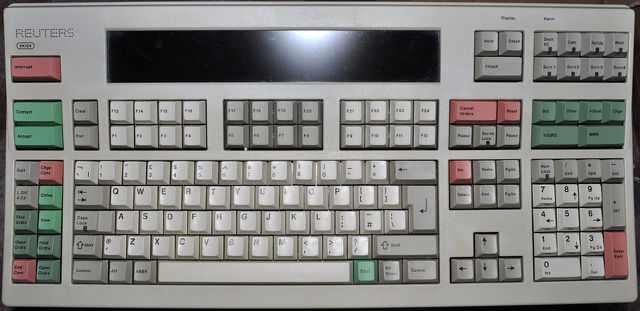
The Reuters model numbers for these are: AK-124 (older) and AK-125 (newer).
The black legends are mostly double-shot (except for the LED window keys). Some legends are pad-printed.
The space bar has the unusual length of 8 units (standard are 10, 7 or smaller).
Caps:
Most are Double-shot ABS. "Super thick."
The 11 caps with (LED) windows are pad-printed
   * Caps Lock
   * Scroll Lock
   * Num Lock
   * (4) Scrn 1-4
   * Desk PC
   * Calc
   * Setup
   * Wkst
- There are 2 more LEDs for the keys on either side of the space bar, but no windows for them to shine through.
Case:
- Top (51) keys are plate mounted
- Lower (main 98 keys) are PCB mounted
- Flip-out feet on bottom, at back
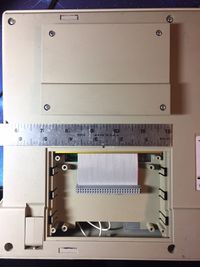
- Under the rectangular plate on the bottom (4 screws) is a 25 x 2 pin ribbon cable, connected to the main PCB, with one end loose.
Pictures
Known variants
- G80-9009 HAU (UK-layout).
- G80-9039HAAUS - Newer model, uses Surface mounted technology (SMT) on the PCBs.
- Depending on age, these keyboards come with either of two Reuters logos.
How to disassemble
- Turn over, bottom side up.
- Remove the 11 recessed screws in the bottom: 4 at the 'back' edge, 4 at the 'front' edge, one each on the left and right edge, and one dead-center. A couple may be under "Warranty voice if broken" stickers. All screws are the same size.
- Note: There is no need to remove the four screws securing a plastic, rectangular plate.
- Turn the keyboard right-side-up, with its the back away from you. (Normal typing position) and pretending the back edge is hinged lift the front edge up. Watching the many wires between the top and bottom find a stable position for the top.
- Inside there are three PCBs: the main set of keys keyboard (0-9, A-Z, Num pad, etc.), the Function keys (F1-F24 and related), and finally the "main" PCB which contains more logic, ROMs, and the 3 DB ports that are exposed in the back.
- To separate the keyboard PCBs from the "main" PCB undo the gray ribbon cables at the "main" PCB end.
- There are grounding straps, but no screws holding in the main set of keys keyboard. If you undo the grounding straps it can be lifted out.
- Additional screws hold down the "main" PCB and Function keys PCB.

