To save an Unsaver

quantalume

27 Oct 2014, 15:53

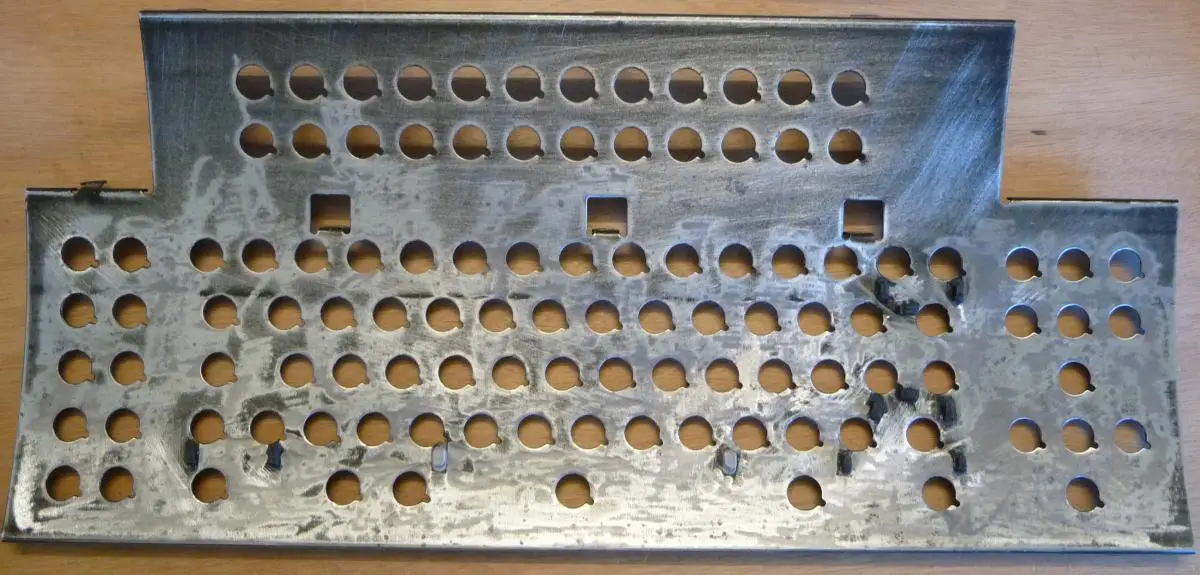
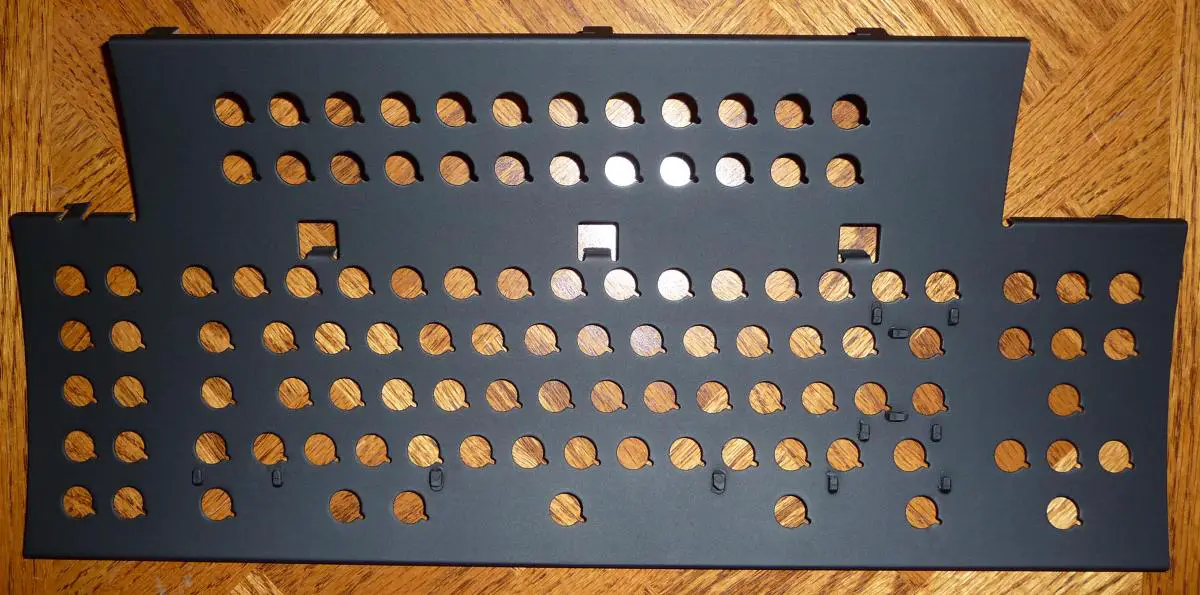
I made good progress over the weekend. First, I removed all of the rust from the top plate, using a bandfile for the heavily-rusted areas and emery cloth for the rest.
P1020693_cr.jpg
P1020693_cr.jpg (129.88 KiB) Viewed 4983 times
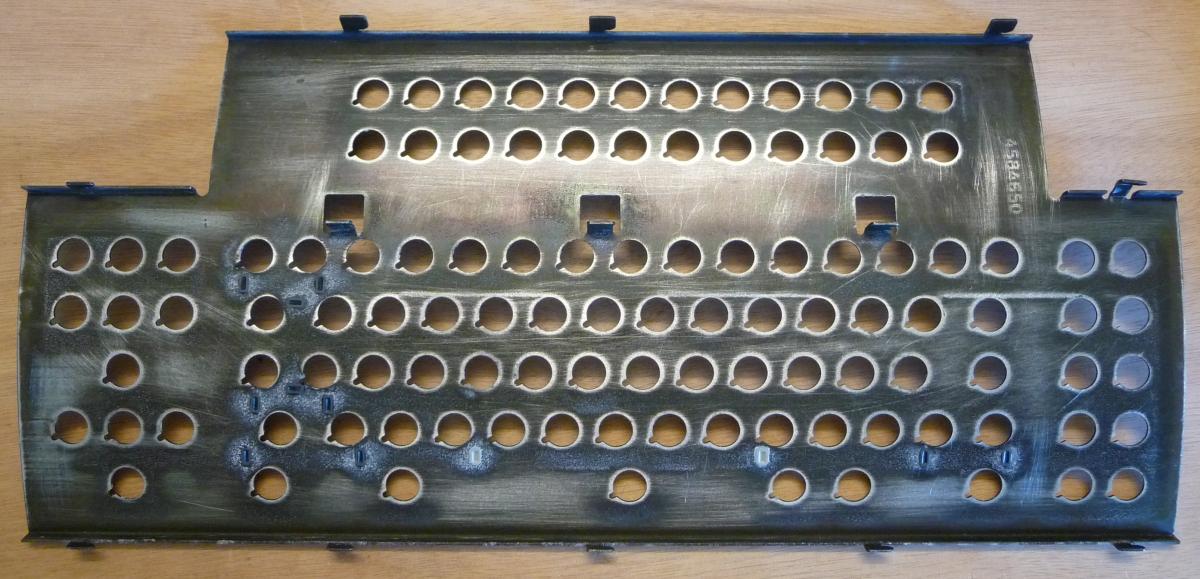
There was a lot of foam crusted onto the back of the plate, so I sanded the other side as well.
P1020695_cr.jpg
P1020695_cr.jpg (132.88 KiB) Viewed 4983 times
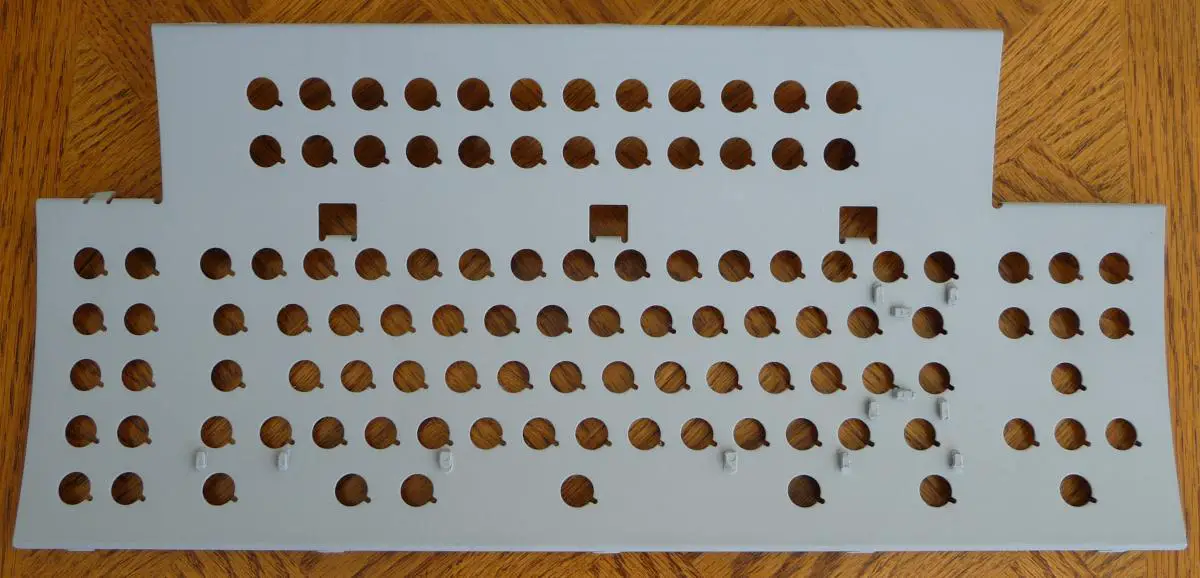
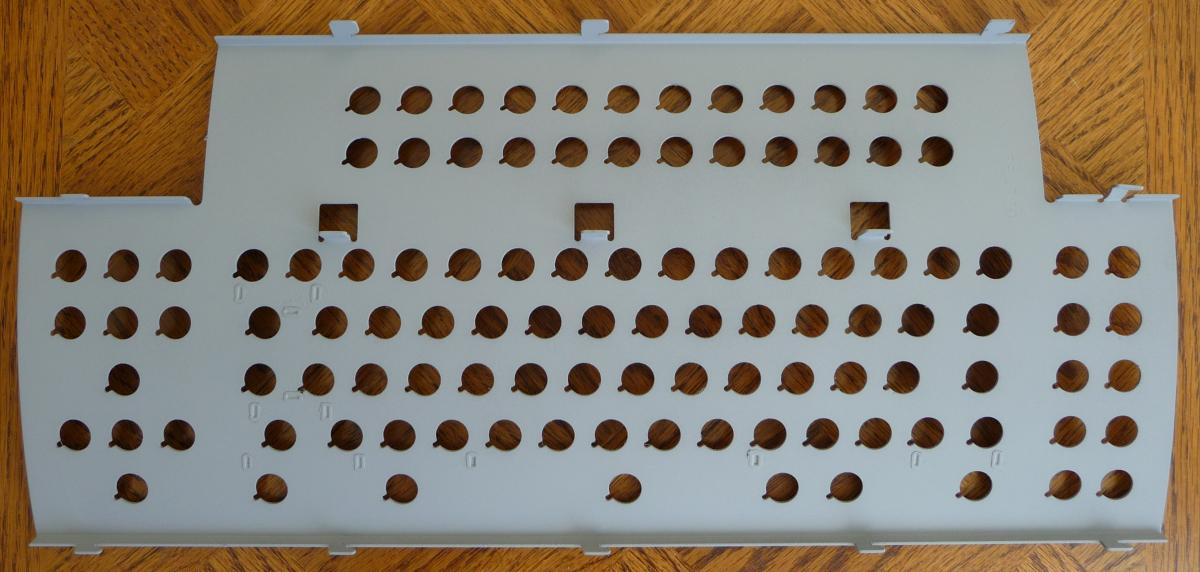
Next, I used two coats of an automotive primer with rust inhibitors to thoroughly cover both sides and all edges.
P1020701_cr.jpg
P1020701_cr.jpg (97.94 KiB) Viewed 4983 times
P1020704_cr.jpg
P1020704_cr.jpg (97.2 KiB) Viewed 4983 times
After drying overnight, I sanded lightly and followed up with two top coats.
P1020709_cr.jpg
P1020709_cr.jpg (132.68 KiB) Viewed 4983 times
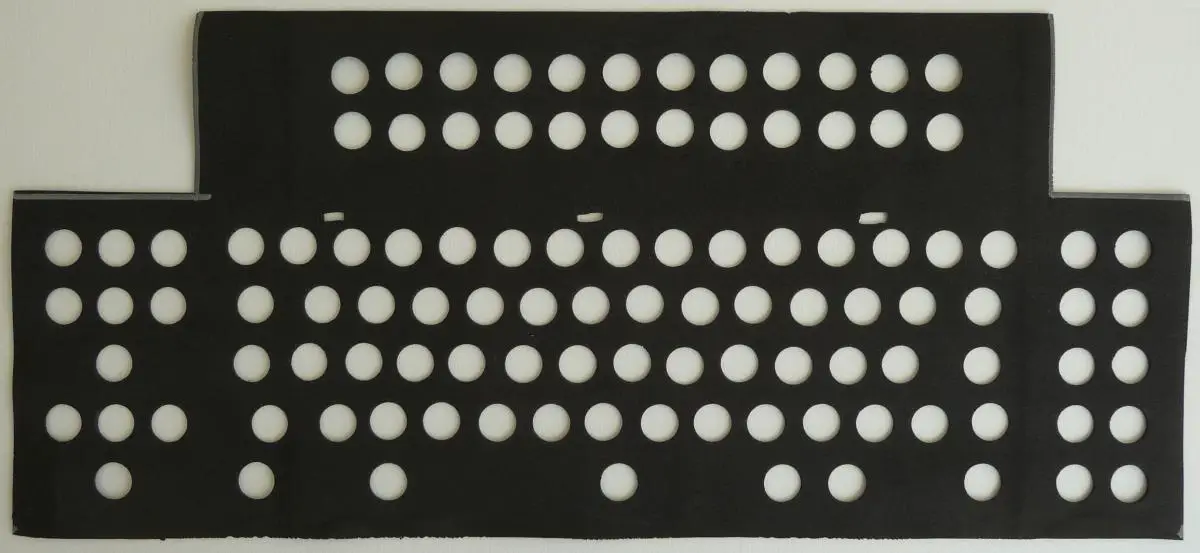
That flat black paint cures completely in about one hour in the hot Texas sun, at which point you need oven mitts to handle the plate. While I was waiting, I punched out a new layer of foam.
P1020705_cr.jpg
P1020705_cr.jpg (75.8 KiB) Viewed 4983 times
This is the foam I chose. I've experimented with different foams, but I've found that this soft, thin (1.6 mm) foam works best. If you take apart a Model F, you will see that the foam between the top plate and the barrel assembly is squished down to a fraction of a millimeter, so not much thickness is really needed. I used a 12.7 mm (1/2") punch, which is about 1 mm larger than the diameter of the barrel. This seems to give enough room to accommodate the indexing projection without making a separate cutout for it.

As I mentioned, a lot of the old foam was left behind, including on the barrels. Cleaning these up will be the next order of business.

User avatar
Hypersphere

27 Oct 2014, 16:55

@quantalume: Those are nice clean punches on the foam layer! Could you give us some details about the punching method? For example, the brand of punch, what kind of mallet or hammer, and what kind of backing (pine wood, etc.) when punching the holes. Did you sharpen the punch or just use it "as is"? I used a lab "cork borer" set, but I found that I needed to resharpen the borer after making just a few holes (cork borers are made of relatively soft brass rather than steel).

It is interesting that you used such thin foam (1/16 inch). I used 1/8 inch silicone foam on an XT, but it was a struggle sliding the plates into position. I was thinking of using 3/32 inch next time, but it appears that 1/16 inch might be enough.

EDIT: PS: How did you mark the hole positions on the foam? Template? Spray paint through the barrel plate? Other?

quantalume

27 Oct 2014, 17:18

Sorry, I guess I left out a few details. To mark the holes, I used the standard procedure of taping the foam to the back of the plate with loops of cellophane tape before painting.
P1020697_cr.jpg
P1020697_cr.jpg (44.6 KiB) Viewed 4963 times
This foam is really soft, so you must use care not to tear it when removing it after marking.

This is the type of punch I used:
punches.jpg
punches.jpg (31.36 KiB) Viewed 4963 times
I did sharpen it before use with a set of needle files. To actually perform the punching, I lined up the punch by eye and then hit it a few times with a small hammer. Then, maintaining pressure against the foam, I rotated the punch 360 degrees before lifting it off. This makes for a really clean hole. I used a piece of soft pine for backing. You want to avoid multiple punches over the same spot of wood in order to achieve clean cuts.

Regarding the foam thickness, this is the first time I've tried something this thin on a tall barrel plate (one with function keys above and steel hooks in the middle). I'll let you know how it works out when everything is back together.

User avatar
Hypersphere

27 Oct 2014, 17:28

@quanalume: Thanks for revealing your trade secrets! It all makes sense after seeing it written down. The combination of soft pine backing and rotating the punch 360 degrees after a few hits with the hammer certainly appears to work very well.

Lining up the punch by eye is not trivial. I had trouble centering mine on the paint spots. It would be easier if the spots were bigger than the punch, but I was also cutting separate holes for the indexing projection. I suppose if you are encompassing the index hole with the main barrel hole, you could use the index hole as an extra guide for the punch.

andrewjoy

27 Oct 2014, 18:04

nice work ,

to clean the barrels i find a good soak in dishwasher or cloths washing powder works best dont use the non-bio stuff cannot clean anything with that rubbish.

Dont do this to side printed beamspring caps tho :(

quantalume

28 Oct 2014, 02:42

andrewjoy wrote: nice work ,

to clean the barrels i find a good soak in dishwasher or cloths washing powder works best dont use the non-bio stuff cannot clean anything with that rubbish.

Dont do this to side printed beamspring caps tho :(
I cleaned the barrels in soapy water first, but the foam residue stayed behind. You can see how they look before and after cleaning with an isopropanol-soaked cotton swab.
P1020717.jpg
P1020717.jpg (61.14 KiB) Viewed 4925 times
I'm sure it wouldn't hurt anything to leave the residue, but I'm a perfectionist.

andrewjoy

28 Oct 2014, 10:10

A parts XT i got off ebay had the exact residue on the barrels, i would have also liked to have used isopropanol but i did not have any. A long few soaks sorted it out :).

cannot wait to see the finished board

User avatar
Khers

28 Oct 2014, 11:03

Nice work quantalume! Your unsaver is gonna look ace!

Considering sanding down the plate of my bigfoot to get rid of the rust. The rust-proofing primer you've used seems like a good idea (why did IBM not rust proof their plates from the off?). What type of paint did you use for the top coat?

quantalume

28 Oct 2014, 12:43

Khers wrote: Nice work quantalume! Your unsaver is gonna look ace!

Considering sanding down the plate of my bigfoot to get rid of the rust. The rust-proofing primer you've used seems like a good idea (why did IBM not rust proof their plates from the off?). What type of paint did you use for the top coat?
Nothing special, just flat black Rustoleum. Yeah, that's one of my criticisms of the Model F too, the plain steel top plate just waiting to rust. Of course, it's unlikely to rust all the way through to the point of affecting operation.

andrewjoy

28 Oct 2014, 16:00

It is also an advantage as it massively improves durability :).

xwhatsit

28 Oct 2014, 21:35

Are the Model F plates not gold passivated like on the beamsprings? Cheap bastards!

andrewjoy

28 Oct 2014, 21:40

I think the backplate of the unsaver is thats about it.

User avatar
Muirium
µ

28 Oct 2014, 21:41

Gold passivated? How would we tell? The Kishsaver has a nice gold shine to it, if that's anything to go by:

Image

User avatar
beltet

28 Oct 2014, 23:14

Khers wrote: Nice work quantalume! Your unsaver is gonna look ace!

Considering sanding down the plate of my bigfoot to get rid of the rust. The rust-proofing primer you've used seems like a good idea (why did IBM not rust proof their plates from the off?). What type of paint did you use for the top coat?
Not trying to be a jerk, but if I designed a keybord I would assume it would be used indoors in regulated temperature and moisture. So I would not design the plate to be rust proof. Or I maybe missed some sarcasm?
Anyway when they have been stored like this they it would been very appreciated.
Are there some specific models that was marketed for industries? Maybe those have a little more "durable" plate?

Btw, really nice work on the plate!

quantalume

29 Oct 2014, 04:17

beltet wrote: Not trying to be a jerk, but if I designed a keybord I would assume it would be used indoors in regulated temperature and moisture. So I would not design the plate to be rust proof. Or I maybe missed some sarcasm?
Well, they may be used primarily indoors, but people do spill things on their keyboards. In fact, IBM gave a lot of thought to this on later Model Ms with all the channels they incorporated into the plastic (which I hate since it makes it a pain to clean). You can literally dump a can of soda into a later Model M, and it will keep working.

quantalume

29 Oct 2014, 14:47

The pivot plates needed cleaning; many of them had pieces of foam or other crud stuck to them. I soaked the plates and springs in alcohol for 20 minutes, then wiped each one individually with a microfiber cloth.
DSC_0393_cr.jpg
DSC_0393_cr.jpg (79.07 KiB) Viewed 4792 times
A couple of the springs were bent, so they will need to be replaced. It's not fun when you find out after wrestling the plates back together that you have one or more keys which don't click, and you then need to take everything apart again.
DSC_0398_cr.jpg
DSC_0398_cr.jpg (30.67 KiB) Viewed 4792 times

andrewjoy

29 Oct 2014, 16:28

how many springs do you need i may be able to help

User avatar
fohat
Elder Messenger

29 Oct 2014, 17:27

quantalume wrote:
It's not fun when you find out after wrestling the plates back together that you have one or more keys which don't click, and you then need to take everything apart again.
Heartbreaking is what it is, and I have done it dozens of times.

Probably the most annoying part is that all the key stems have to go on and off each time.

quantalume

29 Oct 2014, 17:28

andrewjoy wrote: how many springs do you need i may be able to help
I have a parts board, so I should be good to go. Thanks for the offer though!

andrewjoy

29 Oct 2014, 17:41

fohat wrote:
quantalume wrote:
It's not fun when you find out after wrestling the plates back together that you have one or more keys which don't click, and you then need to take everything apart again.
Heartbreaking is what it is, and I have done it dozens of times.

Probably the most annoying part is that all the key stems have to go on and off each time.
It does teach you how to take a model f apart and put it back together again very quickly.

I have done it too much recently, i got some bits for an ISO conversion on my 122 but i think it can wait for a bit i cannot face it at the moment . I have a beam spring controller on the way thats more important :P. its on my to do list tho right below the beam spring and above the find some vintage/nixdorf mx black.

quantalume

29 Oct 2014, 17:42

fohat wrote: Heartbreaking is what it is, and I have done it dozens of times.

Probably the most annoying part is that all the key stems have to go on and off each time.
Yep. The other thing which is frustrating is when the malfunctioning spring and pivot plate look exactly like all the others and you have no clue why it doesn't work, even after swapping stems and barrels. Possibly the spring is just "tired." What I may do this time is assemble a standalone stem and barrel and then test each pivot plate and spring before loading it onto the plate.

andrewjoy

29 Oct 2014, 20:21

one day i will write a guide on how to swap springs without disassembling a model F

User avatar
snoopy

29 Oct 2014, 20:32

Looks like a fun restoration project. I think I also need an Unsaver for my collection... :?

quantalume

01 Nov 2014, 06:09

I started putting everything back together. First step was loading the foam and barrels onto the top plate.
P1020718.jpg
P1020718.jpg (96.55 KiB) Viewed 4673 times
The holes in the plate were a little tight because they now have four coats of paint on them. I think next time I'll sand the holes a little (or use less paint).

I loaded the springs and pivot plates into the original configuration. I'll think about changing the layout another time.
P1020721.jpg
P1020721.jpg (100.33 KiB) Viewed 4673 times
There were 8 springs which were distorted in one manner or another and didn't make the cut.
P1020741.jpg
P1020741.jpg (71.8 KiB) Viewed 4673 times
I carefully lined up the backplate without disturbing the pivot plates and clamped the pieces together with binder clips. I used mylar under the clips on the back side...
P1020725.JPG
P1020725.JPG (272.84 KiB) Viewed 4673 times
...and foam under the clips on the front side.
P1020727.jpg
P1020727.jpg (113.5 KiB) Viewed 4673 times
This allows the back to slide under the clips while protecting the front from damage to the paint.

It's a good idea at this point to make sure that the relationship of the tabs to the slots in the backplate will allow proper seating. You can see here that the tab is poking through enough so that it will catch when I start to slide the plates together.
P1020730.jpg
P1020730.jpg (59.97 KiB) Viewed 4673 times
Thanks to a tip from prdlm2009, I used a clamp from Harbor Freight Tools to coax the plates together. A hammer works pretty well too.
P1020731.JPG
P1020731.JPG (177.96 KiB) Viewed 4673 times
The foam under the clamps did a good job protecting the paint.
P1020737.jpg
P1020737.jpg (92.5 KiB) Viewed 4673 times
I should be wrapping up the assembly tomorrow, save for a new xwhatsit controller making its way here from New Zealand.

xwhatsit

01 Nov 2014, 09:50

Go controller, go! You can make it!

Beautiful work quantalume. I wish I had your patience and attention to detail (not to mention tools! That clamp is nifty...).

User avatar
Muirium
µ

01 Nov 2014, 13:25

Nice indeed. I hope everything works perfectly once you get the controller in. Glad to see "the Unsaver that got away" went straight to a good home!
andrewjoy wrote: one day i will write a guide on how to swap springs without disassembling a model F
You mean the chopstick?

https://imgur.com/a/6bnzW/noscript

I've tried it (with a trimmed matchstick) and it does work. Awkward, but much quicker for swapping springs than a bolt mod on an M!

quantalume

01 Nov 2014, 19:52

I'm pretty much finished with the restoration and reassembly. I thought I'd post a couple of before-and-after photos...
BA1.jpg
BA1.jpg (473.74 KiB) Viewed 4627 times
BA2.jpg
BA2.jpg (510.92 KiB) Viewed 4627 times
...as well as a couple of close-ups.
P1020755.jpg
P1020755.jpg (226.91 KiB) Viewed 4627 times
P1020760.jpg
P1020760.jpg (194.71 KiB) Viewed 4627 times
All of the keys click uniformly, and the barrels seem to be tight enough. I think I'll continue to use the 1.6 mm (1/16") neoprene foam as I've had good results with it, and it makes reassembly a lot easier than the thicker foams I've tried.

I want to thank all of the members of the community who previously took the time to post photos and advice regarding Model F restoration, including prdlm2009, Pyrelink, fohat, Hypersphere, andrewjoy, Parak, wcass and others. A special thanks goes to Muirium, whose gentlemanly unselfishness made it possible for me to acquire this board in the first place. And, of course, thanks to Cindy for uncovering all these old boards and saving them from the shredder.
Last edited by quantalume on 02 Nov 2014, 04:25, edited 1 time in total.

User avatar
rindorbrot

01 Nov 2014, 20:14

Looks very nice, good job! I'm jelly.
Last edited by rindorbrot on 01 Nov 2014, 20:14, edited 1 time in total.

andrewjoy

01 Nov 2014, 20:14

That is amazing work , it looks almost new better than new in fact as that paint job on the plate it was better than the orginal, good job :)

User avatar
Hypersphere

01 Nov 2014, 20:46

Looks great. I'd like to have an unsaver, although I have more than enough work ahead of me to refurbish and convert some other Model F and beam spring keyboards.

You did such a fine job on the barrel plate, it might be nice to install some windows in the front of the case and some lighting inside so that the internal restoration could be displayed. ;)

Post Reply

Return to “Workshop”