How about another Apple M0110 build?

sean4star

05 Dec 2013, 19:37

Greetings! I joined the site about 2 months ago, but was lurking about for a month before that. So this is a means of introducing myself and documenting one of the projects I’m working on…

First off, prior to a few months ago, I had no idea what a mechanical keyboard even was. I was doing some searching on ergonomic keyboards, as I had done many times in the past (I am a CPA/accountant and spend most of my day at the computer and I have chronic pain in my right wrist and arm). But this time I somehow stumbled on something new…a whole new world, really…I found mechanical keyboards, buckling springs, Kinesis, some of the fine work by matt3o, suka and others, and finally hasu’s keyboard firmware.

All of it just came together for me and I thought, why the hell not? So I started a project to make my own keyboard from scratch. But…that project is large and involved, so in the meantime I am getting my feet wet with a “smaller” (haha) project that I am running in parallel. Several have gone before me, so there is already some good documentation and I feel on pretty solid ground. It is a rebuild of an original Apple M0110 keyboard. I’ve seen a few comments about the HHKB being based on the M0110, so I’ve decided to call it my:

Happy Apple Keyboard!

Before I had really figured out what I was doing I bought an Apple M0110A, the extended cousin of the M0110:
Image Image
(I didn’t think to take a pic until I had already taken the case apart…)

I picked it up for cheap so it became my learning board. I stripped it, desoldered the PCB, took apart a few keys, traced the PCB lines to figure out how the keyboard matrix worked, etc. It wasn’t until later that I settled on rebuilding an M0110. But at least now I have plenty of spare parts!

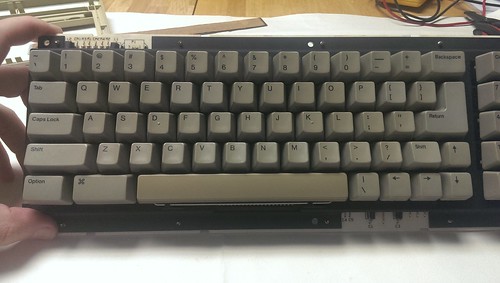
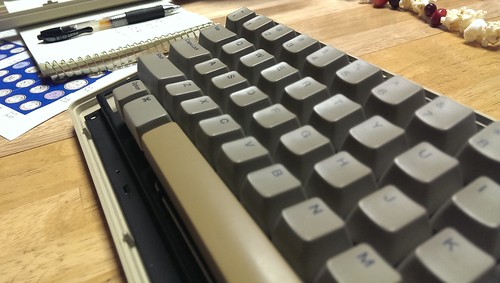
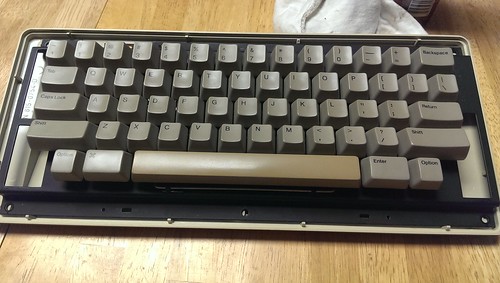
My next step was buying an M0110. It was in sad shape, but for a price I could live with:
Image
The stem for the 0 key was broken and the key itself was missing. I had plenty of extra switches and a 0 key from my parts board, so I wasn’t worried about that. But…when I received the board in the mail I found that the right shift keycap had been replaced with a large 0 key from either an M0110A tenkey or a M0120 keypad. I didn’t see this in the auction when I bought it so I was pretty upset, but luckily the left shift from an M0110A is the same size as the shift keys on the M0110. Crisis averted!

Step 1: Desolder original PCB

Image

Image
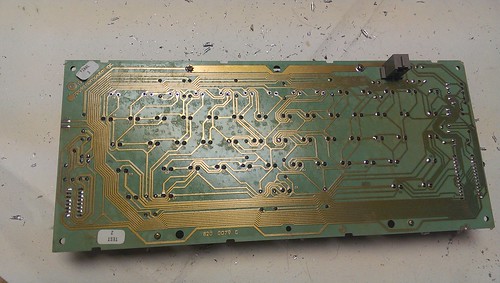
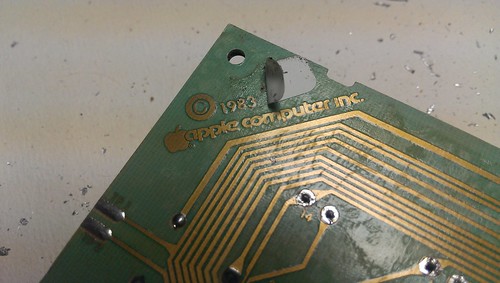
I think the PCB will make a nice bit of vintage computing art. Once it’s completely desoldered and cleaned up I plan on mounting/framing it.

Step 2: Build new keyboard matrix – rows and diodes

First, I replaced the switch with the broken stem for the 0 key. I also replaced the locking switch for the Caps Lock key with a standard linear switch from my parts board. I plan on using the Caps key as a tap(Caps)/hold(Control) key. More on that when I discuss the firmware in the next post.

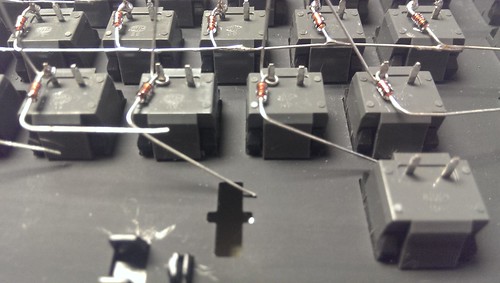
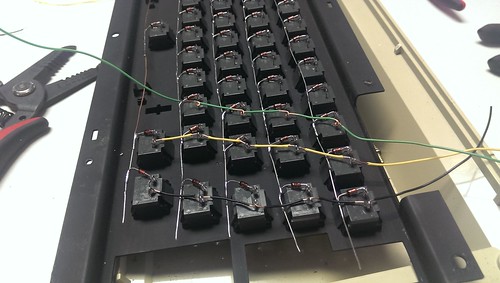
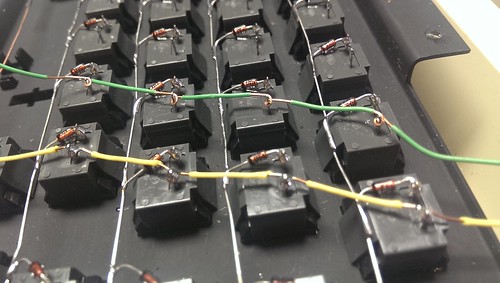
Wiring the diodes and making the matrix rows:
Image

Image
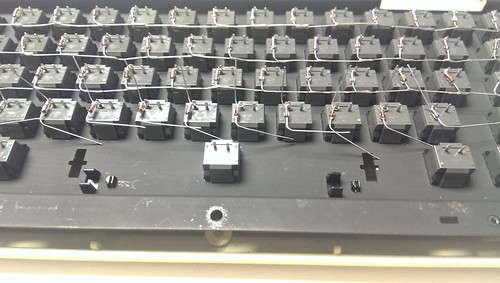
(Credit goes to lowpoly and his “The Apple M0110 Today” freestyle wiring method)

I used 1N1418 diodes, pretty standard it seems. One little twist (if you will excuse the pun) with my method was twisting the diode lead around the switch contact, as you can see in the pics. This allowed me to prep an entire row and solder one key after the other very quickly.

Step 3: Build new keyboard matrix – columns

I used old telephone wire that I had salvaged recently. So I had 4 different colored wires to alternate. I think it adds a fun look to the matrix…black, yellow, green, red…
Image

Image
I used the same twisting technique to I could prep and solder several wires at once.

Step 4: Wiring the matrix to the Teensy 2++

I used some old IDE cable that I had laying around.
Image
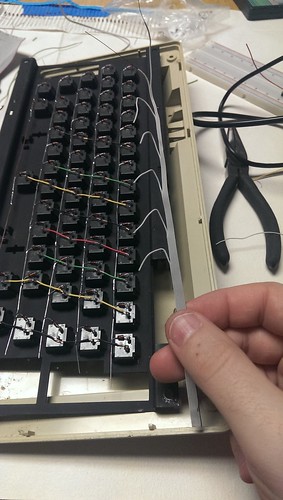
The cable is too short to reach all the way across the board, so I decided to meet in the middle. I was going to have 2 strips of 7 wires each (to cover the 14 columns) and another strip of 5 wires running down the center of the board (for the columns).

But…I realized that I could get them all on the same ribbon:

Image
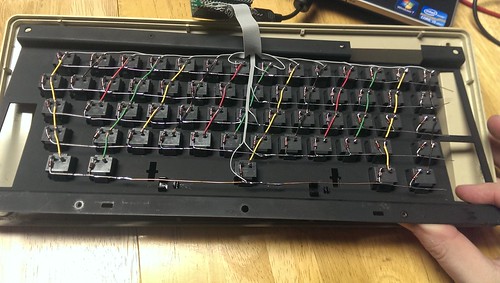
Matrix completed! My only gripe was the way I finished the rows on the right edge of the picture. When I was twisting and soldering the diodes I just did them all the same direction. The ones on the end should have been bent the other way. I will probably go back at some point and fix this to make it nice and clean.

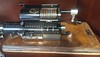
Temporarily wired up to the Teensy:
Image

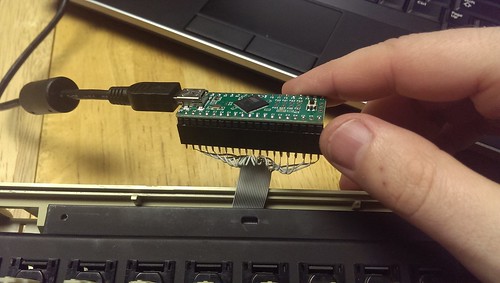
A sharp eye might notice I connected one of the wires to D6, which is the built-in LED pin. I didn’t even notice until I saw the little light flashing when I pressed certain keys! And yes, it works just fine, even connected to the D6 pin. (I’ll get to the firmware in the next post…)

Step 5: Cleaning the PBT Keycaps

I cleaned the keycaps in soapy water to remove all the grime:

Image
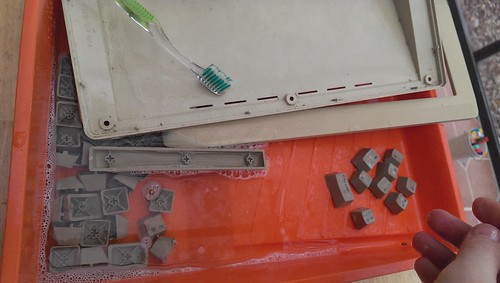
I cleaned the case and the spacebar as well to prep for retr0briting…hopefully this coming weekend.

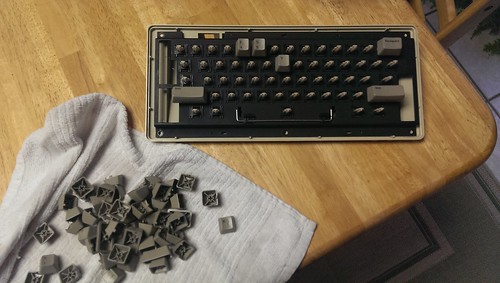
I went ahead and placed all the clean keycaps back on the board:
Image

And dremeled out the extra long Caps Lock stem mount.
Image
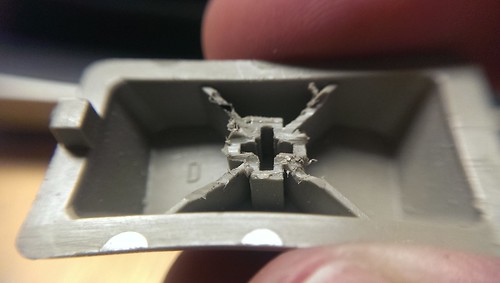
This requires a steady hand and a sharp eye. If you grind away too much of the mount then the key will either sit too low or not fit as tight on the stem as it should. I wasn’t TOO worried since the Caps key from my parts board was the same size. But I didn’t end up needing it, first try’s the charm.

Image
It fits nice and snug…no wobble. And yes, I was making homemade Christmas tree decorations at the same time… :)

Image
Looks pretty good so far…

To Do
Retr0brite the ABS parts – case and spacebar:
I’ve bought all the ingredients. Now I just need some time during the day so I can monitor it while it does its thing. I live in Texas so I should have plenty of light during the day, even in December.

Attach Teensy wiring and USB cable – permanent solution?

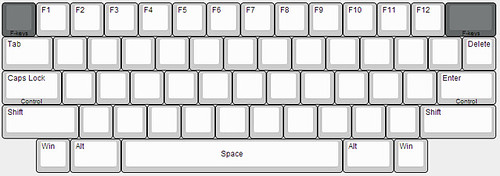
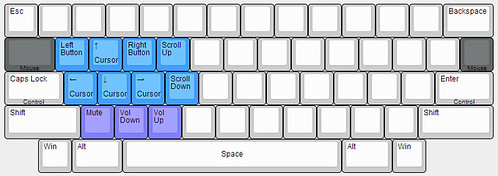
Finalize firmware (see the next post)


Oh, and one more thing… (I know…shameless)

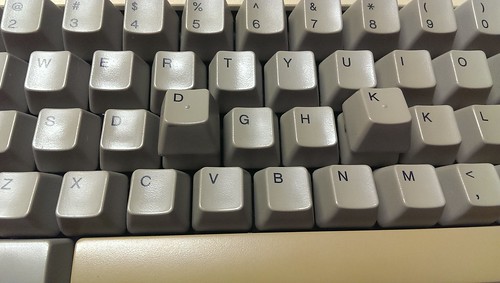
I noticed that the M0110 keycaps don’t have any home row nubs. Traditionally they are found on the F and J keys. However, the M0110A *does* have nubs, but they are on the D and K keys…Still not sure if I will use them or not… Image

sean4star

05 Dec 2013, 19:37

Firmware

As I *think* I mentioned before, I'm using hasu's excellent tmk_keyboard firmware. I have almost zero experience with programming, C, compilers, Teensy loaders, etc. But it wasn't too terrible getting everything to work. And hasu's firmware is pretty easy to edit once you know how the files all work together. Plus hasu is very responsive to questions, even if they are really basic or off-the-wall. I can't thank him enough.

More later…eventually…


Keyboard Layout

Default Layout:
Image
(Using the Online Keyboard Layout Editor)

As you can see, I made a few changes to the default layout – different from what the keys actually show.
  • Replace tilde (“ ` ” and “ ~ “) with Esc
  • Replace backslash (“ \ ” and “ | ”) with Del.
I rarely use tilde or backslash. They will be pushed to a secondary function layer. On the other hand, I use both Esc and Del frequently. From a key placement perspective it’s nice having Esc in the top right corner and backslash is right next to the Del key on a standard 104 layout. So these changes feel very natural.

Also, the Option, Apple Command, and Enter keys in the bottom row are not standard for modern keyboards. So…I made some changes.
  • Using the little “Option” keys for Win (GUI)
  • Using the Apple Command (on the left) and Enter (on the right) as left and right Alt
One other problem…the original M0110 didn’t come with Ctrl keys. So, I’m using the tap & hold concept and placing the left Ctrl on top of the Caps key and the right Ctrl on Return. Tapping the key will do what you expect, Caps lock on/off and Enter. But holding will be the same as holding Ctrl.
The Caps key on the M0110 uses a locking key switch. This obviously won’t work with the tap & hold idea, so I modified the key to a linear switch, as mentioned before.

In the key layout pic above, you will see the side labels. These are the key functions when the key is held. You may have noticed that in addition to the Ctrl tap & hold keys there are also tap & hold keys for a Fn (tenkey) layer, F-keys, and mouse keys.

Tenkey Layer
Image
(Using the Online Keyboard Layout Editor)

Holding the space bar activates the tenkey/navigation/misc layer.

As an accountant, it is important to me to have a tenkey. You may ask, “Why use a tenkeyless board?” Well, as I mentioned in the first post, I have pain in my wrist and arm, especially the right arm. I experimented a bit and found that the placement of the keyboard with the built-in nav cluster and tenkey push my mouse far off to the right side of my desk. I use the mouse a lot, not because I don’t know keyboard shortcuts, but because much of the proprietary software my company uses is graphical and almost completely reliant on point-and-click. I’m convinced that reaching for the mouse, or worse, resting my hand on the mouse, for long periods of time at that weird right angle is a big part of my arm pain.

Anyway, I want…no, need a tenkey in my board AND for the board to have a small footprint. Solution: tenkey built into a secondary layer. Since the M0110 has a number key row, I figure why not start with 7 through 9 and build the tenkey around that? The comma, period, and slash (divide) cooperate perfectly! So I just filled in the rest.

Here is my preferred desk tenkey:
Image
(Sharp Compet QS-2130)

I also have these, but I’m not as fast on them:
ImageImageImageImageImageImageImage
I know…I know… :lol: :roll:

When using the Sharp tenkey, the home row is 4/5/6, so that my thumb is resting on the large 0 key. For the Happy Apple, I found I could get the same result by moving the zero to the N. I’m shifting my whole hand up a row, but it seems to work. This also puts the + on the P (easiest for my pinky). The second easiest is the semi-colon, but I want to keep + & - and * & / together in pairs, so minus goes on the 0 key. I found it’s a little hard to hit, but the actual “ - ” and “ _ ” key is easy, so I have both of them working as minus keys on the tenkey layer for now. I also left the “ = ” and “ + ” key active on the tenkey layer. That leaves semi-colon as * and / stays where it is labeled. For excel, it’s very nice to have the equals and parentheses keys. I almost never use the double zero key, but it fills up the empty space left by moving zero to the N and it matches the Sharp.

I’m pretty happy with the tenkey layout for now.

The nav-cluster is a little bit of a work in progress. I’ve tried several different layouts, but this seems to be working for me. The arrows felt natural on WASD. This is so common that it is basically the standard. But I also wanted the Home, End and Page Up/Down keys close to use in shortcuts.

Some of the rarely used keys:
  • The Insert key I threw over next to the Delete key. I’m not sure I’m happy with this yet. Since Delete is on the default layer I would have liked Insert to be the same key, but on the tenkey layer. I didn’t do it because it seems weird to move backslash to a differently labeled key…I’m still not sure.
  • the Print Screen, Scroll Lock, Pause/Break keys are in their standard order, up out of the way on the number row.
  • Number Lock…I originally had this in it’s normal place – top left corner of the tenkey. But I really wanted the = in easy reach of my pointer finger. Of course, I may find that I use the regular “ = ” and “ + ” key, so this may be a non-issue. For now, I just dropped NumLock in line with the other 3 keys that I almost never use.
Tilde and backslash are where they are labeled. I needed the space on the default layer, but I still wanted them within easy reach.

F-key Layer
Image
(Using the Online Keyboard Layout Editor)

It seemed natural to layer the F-keys over the standard number keys. Using Esc (tilde) and Backspace as tap & hold function keys, I can get to the F-keys using either hand. With Esc and Backspace taken up as function keys there are exactly 12 keys in the number row for the 12 F-keys.

Simple enough…

Mouse Layer
Image
(Using the Online Keyboard Layout Editor)

I never would have thought of using the keyboard to “hijack” the mouse. But there it was in hasu’s firmware. So, why not?

I wanted the mouse keys to overlap the nav-cluster to make it easier to remember. Even down to the Page Up/Down functioning as the scroll wheel. The mouse keys don’t operate as smooth as I was hoping. There is a little stutter because it treats each key press as a little step. So it’s sometimes hard to get right where you want to go. Also, the keys work just like every other keyboard key. The first press moves a step. Hold it and it will keep going. Hold it longer and it goes faster and faster. This may work for letters, but not so great for the mouse. I do like the scroll feature though. The jury is still out on this though…

I threw in the volume buttons as an afterthought. There are many other media buttons, but I’ve never felt the need to use them…maybe I’m missing out?

Right now the F-keys and mouse keys are a separate layer. But they don’t overlap…so I will probably combine them. I like having the mouse function key on Tab because it makes it easier to use the mouse keys one-handed. However, if I get rid of the mouse layer, I may just add the volume keys to the tenkey layer. I can’t add the f-keys to the tenkey layer because of overlap, so I think I will have at least 2 function layers no matter what.
Last edited by sean4star on 12 Dec 2013, 01:10, edited 1 time in total.

User avatar
matt3o
-[°_°]-

05 Dec 2013, 19:57

sooner or later everyone does a M0110 :)

I also worked on the same project, that keyboard has an incredibly retro charm that's impossible to resist :)

Findecanor

06 Dec 2013, 07:39

sean4star wrote:Traditionally they are found on the F and J keys. However, the M0110A *does* have nubs, but they are on the D and K keys…
Nubs on D and K was the convention on Macintosh from the M011A onwards and all keyboard with ADB. The Mac USB Keyboard was the first to have them on F and J.

sean4star

12 Dec 2013, 01:13

I added some discussion of the layout I'm using. It's still a work in progress, so it evolves as I use the board, but I'm pretty happy with it so far. I didn't do anything too revolutionary. I made it all up on my own, but looking around on the Workshop forum I'm seeing lots of similar layouts. Oh well, at least that means I'm on the right track.

Unfortunately, I didn't get to retr0bright this weekend. Texas was hit with a freak ice storm. Maybe next weekend?

User avatar
scottc

12 Dec 2013, 02:12

Great run-through, thank you for posting it.

Cool project, hope the retr0bright goes well! :mrgreen:

Post Reply

Return to “Workshop”