Page 2 of 2
Posted: 16 May 2016, 14:21
by alh84001
Thanks shreebles. Good to know. I took some time to sand the backplate this weekend, and polish the barrel frame cut, but nothing else. If I catch time, I'll check the fit today.
What did you use to drill that second hole?
Posted: 16 May 2016, 14:56
by shreebles
hypkx wrote: Thanks for the feedback, I had also to modify booth holes and after the first test the spacebar wasnt right in place and stuck with the case. Now everything fits, currently I try to program it, I will post more pictures from the finished keyboard. I used a table saw for the metall plate, so it was easier to chop it. Btw nice keycaps shreebles, I use the keycaps from my model F bigfoot.
Ah, good to hear it. So I'm not alone, then.
I will also convert this SSK to FSSK once I get my controller, already have all the other parts.
Wish I had had a tablesaw, but I don't have the space or the money for "real" tools yet, so I just use whatever tools I have so far.
Thanks for the compliments on the keycaps, got them from plasticchair a few months back. I bought a complete M from him just to get these awesome APL caps, ISO-DE to boot

For some reason there are no nubs on the F and J keys. I need them for touch typing so I swapped them from another M.
I also have a few one-piece caps from two bigfoots laying around, how do you feel about those caps?
Do you think one-piece is in any way superior to two-piece?
alh84001 wrote: Thanks shreebles. Good to know. I took some time to sand the backplate this weekend, and polish the barrel frame cut, but nothing else. If I catch time, I'll check the fit today.
What did you use to drill that second hole?
I used this
And two metal drill bits, and it was probably the easiest part of the whole mod.
I used a size 5 for the small hole on the right, but had to make the hole bigger afterwards with a metal file.
For the rectangular cutouts, I made two small holes next to each other with the size 5. Then I took a size 8 drill bit to make both holes big enough to match the size I needed. Then I sawed off the gap between them and took a file to make the cutout rectangular instead of round.
Posted: 16 May 2016, 15:45
by alh84001
Thanks! I definitely need some new drill bits. I plan on using a dremel, then files for the cutouts.
Posted: 17 May 2016, 10:28
by hypkx
alh84001 wrote: Thanks! I definitely need some new drill bits. I plan on using a dremel, then files for the cutouts.
Btw I used this to make the holes:
but I made the most with the file, including the cutouts, first I used a metal cutting shear and then the file.
@shreebles
I have also seen plasticchairs apl model m and loved it immediately, cool that you bought it. I think one piece keycaps are a way better than two piece ibm keycaps. I never thought that people who has said this were right, because I loved the two piece design when I got my first model m a year ago, but now, after I got my two model F's I changed my mind (or even before that, beause my SSK has also one piece keycaps and after changing all to two-piece, I changed them immediately back). The one piece caps are snapier, I use current a combination of two piece and one piece on my FSSK and I can hear and feel that the one piece caps are a way smoother. If I hit them offcenter nothing happens, but the two piece caps scratching a bit at the inner side of the barrel. I think I will use on my FSSK only one piece caps (except rgb mods
).
Posted: 17 May 2016, 11:01
by shreebles
Crap, I need to get out the one-piece caps, then. Well, at least I have one-piece in ISO-DE thanks to the Bigfoots.
But they don't look nearly as nice as the APL ones, which are unfortunately two-piece.
Well, maybe that's the reason my cut-down ISO SSK still doesn't feel as nice as the stock Lexmark SSK which has one-piece caps.
Or maybe it's the floss mod I had done on the former, that kills the tactility as some say.
Posted: 17 May 2016, 11:12
by hypkx
I dont like the floss mod, I got my SSK premoded and dont like that the keys are such inconsistent. Maybe I will undo it or redo. I think you should test what feels better.
Posted: 17 May 2016, 11:36
by shreebles
The problem is that the age or use of the flippers seems to play a part as well.
I always look for the lightest, snappiest feel in Model Ms. For this reason, I have preferred newer M's over older ones, and Lexmark ones over IBM.
On a bolt-modded one, you could simply swap out the flippers, then you don't have to throw away the mod (cutting those bits was a lot of work!).
But if you use different flippers it's not comparable anyway.
Probably, most likely, I will just tear out the floss in the end and live with the ping

Posted: 18 May 2016, 20:26
by hypkx
Updated the post (with controller soldering), now everything is there.
Posted: 19 May 2016, 12:22
by alh84001
Really nice job with the cables.
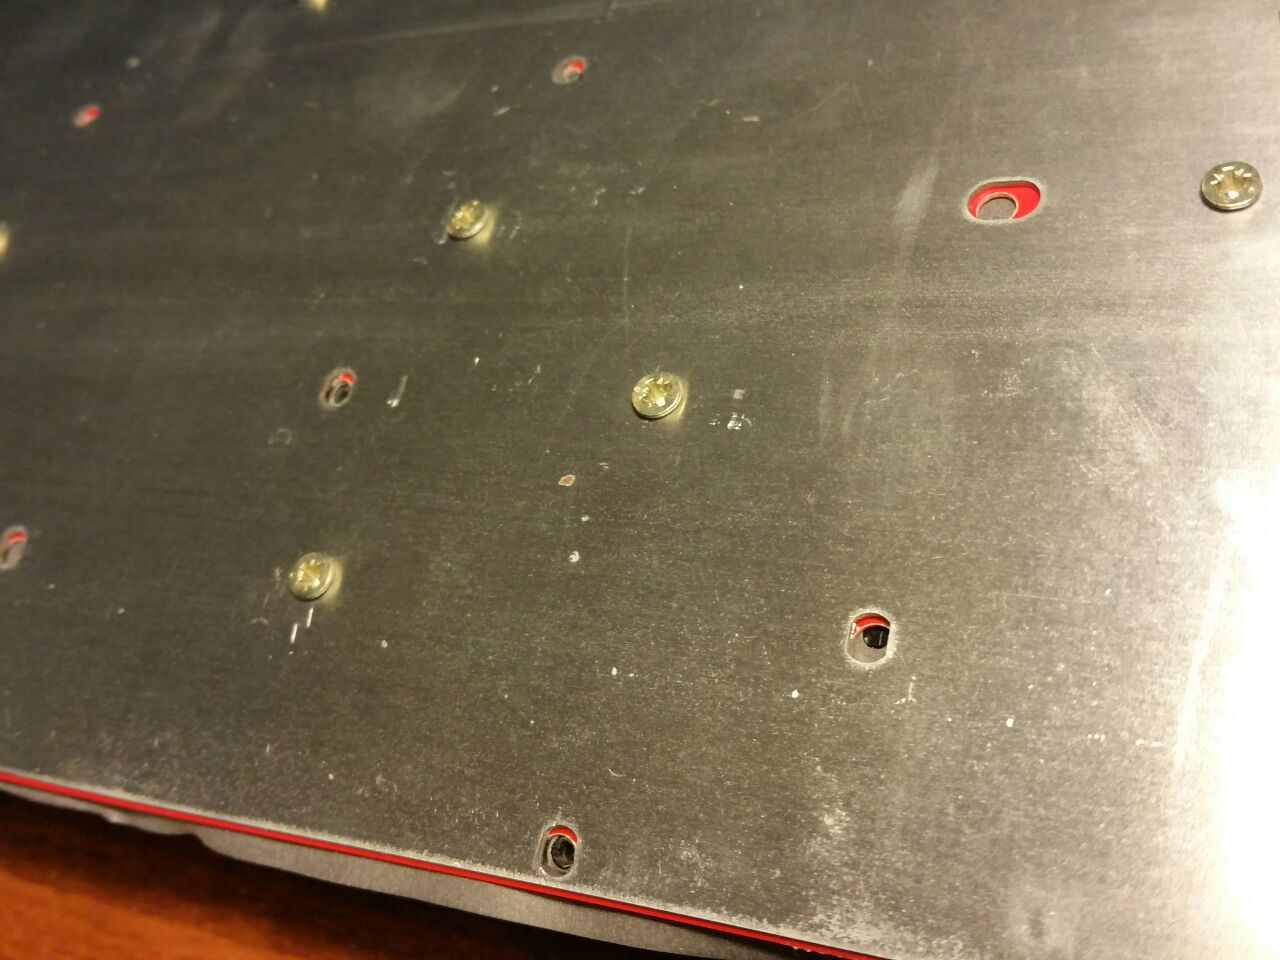
Here are a couple of my pics from yesterday.

Test fitting the plate to the case. I widened the left hole to the right a bit.

Testing some keys.


Keys on the right seem to fit better than keys on the left. A bit confusing, but I guess a bit of a movement to the left is still needed. Also, the barrel frame obstructs the top case on the right a bit. Nothing major, I just need to press the case with hand for the last milimeter. I think that after screwmodding, that will not be an issue.
Posted: 19 May 2016, 19:36
by hypkx
Thanks for the pictures and I will update this thread again in some days, after the discussion about the cable lengths and groundind issue, I will remove the connectors and solder the controller with a very short cable direct to the pcb. Also I will tape the controller on the isolated plate and try to improve the grounding. Pictures will follow.
Posted: 21 May 2016, 18:18
by hypkx
updated again, now everything (except the key "T" works), I used a greenock spacebar grounding cable and a shorter cable for the controller.
Posted: 22 May 2016, 07:13
by idollar
hypkx wrote: updated again, now everything (except the key "T" works), I used a greenock spacebar grounding cable and a shorter cable for the controller.
A very nice job, indeed.
I have checked again your pictures and realised that you have painted the back plate. Are you sure that the metal is grounded ? You may need to scratch the paint to ensure that there is good contact.
If this is the problem, my recommendation is to test it. To do it, I would scratch the paint in a different place and check for continuity.
Posted: 23 May 2016, 20:01
by hypkx
idollar wrote: hypkx wrote: updated again, now everything (except the key "T" works), I used a greenock spacebar grounding cable and a shorter cable for the controller.
A very nice job, indeed.
I have checked again your pictures and realised that you have painted the back plate. Are you sure that the metal is grounded ? You may need to scratch the paint to ensure that there is good contact.
If this is the problem, my recommendation is to test it. To do it, I would scratch the paint in a different place and check for continuity.
I scratched the plate at the point for the grounding screw, I will test what I can do if I have more time, maybe a bad flipper cause the problem.
Posted: 13 Nov 2016, 17:55
by alienman82
removed.
Posted: 14 Nov 2016, 22:02
by hypkx
Thanks.
Posted: 22 Dec 2016, 23:26
by tentator
so cool how this turns out!
I'm also playing on my fext on a unicomp case, now I found the holes on the plate to be a bit shifted too much, being the fext quite wide in the holes on the extremes you really see it not to fit perfectly.. did you also observe this?
- photo109275380194586266.jpg (140.05 KiB) Viewed 4959 times
Posted: 22 Dec 2016, 23:58
by hypkx
Yes, if there is nothing important (like traces) just screw the screw in. If you are not sure you can ignore it, I think it will work also without all screws. I think it dont will damage the pcb when you screw in the screws, even you have shifted the pcb in some places a bit, I did the same and it worked perfect in the end.
Posted: 23 Dec 2016, 00:01
by tentator
and the foam you put between back metal plate and the pcb? 'cause I tried between flippers/barrels and pcb and the sound of the keys are quite "strange"..
Posted: 23 Dec 2016, 01:59
by hypkx
Its a original model m "foam" idk how I should call it (the black which is normally above the membrane sheet). I put them between pcb and metall plate. I used two sheets I had laying around. I think you can also use thicker foam to dampen the keystroke, something like (we call it in germany moosgummi

) 2mm/1mm thick foam.
Btw I dont own this keyboard anymore, its now in the possession of a other user and makes him happy, I just dislike the tkl form factor (even if I own two tkl keyboards, but the novatouch and SSK sadly don't come in a smaller layout).
Currently I modify a model F AT to normal german iso, with normal spacebar and additional alt/ctrl keys. The layout of the F AT satisfies me more.
Re: Howto: chop a model m barrelframe/ steel plate to fit in a (F)SSK case
Posted: 23 Dec 2016, 02:34
by Techno Trousers
hypkx wrote:
Currently I modify a model F AT to normal german iso, with normal spacebar and additional alt/ctrl keys. The layout of the F AT satisfies me more.
I'd like to see a picture of that!
Posted: 23 Dec 2016, 02:39
by hypkx
Techno Trousers wrote: hypkx wrote:
Currently I modify a model F AT to normal german iso, with normal spacebar and additional alt/ctrl keys. The layout of the F AT satisfies me more.
I'd like to see a picture of that!
I will post some, today I brushed the plate and desoldered the controller to make place for a xwhatsit (even if it would be also worked with a soarers, but I want it easier to program).
My inspiration:
https://geekhack.org/index.php?topic=48288.0

