Page 2 of 3
Posted: 17 Feb 2011, 19:07
by Minskleip
kidchunks wrote:noctua wrote:don't forget to activate the internal pullup's
internal pullup?
The Teensy's chip has pullup resistors for the i/o pins which you have to enable when using a button. It makes the voltage over the button high (pulls it up) when it's not in use, and 0 when it is pressed.
If they weren't internal, you'd have to solder them in yourself. Read through the tutorial section on the Teensy shop page if you haven't used it before - it was eye opening

Posted: 17 Feb 2011, 19:15
by noctua
Yes, you can't be too careful these days..

Posted: 17 Feb 2011, 20:14
by kidchunks
Appreciate the information! I've bought two teensy boards for my custom boards(Will be posting the project thread soon). Still waiting on the rest of my parts before I start soldering/testing. I'll definitely read up! I like how the teensy's come with a postcard like diagram of the board!

Posted: 06 Mar 2011, 19:14
by ranm

Hey Minskleip, what kind of software do you use to make this type of graphics ? I've seen similar on GH but never bothered to ask...
Care to shed some light on the matter ?
Posted: 06 Mar 2011, 19:22
by sixty
Actually the image is made by 7bit. I asked him before. Turns out he wrote his own 2d vector software and used that to create it. What a talented guy!
Posted: 06 Mar 2011, 20:14
by ranm
sixty wrote:Actually the image is made by 7bit. I asked him before. Turns out he wrote his own 2d vector software and used that to create it. What a talented guy!
I've also seen some images created by allegedly keyboard layout software on kbdmania but never found the software. Has 7bit published it online or is he keeping it to himself ?
Posted: 11 Mar 2011, 01:13
by JBert
Some clever use of scripting would allow you to spit out an SVG or PostScript file which you can then render to an image.
From what I remember generating PostScript code it does take a lot of tweaking to get it just right.
Posted: 11 Mar 2011, 21:10
by hoggy
As for the double switch issue...
Double keys on an access keyboard are really a dud switch and a programmed switch. If both keys were programmed the same then the controller would have to filter out the second unwanted activation. Far easier to blank a switch.
If you wanted to use the POS kit, then you could try 'blanking' the output from one switch and remove that spring. That way you could change your mind later.
Getting hold of a cheap programmable XY board would be a great way of prototyping the layout...
Posted: 15 Mar 2011, 01:51
by Minskleip
Hey guys! Sixy's right, I took the image from 7bit. Thank you seven!
The status of the projects is that I'm closer to funding! Yey! And I've tried some more pcb designs and cad work.
Posted: 30 Mar 2011, 11:31
by bpiphany
Does mounting keys across several switches really stabilize them at all? Smashing them hard somewhere between the switches bottoming them out I suppose would work the same way as a stabilized key but what about a lighter touch? I havent tried any keys mounted like that...
Posted: 30 Mar 2011, 17:07
by IanM
ranm wrote:what kind of software do you use to make this type of graphics ? I've seen similar on GH but never bothered to ask...
If you want to make your own vector graphics (.SVG) images,
Inkscape is very impressive.
Posted: 09 Apr 2011, 21:48
by Minskleip
I haven't tried this either, but I assume that the physics works the same as with the stabelizers on buckling spring keyboards, where the switch barrel is on one side, and the other has a smaller hole with a pin, essentially a smaller barrel without a spring. Works good, so it should be the same with two cherries.
Posted: 14 Jul 2011, 00:02
by Minskleip
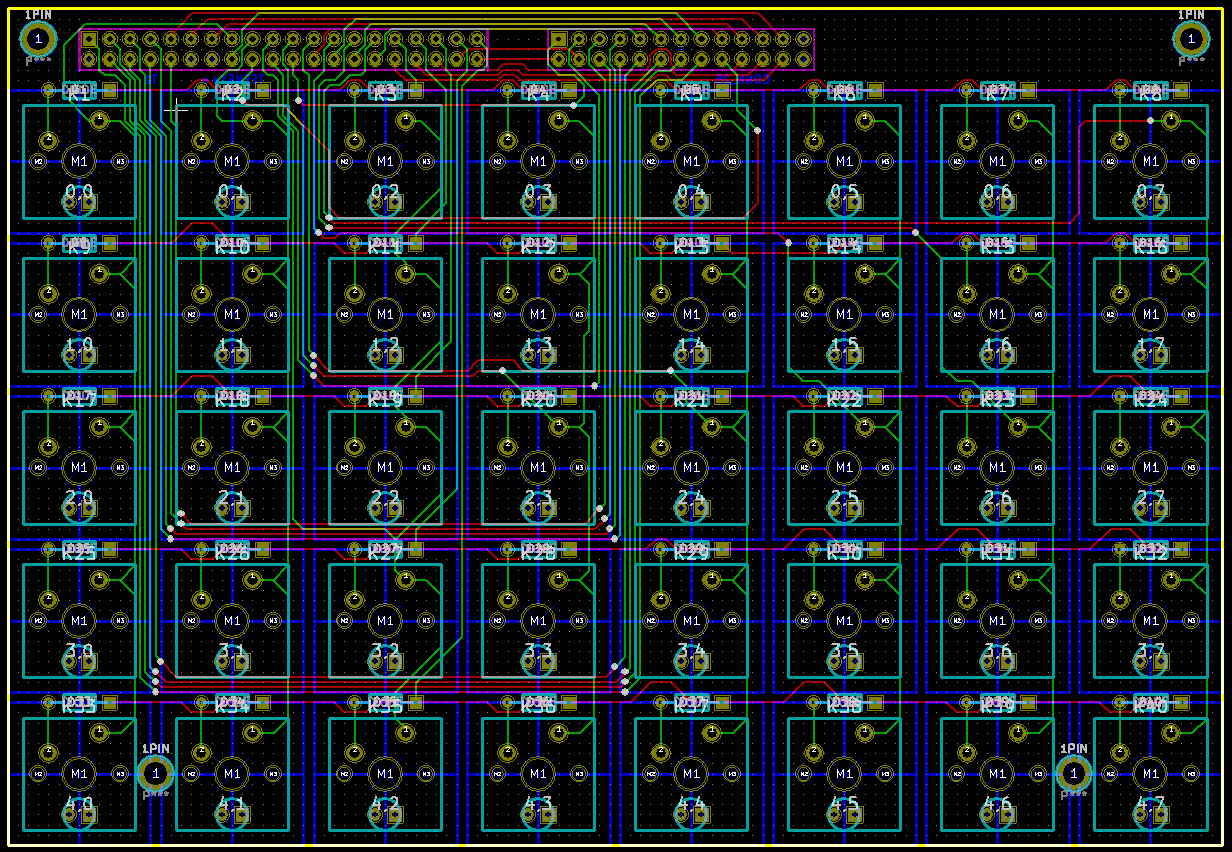
I've got the Teensy and made some progress on the PCB! I simplified it so that the same can be used for both hand modules.
I could simplify it even more by using the Teensy IO's which are not used for keys (I plan to use them for LEDs) on demand with wires too, but that'd be very ugly..
Posted: 14 Jul 2011, 19:41
by Input Nirvana
Fantastic project, valuable and needed, and long overdue.
I'm linking this great thread to a related thread on Geekhack. The title of the thread is QWERTY-COLEMAK VIA HARDWARE, but it's going to be a more inclusive project (programmability, macros, switchable layers...)
http://geekhack.org/showthread.php?1945 ... e-firmware
I just started the thread, and am compiling people and ideas to get the momentum going. Hasu has posted, and his code is being looked at, and I've emailed a several people with similar ideas/projects that may not have been posting recently. Hopefully, there are some items that people can share to further the cause

I'll convert the GH thread to a wiki project in a few days, and have a decent way for people to collaborate more easily.
Posted: 14 Jul 2011, 22:25
by Minskleip
That's very cool! I want to use Hasu's PS/2 to USB on my Minitouch, but I'm not sure if it's possible to remap or move the Fn-keys unless the Fn key has a scan code..
Anyway, I'm looking into using Hasu's code for this project, and I want macros such as "when I press key X, the HHKB layer is locked, and SHIFT is locked and ENTER is changed to CTRL+V and ESC cancels it all, so I can press X, move the cursor around and enter copies everything to the clipboard".
Posted: 02 Aug 2011, 19:21
by Parak
Eeenteresting, and great work so far! Happened to stumble on this thread by accident. I've been quietly working on something relatively similar (split matrix) since last year, though it's not close to being ready for the public reveal just yet. Primary inspirations were also dmw's humble hacker, the M15, and the μTron.
It's quite ambitious in scope and complexity, so it has been rather rough going since I essentially had to learn electronics engineering from scratch for most portions of it, wishing I had an EE expert as a friend for help
. Good thing I have a partner for the code bits. I'll finally have the first fruits of my labor today (pcbs from china), so it's getting there slowly but steadily.
On the matter of 1x2 keys though, it's definitely a bit of a problem. I tried removing the spring from one of the switches, but that actually makes it worse as that switch does not bounce back properly anymore. So the least weight possible for actuation on 1x2 keys is 45*2=90 grams by my reckoning, making them fairly beefy even for thumbs/index fingers. The ideal scenario here I think is to get custom springs made that are 20-25 grams, and that way the double keys will be much better to deal with. I wonder if there's anyone on the forums here that knows about custom springs for cherries... *coughhackwheezeeye*sixty*coughhackwheezeeye*

Posted: 02 Aug 2011, 20:27
by Minskleip
Haha yes, I want sixty's springs and lube too!
My project here is taking so much time that I'm going to wait with finishing up the PCB untill I get the keycaps, so I can play around a bit with them (I'm not 100% sure what I'll get, so it'll be like christmas). I think I'll add at least one more row, so better be sure before finishing it up.
Posted: 04 Oct 2011, 14:57
by Minskleip
Bought PCBs
Check first post.
Posted: 04 Oct 2011, 16:41
by yench
i hope they work as intended! looking forward to see the final board
what did you pay for the pcb's?
Posted: 04 Oct 2011, 17:26
by Minskleip
$120 + shipping. Most of that was tooling actually. Not very much, but not that little either considering how simple the design is.
Posted: 22 Oct 2011, 11:38
by cactux
[Account and posts deleted on request]
Posted: 22 Oct 2011, 20:40
by Minskleip
I think the PCB is 1.6 mm and the requirement is 1.52 +/- 0.152 mm
Posted: 06 Apr 2012, 18:20
by off
I think that requirement is for the plate, not the pcb- I could def be wrong though.
Either way, are you (or is this project) expired yet?
Else; any updates?
Re: [Project] The XYNV Keyboard
Posted: 06 Apr 2012, 20:01
by dirge
This looks fantastic. Very good work mate
Posted: 09 Apr 2012, 22:57
by Minskleip
Update and update

It's of course not cancelled because I have all these PCBs. I started soldering switches, LEDs and diodes and made a base for (on half) of the case, but it will look so crap (and the thought of soldering all those LEDs with wires is very off putting) I've put that part aside for now. I got two (twice the size!) Tipros from Ebay, and one smaller Tipro from here which I'll replace the internals of with my PCBs. It's a big job desoldering all the switches though, so I've started with the small Tipro. It's finished and have been laying here for a few months just waiting to be programmed... I'm about to start desoldering the larger Tipros.
One of the reasons for being so slow in addition to the interest going up and down is that I've got these awesome "black 122 key Tipros" from 7bit which are much better than regular keyboards.
Posted: 09 Apr 2012, 23:16
by Minskleip
Posted: 09 Apr 2012, 23:30
by Icarium
You're doing solid work. Liked your split 2x32 key Tipro board as well. Keep it up!
Posted: 10 Apr 2012, 02:37
by off
Yay update!
Blues with black springs? How's that feel to you? What I think I've heard is that it takes away quite a bit of the tactility; though faster return to top is ofc welcome..
.....Are you planning to put an lcd there?
Re: [Project] The XYNV Keyboard
Posted: 10 Apr 2012, 11:14
by Minskleip
I've only prodded them a bit, but I think they're still too tactile. Clear springs would be better.
The unit came with an LCD but I don't know how to use it with the Teensy so I'll just leave the space open (covered with acryl) and have status LEDs.
Re: [Project] The XYNV Keyboard
Posted: 10 Apr 2012, 11:16
by Minskleip
Icarium wrote:You're doing solid work. Liked your split 2x32 key Tipro board as well. Keep it up!
Thanks! Now when winter is fading I want to work on this again.