Page 33 of 73
Re: (Model MF) Remodeling the Model M
Posted: 03 Sep 2016, 15:30
by Techno Trousers
Super cool!!
Posted: 03 Sep 2016, 15:40
by alh84001
See Unicomp, it's not that hard.
But seriously, this is megaawesome.
Posted: 03 Sep 2016, 16:02
by phosphorglow
lot_lizard wrote: I'm eager to see the results 15 hours from now.
The future is
NOW thanks to impatience! ;P
The cure time for this resin is 16 hours... but when I noticed the excess had solidified enough I couldn't help myself. I figured I'd still have issues to sort out and it wouldn't be perfect so I just ran with it. I'm glad I did.
I think this will work just dandy. I have to fix the plaster support shell (first attempt at doing it this way) and I also underestimated the amount of resin needed.
E TwentyNine wrote: How does the inside look?
How do you suspect the wear/toughness of a "real" cast will hold up to daily use?
I need to work out a few more vents, but the inside is a pretty close duplicate of the real thing.
As for wear/toughness, the resin I'm planning on using (Innovative Polymers IE-3076) has properties similar enough to production thermoplastics. I'll buy some soon to play around with. Eventually I'll do some stress tests (drop it, hit it, throw it at the wall, etc...) and see how it goes.
alh84001 wrote: See Unicomp, it's not that hard.
Welllllll... it's pretty darn tricky even on this small of a scale. And I'd imagine that a new injection mold for production is pretty pricey. Sure would be nice if they did, though.
Posted: 03 Sep 2016, 16:56
by phosphorglow
Teehee! Otay. This is enough for now. I have lots of other things to finish up before I continue messing with this.
But I'm feeling pretty optimistic about it.
Posted: 03 Sep 2016, 17:59
by Hypersphere
It's like watching the pod people taking on form in the original 1950s version of "Invasion of the Body Snatchers"!
Posted: 03 Sep 2016, 18:10
by phosphorglow
I was hoping for more of a "The Human Duplicators" (1965) sort of feel.
Mainly because, well, Richard Kiel...
Posted: 03 Sep 2016, 20:02
by alh84001
That's some uncanny valley stuff. I am looking at it and expecting it to start glowing. Hm, translucent case with ligthing inside, would that be possible?

Posted: 03 Sep 2016, 20:38
by E TwentyNine
I'd be curious if you could modify the top of the front, eliminate the oval, or do something like what's in my avatar but with MMF. Or better yet - customizable. Can I get one in green metal flake resin? How about a faux marble look? Lots of possibilities...

Posted: 03 Sep 2016, 20:49
by lot_lizard
phosphorglow wrote: I think this will work just dandy.
Couldn't be more impressed. It really is difficult to pull off what you are attempting, and achieve the results you are getting. I think you are really onto something. I know we get hung up on metal cases (which if you wanted to make a mold of your molds, we could cast metal using one time molds)... but there are many characteristics of proper resin that are appealing (vibration reduction, sound dampening, etc).
Again... beautiful work
EDIT: Do me a favor though. Edit the posts and get the pics out of the spoiler tags. These beauties shouldn't be hidden.

- image.jpeg (32.25 KiB) Viewed 7335 times
Posted: 03 Sep 2016, 23:59
by lot_lizard
Just a quick status update. I am in South America until late this evening (short notice), but I am going to check out a demo of the LaserPro Explorer (along with a smaller Epilog) late tomorrow afternoon as our foam laser cutting option
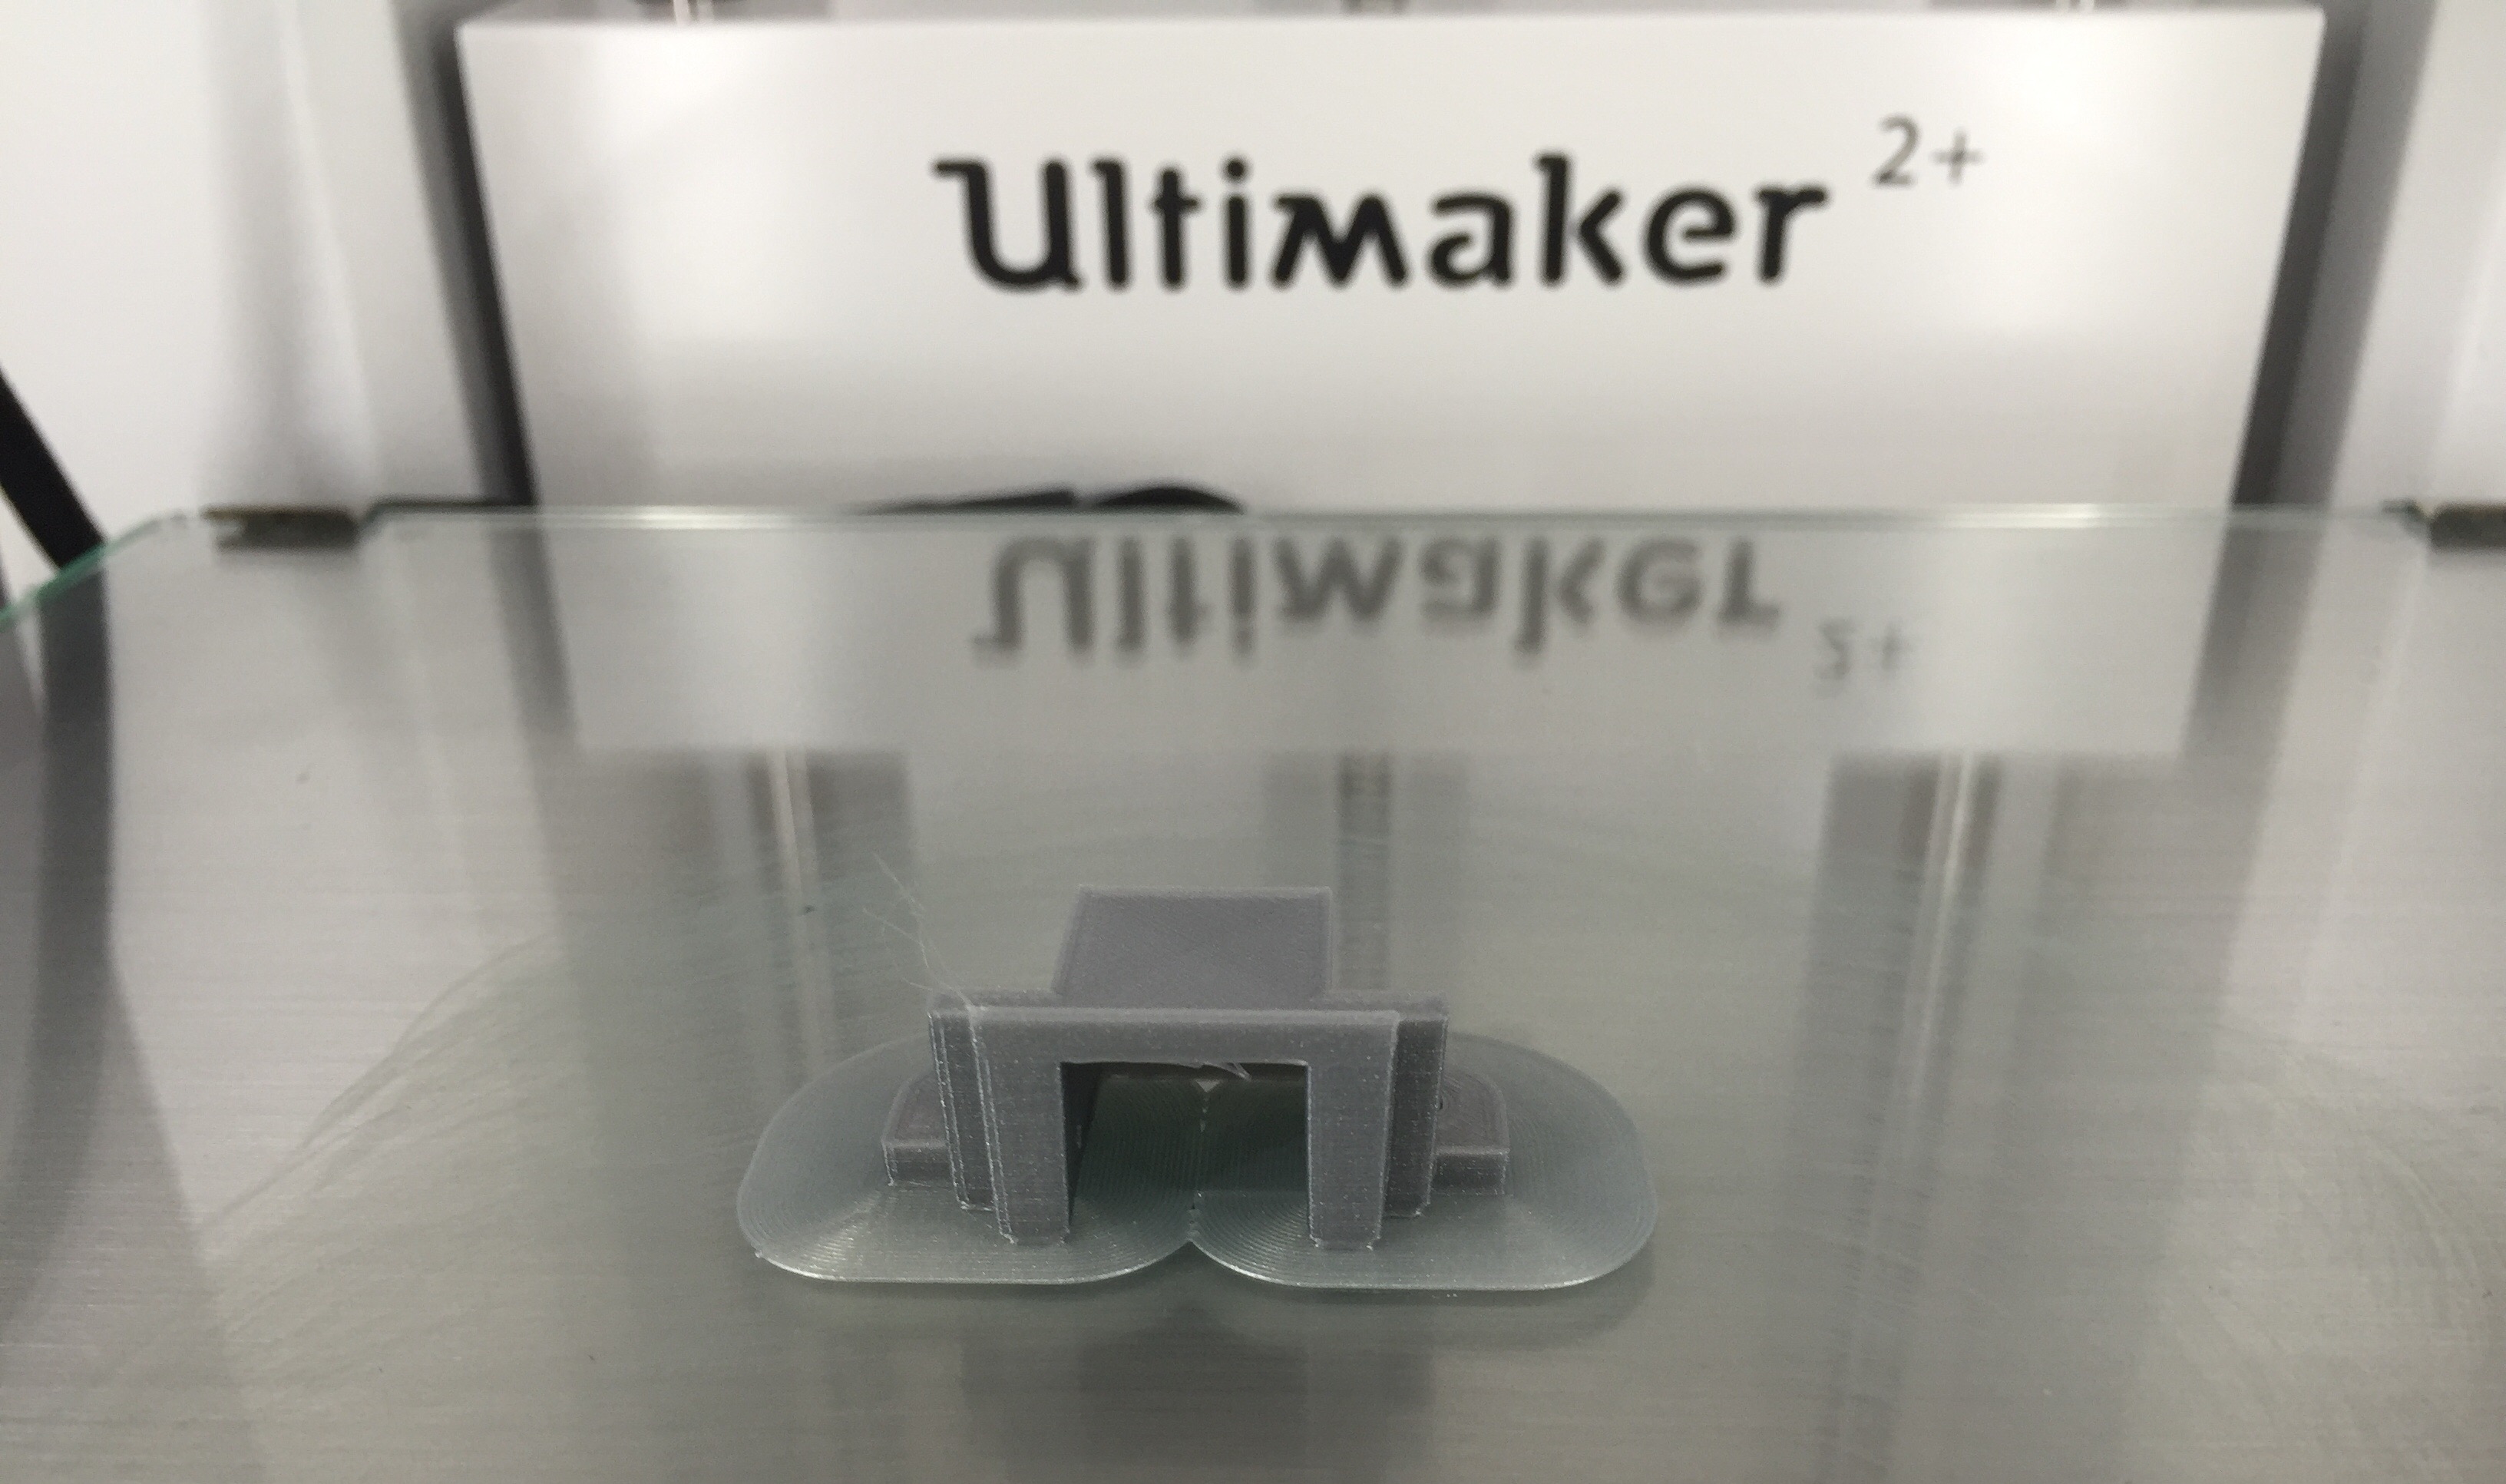
I did get a chance before I left to print one of our retainer clips on the Ultimaker, and it worked famously. Travel was short notice, and threw a kink in my plans, but this is best pic I have to offer. More early next week.
I was impressed by the Ultimakers software to create bracing automatically (the thin base support was not part of my design, but software added... not impressed by the excess resin it used to brace, but nice to see regardless). I was concerned about the top bridging, but it turned out well. Only minor sanding to correct (I will adjust the design to compensate for all of this). Need to play with the orientation of the print a bit to see if there is a more ideal result. The test PLA was provided by the kit, and we would want to take a different path since some of these parts will be painted, and others receiving sheet screw threading (as others have pointed out... PLA blows for functional parts).
Very pleased with the printer though. I think I will work up a design to get 20-30 parts on a deck at once to save effort. Very promising. Btw... Painter's tape was garbage. Since I didn't have alternatives, I went with a glue stick in the end. Printed several demos, our stabilzer clips, and the retainer clips all did very well after adjustments (just didn't have a chance to take pics yet). Sorry
- image.jpeg (862.24 KiB) Viewed 7299 times
Posted: 04 Sep 2016, 22:32
by Ir0n
Jesus Christ what a project! I lurk here a lot and reddit and don't speak much on geekhack, but I wanted to finally make an account here just to say how amazing I think this is and the Ellipse GB. between you two my wallet is screaming.
That is if I can get in on this lol I'm still reading all the pages and catching up on all of the details, but great work man I would adore a model M with F guts.
Posted: 05 Sep 2016, 03:36
by lot_lizard
Ir0n wrote: I lurk here a lot and reddit and don't speak much on geekhack, but I wanted to finally make an account here just to say how amazing I think this is and the Ellipse GB. between you two my wallet is screaming.
No offence to you GeekHicks, but this is the cool kid table. Welcome aboard, and appreciate the feedback. Ellipse has done a stellar job, and I have massive respect. We are operating little differently here, but all of it is for the greater good... PROGRESS!!!
Status update:... I visited the shop with the laser engraver/cutters for sale and am in a word... Disappointed. The machines were old and don't even support 64-bit, along with other red flags.
My friend also pointed me to a stop on the way back from my trek that has a 2010 Epilog Helix that I will check out tomorrow. The bed is smaller than the LaserPro, but will still handle 2-3 sheets of foam at once. I have been chatting with the Epilog owner quite a bit today, explained what we are doing (she purchased originally for a non-proft Leukemia fund raiser), and she is excited to hear our story.
Posted: 05 Sep 2016, 22:16
by lot_lizard
After a bit of a procurement boondoggle, we are officially set on the cutter front. Again, a 2010 Epilog Helix 35w with 24"x18" working area and downdraft table. It needs a bit of a bath, but I'll probably wait on that until after our project. Certainly serviceable now... The vector cutting table is under the engraving plate.
I need to get shipments out from "the haul" tomorrow for those that didn't want to wait until our eventual group buy, but should be able to make some plastic part and foam progress sometime this week (no travel planned)
Again... If anyone ever needs something cut or engraved in the future on a small scale (not production run), this machine will be available if you cover your material cost and shipping.
Posted: 06 Sep 2016, 00:26
by lot_lizard
Back home and had the chance to take a couple more shots of the USB-B retainer clip printed on the UM2+ using the provided silver PLA. The port is rock solid now, but I will add .05-1mm to the peg diameters. The fit is almost too tight. Very promising though. We still need to work on color matching tactics.
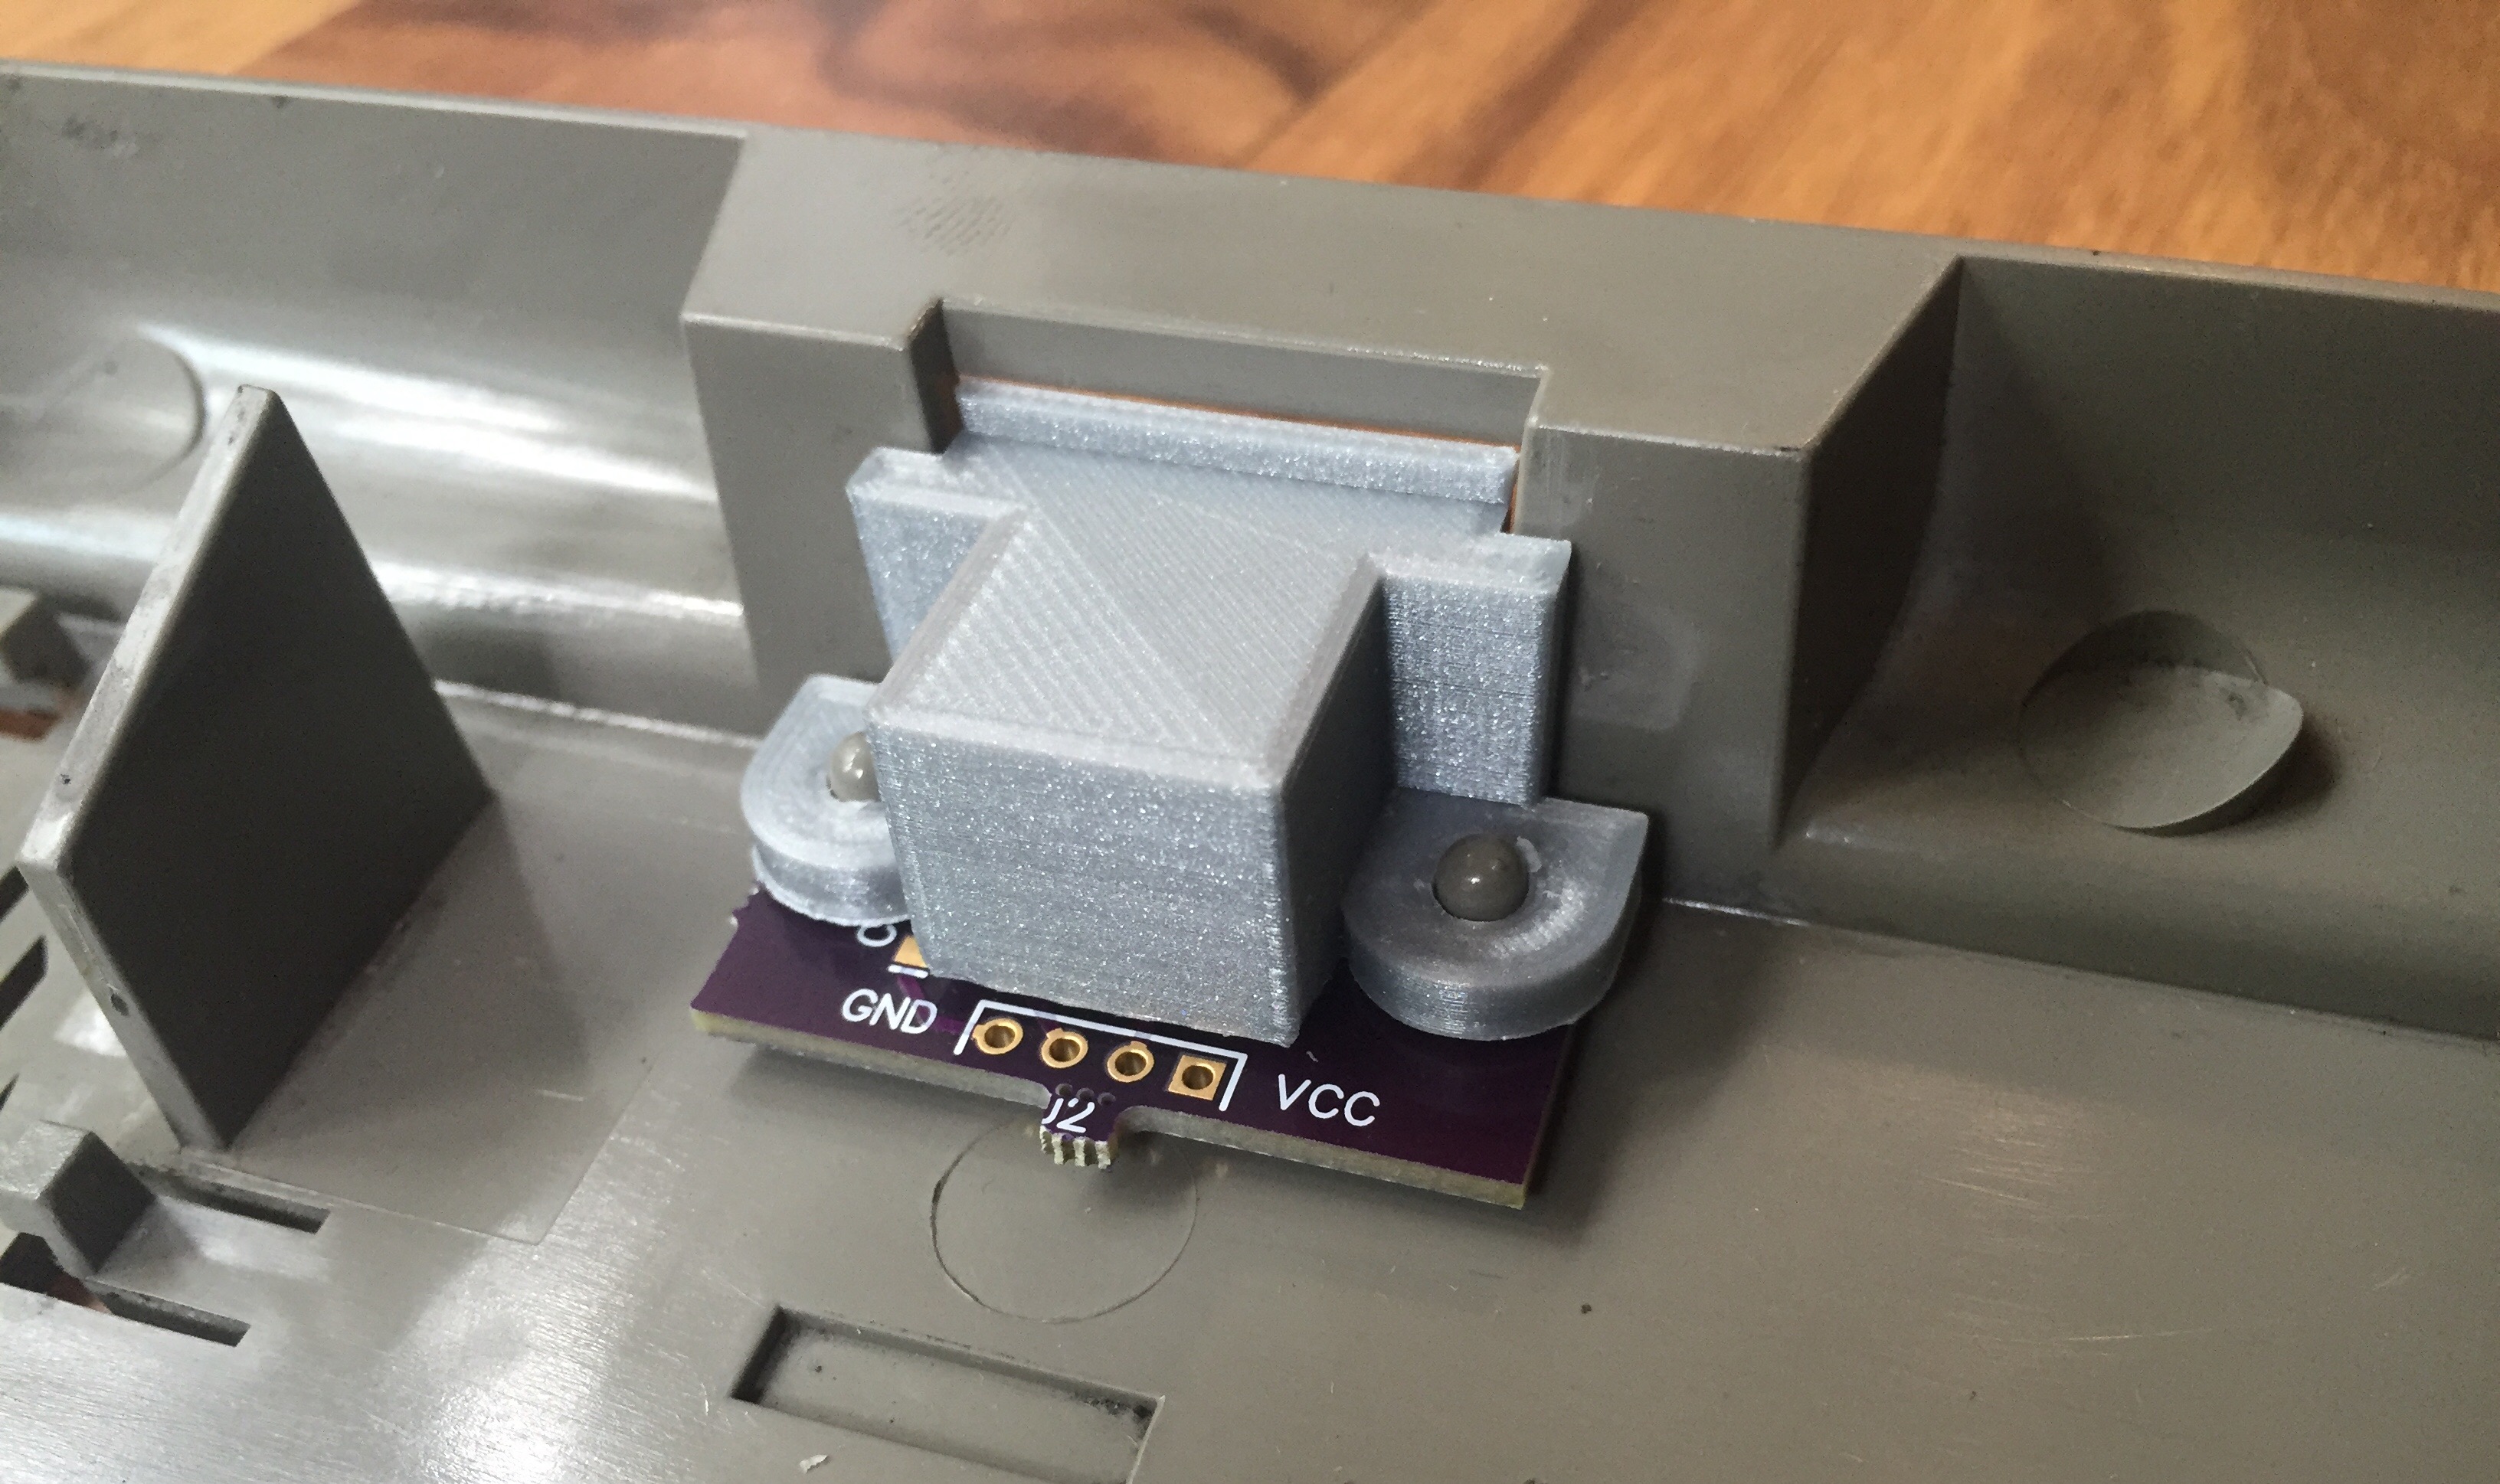
- Securing the port on 5 sides
- image.jpeg (1.19 MiB) Viewed 7182 times
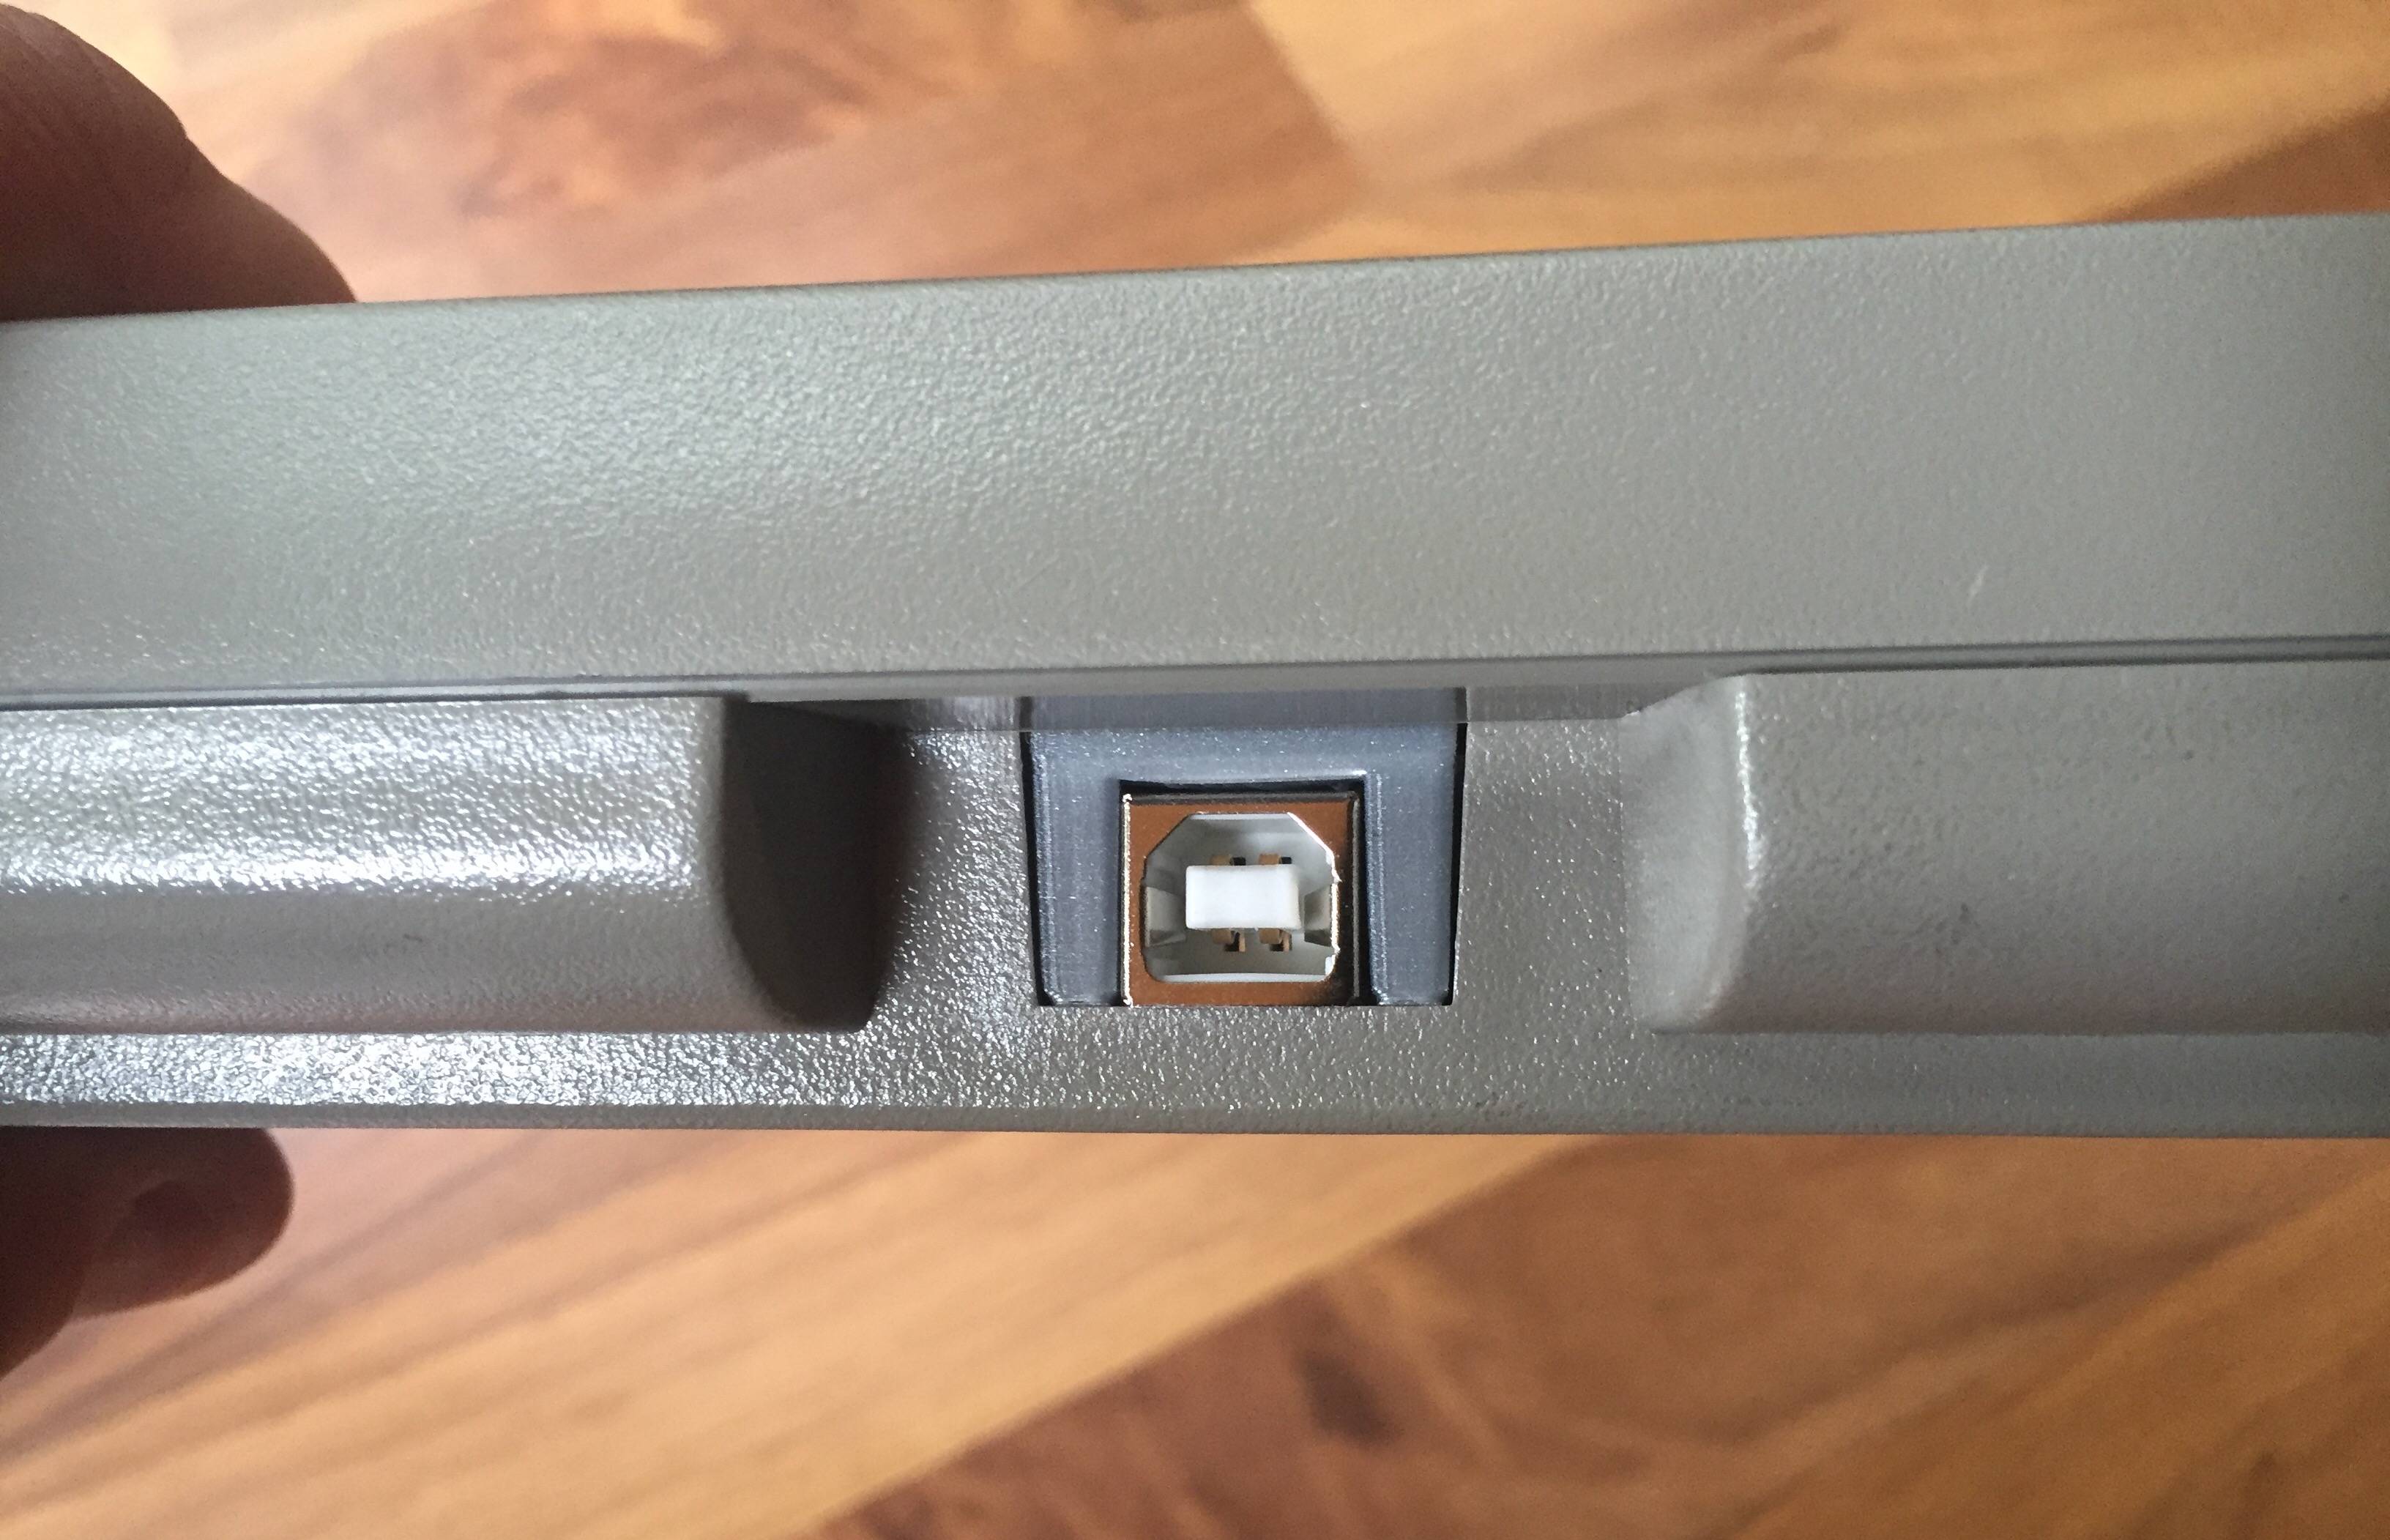
- Flush with the case
- image.jpeg (1.29 MiB) Viewed 7182 times
Posted: 06 Sep 2016, 00:36
by fohat
That is excellent work.
As for color, basic "IBM beige" (aka pearl) is a sure-thing goes-with-everything choice, if you can hit that.
Re: (Model MF) Remodeling the Model M
Posted: 06 Sep 2016, 02:31
by Techno Trousers
Fantastic fit! It's going to look like these keyboards came straight out of the factory with these USB connectors.
Posted: 06 Sep 2016, 03:07
by Ratfink
lot_lizard wrote: The port is rock solid now, but I will add .05-1mm to the peg diameters. The fit is almost too tight.
Ah, now that I look at your models, I see what may be part of that problem. Making holes in OpenSCAD by difference-ing out a cylinder always results in a hole that's slightly too small, since you're placing the vertices at the radius specified, not the centers of the edges. The brilliant
nophead analyzed the situation and created the
polyhole library which is now included with OpenSCAD. Just add the line
to the top of your source, then you can make better holes for 3D printing, like this:
Code: Select all
polyhole(d=CLIP_R_INNER*2, h=CLIP_Z)
Yes, you have to specify diameter instead of radius, and no, you shouldn't try to force $fn.
Posted: 06 Sep 2016, 04:10
by lot_lizard
I have been considering OpenSCAD a toy language because of the implied facets (amongst other things). I appreciate the modules, but that is about it thus far. Thanks for the tip... I'll check it out. It is pretty trivial to work with if you know anything C-based. Just making the facet issue disappear would change my impressions quite a bit. There are 5 other CAD languages that would crush this before some magic library. Hopefully my impressions change, because I like the idea of coding CAD
Posted: 06 Sep 2016, 07:37
by lot_lizard
fohat wrote: As for color, basic "IBM beige" (aka pearl) is a sure-thing goes-with-everything choice, if you can hit that.
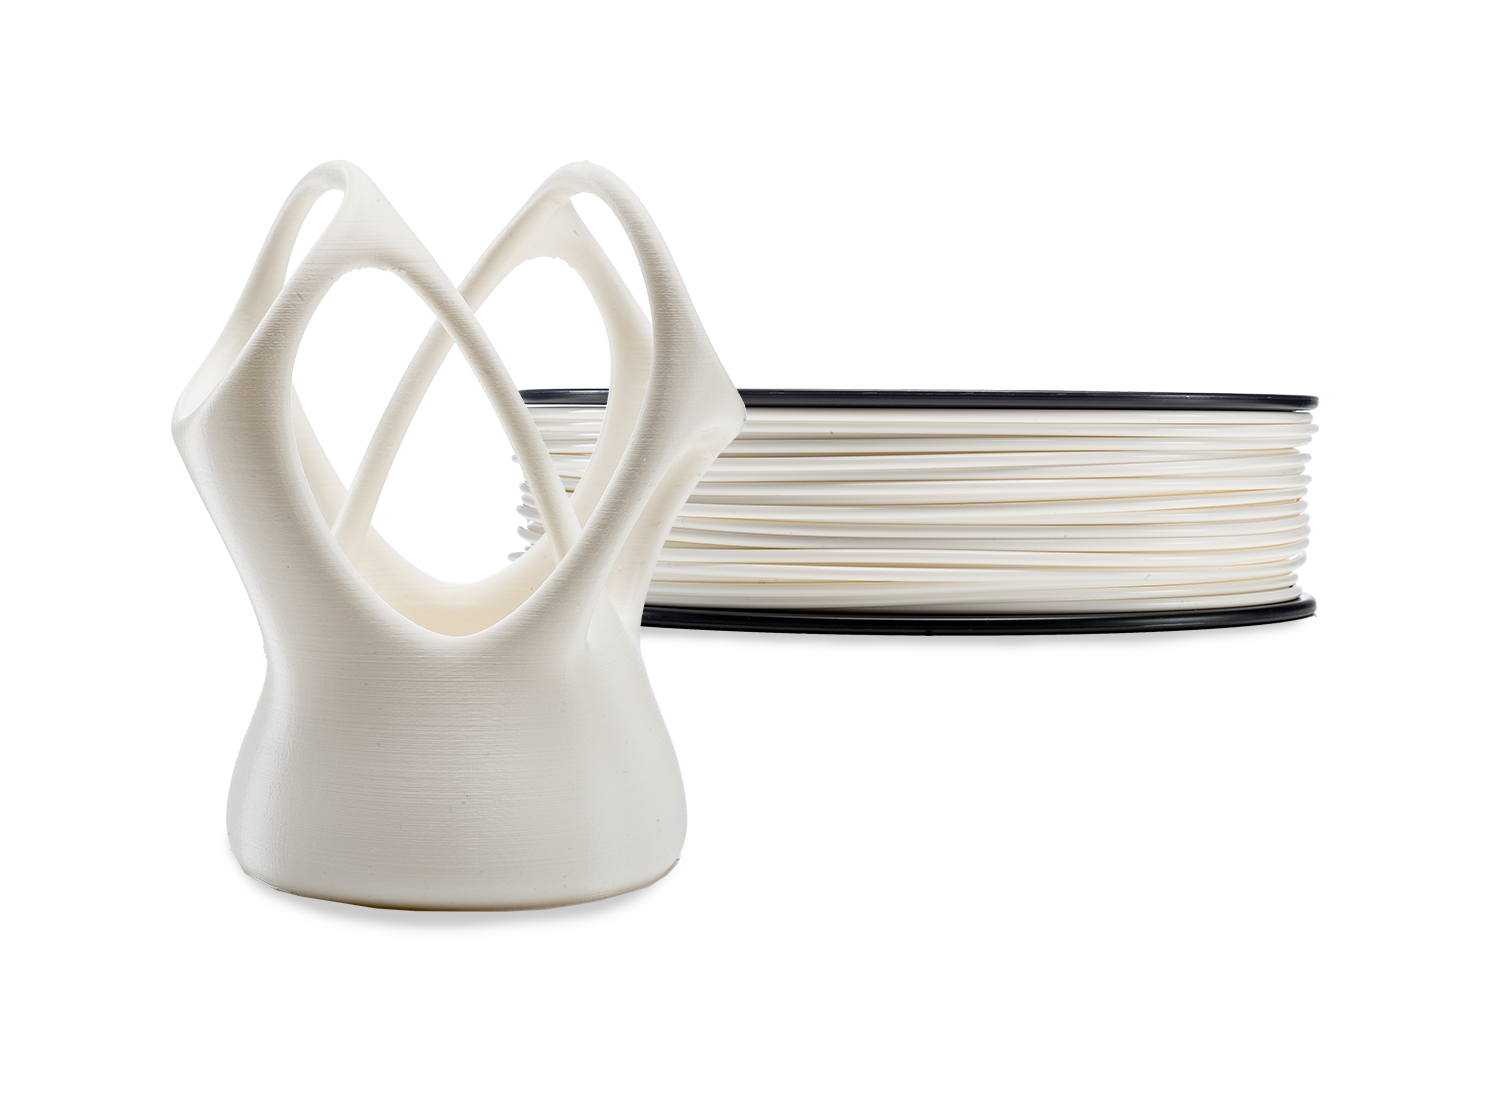
I would like to offer up the retainer clip in two colors (off-white and industrial). For giggles since I know the printer handles PLA well, and it is cheaper than other materials, I think I would like to see how the stock colors turn out.
I think we can get off-white to turn out close:

- image.png (764.32 KiB) Viewed 7032 times
- image.png (730.42 KiB) Viewed 7019 times
But the industrial color will be trickier. I have the acrylic paint already color-matched, but dyeing is actually more interesting.
Does anyone have experience dyeing PLA that could offer up some starter tips? The stabilzer clips for the wired keys will be ABS / Nylon / Polyester since they are tied to moving parts, but no reason PLA wouldn't be an ideal choice for the USB port clips because of color selection and cost.
Posted: 06 Sep 2016, 13:37
by andrewjoy
I am not so sure PLA is the best idea for the retainer clip as it will take some stress from plugging and unplugging and PLA is brittle .
It will also be a paint to have to change filament from one part to the next , unless you have dual extrusion.
As for Dye i am not so sure , painting may be better, you dont want to screw with the filament and cause clogging or extrusion problems
Posted: 06 Sep 2016, 15:30
by fohat
lot_lizard wrote: fohat wrote:
As for color, basic "IBM beige" (aka pearl) is a sure-thing goes-with-everything choice, if you can hit that.
I would like to offer up the retainer clip in two colors (off-white and industrial).
Really close color matches are surprisingly difficult. I used to be in the awning business, and I learned the hard way how difficult it can be. A great fabric manufacturer is hard-pressed to have a few dozen colors, while paint can be mixed almost infinitely. Whites (along with their bastard siblings, the "off-whites") and pinks (along with their cousins, the yellows) were always the hardest for us.
Both of the ones you showed are too dark and too yellow, although the bottom one is much better. And I don't know that anyone has ever teased out a really good Pantone match for IBM's elusive "industrial" mix.
Posted: 06 Sep 2016, 16:01
by lot_lizard
andrewjoy wrote: I am not so sure PLA is the best idea for the retainer clip as it will take some stress from plugging and unplugging and PLA is brittle .
It will also be a paint to have to change filament from one part to the next , unless you have dual extrusion.
As for Dye i am not so sure , painting may be better, you dont want to screw with the filament and cause clogging or extrusion problems
I will be doing batches of multiple parts on a single print (so think an STL of a given part multiplied to create a batch in a single STL). I would print all of one color (say 150 white retainer clips) before moving to the next color or different part altogether, so the filament swaps wouldn't be a big deal to me.
For the dyeing, I would wait to alter the pigment on the finished product versus the filament. I am very comfortable painting, but the dyeing is interesting to me for a few reasons:
- the pigment bleeds into the surface of the part and makes for a longer lasting finish
- the finish itself would be more desirable since we wouldn't need to worry about different paint thicknesses (in the corners, etc)
- MOST IMPORTANTLY... I could do all of the parts for a given color in a vat at once... I'm lazy

I have ordered a few different filaments to try out PLA / ABS / Nylon / Polyester, will print clips in each and take a hammer to them to test.
In the end, no matter what we do, it will be very solid. I stood on this one already... its a little tank.
fohat wrote: Really close color matches are surprisingly difficult.
...
Both of the ones you showed are too dark and too yellow, although the bottom one is much better. And I don't know that anyone has ever teased out a really good Pantone match for IBM's elusive "industrial" mix.
Totally agree... I am just trying to get "close". The plastic will have a slightly different finish anyway, but would just like the initial glance to not see OBVIOUS clashing. I did have one of my industrial cases color matched with a laser, but haven't ever taken the time to translate that output to Pantone.
Posted: 06 Sep 2016, 17:49
by Wodan
I ordered two of those:
http://r.ebay.com/y32vSR
(From a different, German based seller...)
They should each fit 4 drums of Ultimaker filment and hopefull help store the filament dry and clean. Will report more when I get them.
Posted: 06 Sep 2016, 20:55
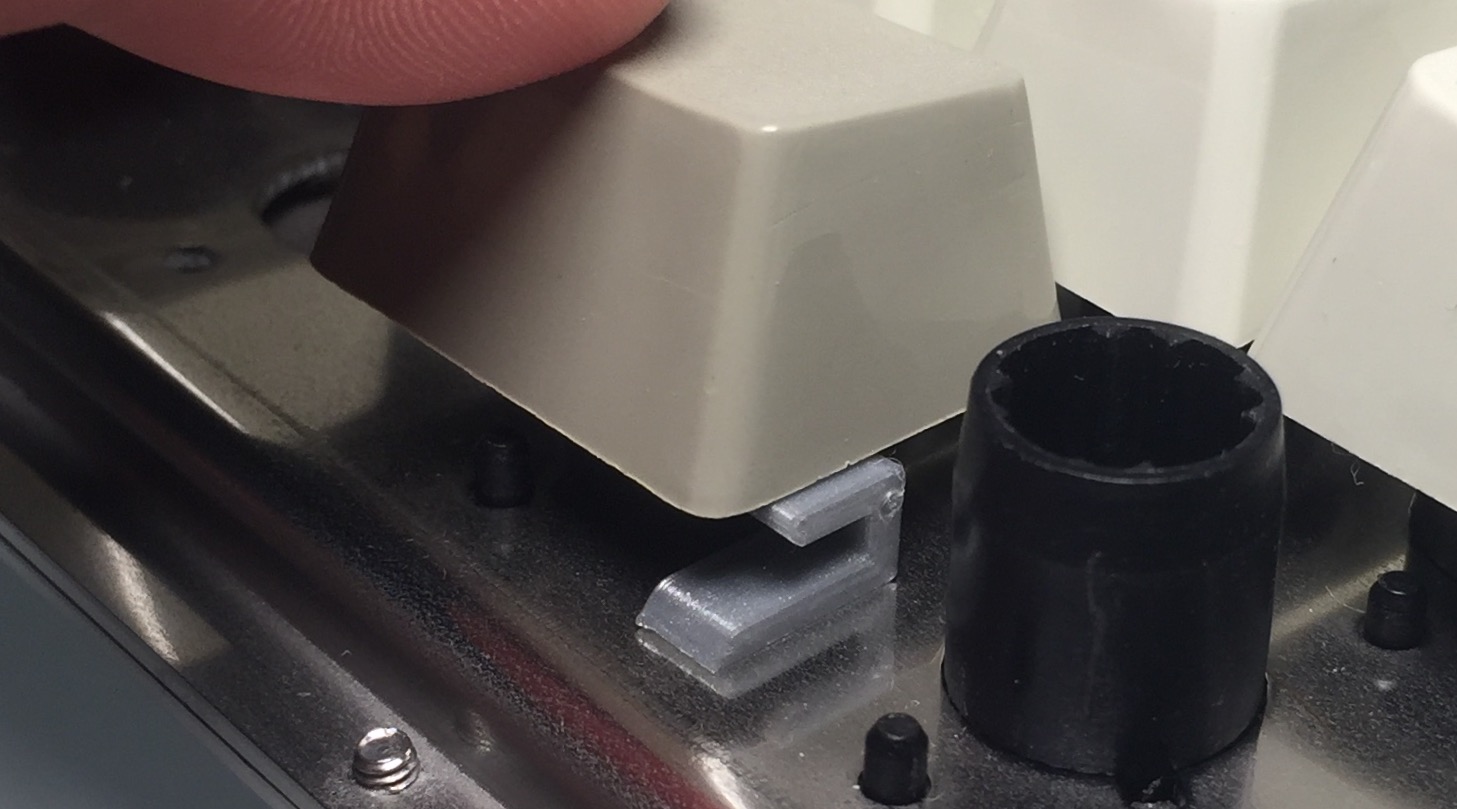
by lot_lizard
Posted: 06 Sep 2016, 21:28
by fohat
I recommend that you verify the height of those boys.
You are probably approaching the point where you will interfere with the downward stroke of the key skirt.
Posted: 06 Sep 2016, 21:55
by lot_lizard
Indeed... Very close. The goal was .5mm clearance, but we could probably stand to give some of that back. Especially if we use a very flexible plastic that retains its shape. It won't take much pressure to keep the wire in alignment. Definitely need to experiment (especially since we are proposing these as a way to fix legacy broken clips... Should be well tested). Appreciate you pointing out. I should have shown that out of the gate.
EDIT: The dimensions will change slightly with the different plastics and resolution as well. Next is to test in whatever we decide we like as an end material and resolution. The above took ~3 minutes to print. Assuming that is doubled with higher grades going forward, we could probably crank out 10 an hour pretty easy. I can fit A LOT of these on one printing cycle (haven't done the math yet per bed size), but the horrible thing would be if something went wrong in the middle, the entire batch... and more importantly time... are lost. I just don't have the opportunity to baby-sit small batches though. Has to be big and vanish for a while. Once I know these are golden, I'll start production (even before the GB)
- image.jpeg (168.79 KiB) Viewed 6955 times
Posted: 06 Sep 2016, 22:46
by lot_lizard
Last couple posts of the day, and I'll stop bombing. What is the most ideal output on this forum for video as an attachment? .MOV is a no-go (would have converted to mp4 anyway). I don't feel like putting anything on YouTube because I'm anti-social, but there is a fun little video I have of an operational laser cutter I was going to show.
Posted: 06 Sep 2016, 22:53
by E TwentyNine
Have access to an extrusion machine? Wonder if you could make a bunch of those clips in one long piece and cut it up...
For videos. vid.me allow anonymous uploads.
Posted: 07 Sep 2016, 02:26
by lot_lizard
E TwentyNine wrote: Have access to an extrusion machine? Wonder if you could make a bunch of those clips in one long piece and cut it up...
I do, and that was the original idea, but when I took into account the cost of tapping two holes per clip, this became more cost effective. The two other advantages are that we avoid metal on metal moving part contact, and this is a simple design that anyone could print later on their own without some special batch run when the need arose.
So I have given in and threw the video out on YouTube. This our laser cutter/engraver doing some silliness as a test. Works beautifully as a Windows 10 64-bit guest "printer" under a Mac Parallels host. Firmware was a bit silly of a process, but we are updated all the way around. Happy to say... IT'S ALIVE!!!, and behaving as expected. The logo is about 8" wide shooting at ~3.5 watts on a raster pattern (75% speed). Cutting the foam will be a fun sight when we crank up the wattage.
Re: (Model MF) Remodeling the Model M
Posted: 07 Sep 2016, 05:05
by Techno Trousers
Woah, was that a time lapse video, or was that real time?
