Page 1 of 1
Laser Cutting Quality - Comments appreciated
Posted: 22 Dec 2015, 12:43
by nicstreet
Morning All
I received a couple of laser cut plates yesterday, the designs for which were from SwillKB plate designer. Ignoring my obvious design issues can anyone comment on the quality of the laser cutting. Having not seen any before I'm unsure as to what finish to expect!
The cost for 2 x 65% size plates in 1.5mm, 2 x bases in 1.5mm, 2 x 3mm sides and 1 x 6mm side was £93.00 delivered
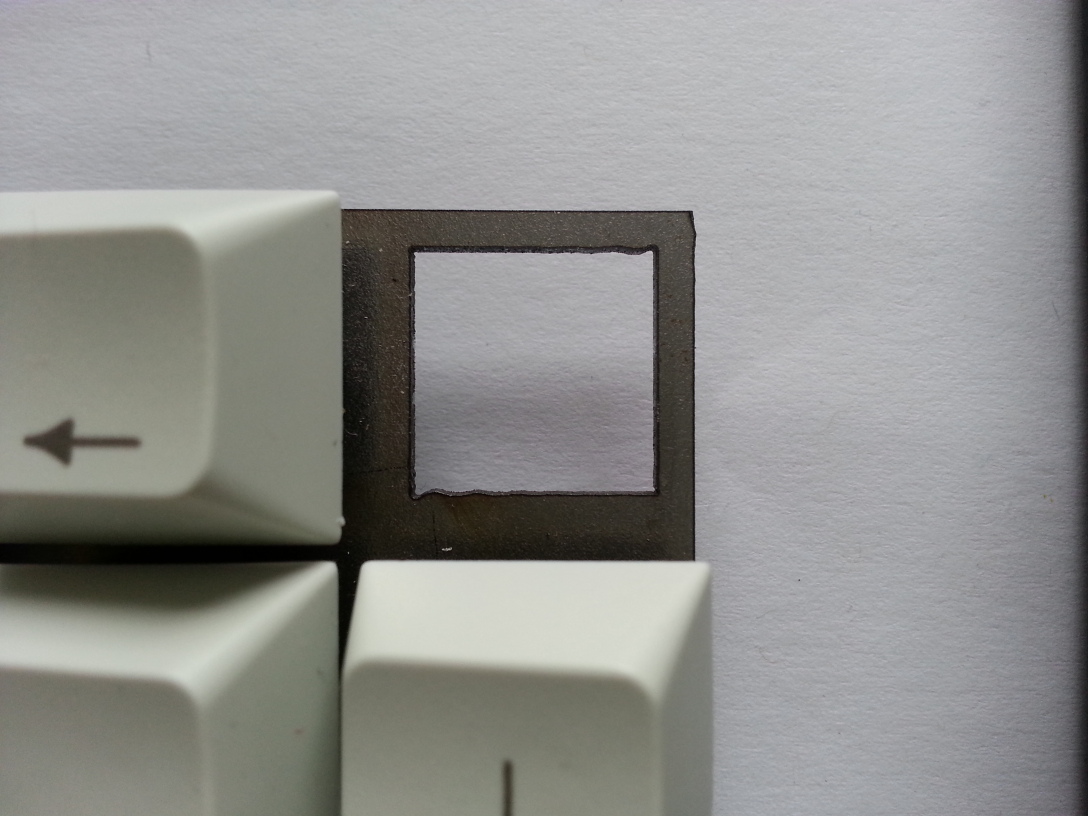
My main concern is as a result of my Gateron blue's fitting extremely tightly in the openings, so tight in fact that a keypress registers but the switch fails to return to resting position (Last pic). I've remedied a couple by filing the opening and the catch mechanism on the switch but obviously I shouldn't have to do this.
Switches are fine outside of the plate so I'm ruling out any manufacturing issues there even though they were cheap of Amazon (£26.00 for 120)
I'll continue to file 'n build but appreciate any observations as I may have to choose an alternative supplier for future projects.
Excuse the pics, taken indoors with limited light and Nokia phone.
Thanks
Nic
Posted: 22 Dec 2015, 15:40
by Matt_
How big are the switch openings?
I just got a plate made from jdcarpe's .dxf file which came up with a few bumps here and there, just as you, nothing dramatic though. Although the switch openings on the drawing are 13.97 x 13.97 mm, they were cut just a tad larger (maybe 14.1 x 14.1, I do not have a caliper precise enough to check more accurately) but switches snap in perfectly and do not move once installed.
Doesn't swill's tool have a dedicated thread somewhere (GH probably) ? You could check if other users ran into the same issue. Did you play with the "kerf" setting?
Posted: 22 Dec 2015, 17:06
by Findecanor
If looks like there could be some burr left in the switch hole. If there is, then you may want to file those down. Otherwise those will chip the switches if you insert and remove them again.
Posted: 22 Dec 2015, 17:10
by nicstreet
Hi Matt, yeah I've just ordered a set of calipers from Amazon so will measure tomorrow when they arrive. I did alter the "kerf" and entered the figure as provided by the company that did the laser cutting. Perhaps me rushing and not fully understanding that setting has resulted in openings that are too narrow. I just wanted something quick so I could play whilst I have some free time over Xmas. Less haste more speed as my Nan used to say!
In terms of the plate itself I noticed a lot of rough edges and burrs although that may be normal with laser cutting?
Fortunately these were both test plates for me too play with so nothing lost really, just a bit of time filing the openings

Posted: 22 Dec 2015, 17:16
by nicstreet
Findecanor wrote: If looks like there could be some burr left in the switch hole. If there is, then you may want to file those down. Otherwise those will chip the switches if you insert and remove them again.
Is this normal? should this be expected regardless of supplier?
Posted: 22 Dec 2015, 17:48
by chzel
Laser produces slag/spatter on the underside of the cut, because it melts the metal to remove it.
Those burrs are most of the time loosely stuck there, so a metal brush should get them easily.
For reference have a look
here and
here. This a from a GB I run this summer.
The TKLs are the default dxfs for the Phantom, but the 60% was made with swill's tool with no kerf adjustment.
The cuts in your seem a bit "crude" but that could be the photo quality fooling me. In your second pic, the lines you see in the middle of the switch opening seem to be the entry point for the laser, and could be avoided with a small modification to the laser path (not a setting you can make, you should talk about that with the shop).
In my aluminium plates the shop had to leave a "finger" on, to keep the centers of the holes attached to help combat a warping issue they had.
Posted: 23 Dec 2015, 17:40
by nicstreet
so...after measuring the switch openings it seems my inserting a "kerf" figure has resulted in openings that are 0.4mm too small. Serves me right for being inpatient and not asking questions, nor fully understanding how it may affect the finished product.
Moral of the story as my dad always said, measure twice, cut once... and if in doubt, Ask!
My punishment for being a ****, several hours spent filing the plate openings to the correct size
Posted: 23 Dec 2015, 18:08
by XMIT
There is an art to building trust in a machine and a process, especially with metal work in particular. Measure everything. Measure it again. Cut something and measure it to make sure it was what you wanted. Cut on scrap to refine the process. It's boring, time consuming, and tedious, but often results in perfect parts and a repeatable process.
So much of engineering is spent on this boring stuff: the fixturing, the testing, the calibration.
I've learned simpler lessons in more expensive ways.

Posted: 23 Dec 2015, 19:39
by nicstreet
indeed, agree entirely... had this not been my first project I would have been seething but hey ho, first time I can live with a couple issues. Would be good if I could find a local cutting shop so I can perhaps practice on some smaller items...
Posted: 23 Dec 2015, 19:40
by photekq
Is that cut from aluminium or stainless?
Posted: 23 Dec 2015, 20:02
by nicstreet
Plate & base in 1.5mm stainless, sides in 3mm & 6mm stainless. If all goes well with my first 'trial run' I'll build an aluminium to use when travelling with my Surface Pro.
Posted: 24 Dec 2015, 12:26
by tigpha
Hi Nicstreet,
Which company did you use for the cutting? The result looks better than those from a local shop, which has a machine that seems prone to "ringing" on sudden cutting path changes i.e. the corners of squares have wobbles, as shown below.
We discussed at length how to mitigate the effect by inserting radii into the corners, to reduce the acceleration required when changing direction, but the DXF files ended up incompatible with their software, which put an end to that.
- 2015-05-08-keyboard-assembled-cut-detail.jpg (241.63 KiB) Viewed 3612 times
Posted: 24 Dec 2015, 12:49
by Matt_
nicstreet wrote: My punishment for being a ****, several hours spent filing the plate openings to the correct size
Wow. Props for going through the hassle of filing all these openings in a
steel plate

tigpha wrote: We discussed at length how to mitigate the effect by inserting radii into the corners, to reduce the acceleration required when changing direction, but the DXF files ended up incompatible with their software, which put an end to that.
The other problem is that you cannot really round the corners of MX switch openings (unless the rounding is very slight).
Posted: 24 Dec 2015, 13:01
by nicstreet
I used Yorkshire Profiles, overall I am quite happy with the service and products. Had it not been for my stupidity I'd have a half finished keyboard. I'll likely place another order early Jan unless I can find an alternative UK based shop.
I've found a place in Manchester city center that looks like they may be able to do Acrylic but not had an answer yet as to whether they can do Stainless.
Where did you get yours done?
Posted: 24 Dec 2015, 13:18
by tigpha
I chose to use
IDF in Chesham, Bucks, as it happened to be between work and home. I think that Tom Wood, who is a really helpful guy, takes far too much upon himself by "fixing" the DXF files to compensate for the crappy software that they use to drive the cutter with. It seems as if Yorkshire Profiles operates far better control software, as the results you obtained look pukka to me.